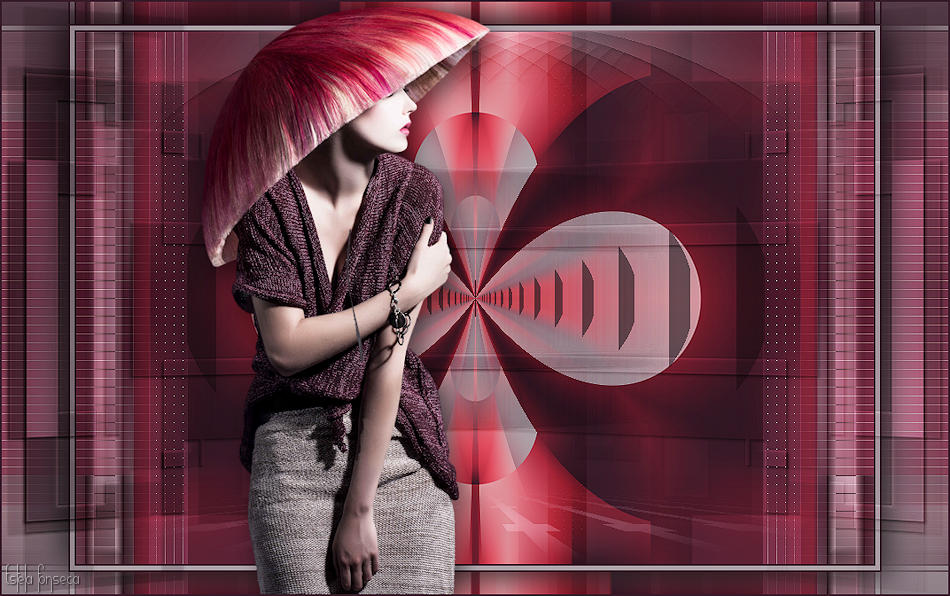
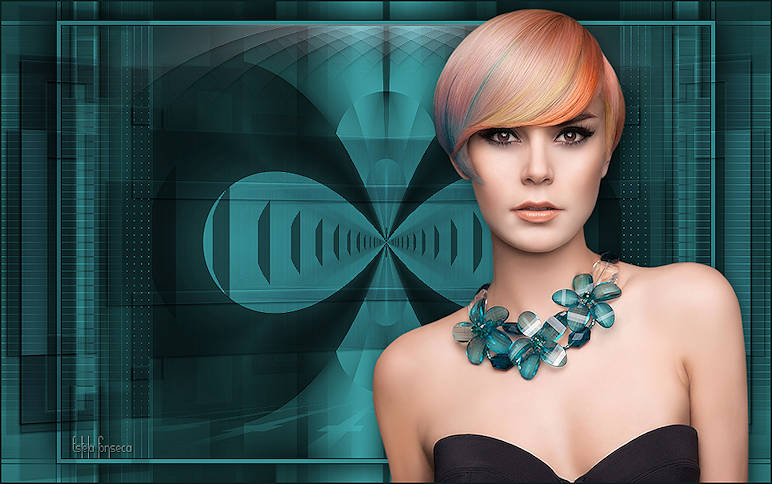
RINOA
Tutorial de Yvonne's-PSP_lessen , original, Aqui.

Este tutorial foi escrito em PSP X8, mas pode ser feito em outras versões
Material Necessário:
Tube de Annelies
Mask de Adita
Plugins Utilizados:
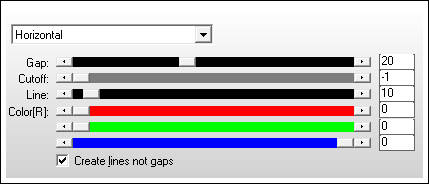
<I.C.NET Software> - Filters Unlimited 2.0AP [Lines] - Lines - SilverLining
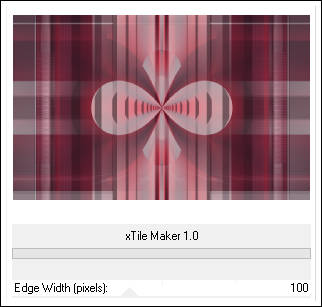
&<Bkg Kaleidoscope> - xTile Maker 1.0 **
Alien Skin - Eye Candy 5 - Impact
Graphics Plus - Cross Shadow
It@lian Editors Effect - Effetto Fantasma
MuRa's Meister - Perspective Tiling
Mehdi - Sorting Tiles, Wavy Lab, & Vibrations
** Importados para o Unlimited 2.0
Preparação:
Copie as Seleções para a Pasta de Seleções do PSPCopie a Mask 20/20 para a pasta de Masks do PSP
Abra todos os arquivos no PSP, duplique e feche os originais
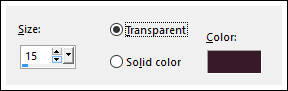
Nota: Ao trabalhar com suas próprias cores, jogue com o Blend Mode e / ou opacidade a seu próprio critério!Cores Utilizadas:
Primeiro Plano cor #aea3a9
Segundo Plano Cor #381b29
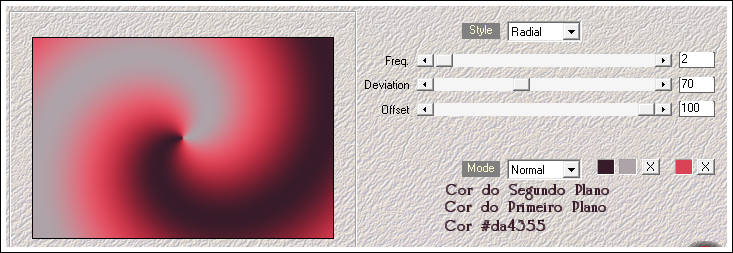
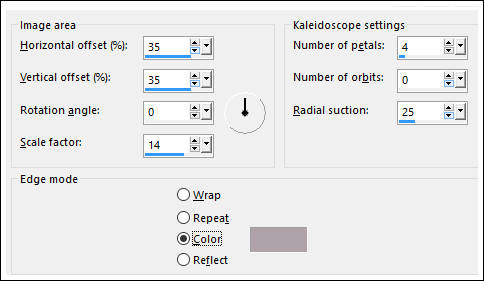
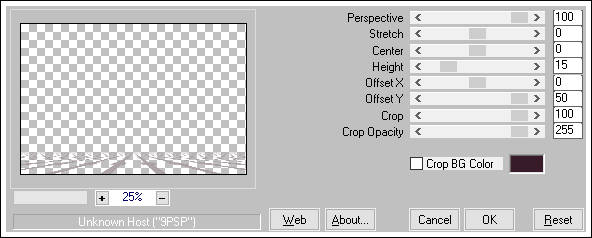
01- Abra uma nova imagem transparente de 900/600 pixelsEffects / Plugins / Mehdi / Wavy Lab
02- Effects / Plugins / Mehdi / Sorting Tiles
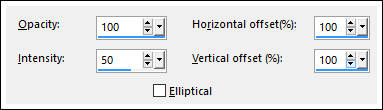
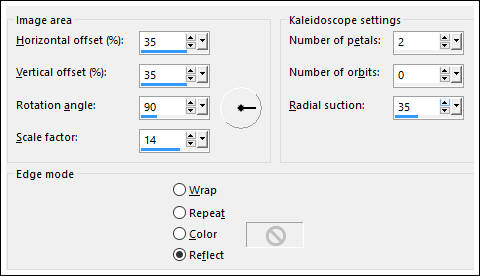
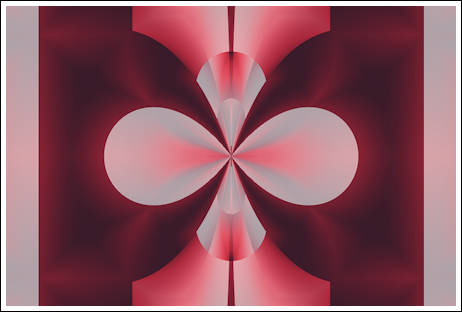
03- Effects / Reflection Effects / Feedback
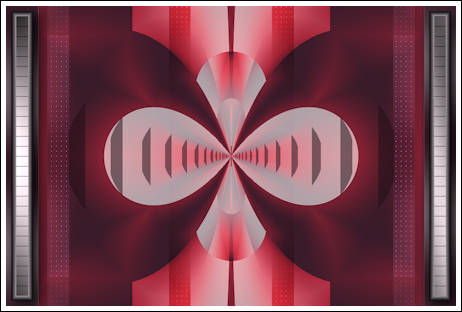
Effects / Reflections Effects / Kaleidoscope
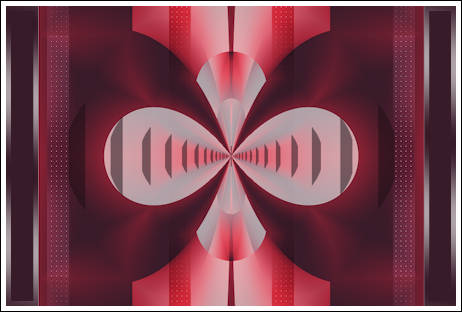
Resultado:
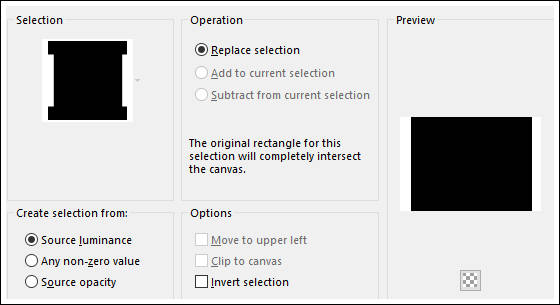
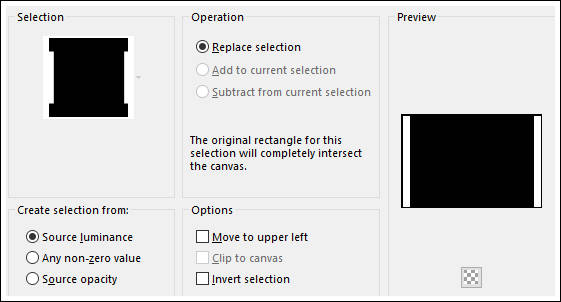
04- Selections / Load/Save Selection / Load Selection From Disk: Rinoa-yvonnespsplessensel1
Selections / Promote Selection to Layer
05- Preencha a seleção com a cor do Segundo PlanoEffects / Plugins / Mehdi / Vibrations
06- Selections / Modify/ Contract / 10 px
Layers / New Raster Layer
Preencha a seleção com a cor do Segundo Plano
Selections / Select None
Layers / Duplicate
Effects /Plugins / It@lian Editors Effect / Effetto Fantasma / Default
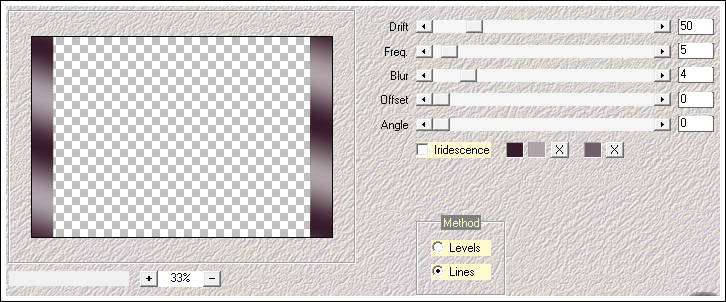
07- Effects / Plugins / AP [Lines] / Lines - SilverLining
Adjust / Sharpness / Sharpen
Blend Mode / Screen08- Layers / Duplicate
Effects / Image Effects / Seamless Tiling / Default
Blend Mode / Overlay
Layers / Arrange / Move Down
09- Ative a Terceira Layer a partir da Layer do Topo (Raster 2)
Layers / Arrange / Bring to Top
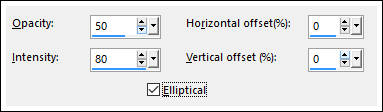
Effects / Reflection Effects / Feedback
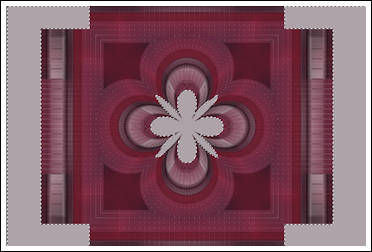
Resultado:
10- Selections / Load/Save Selection / Load Selection From Disk: Rinoa-yvonnespsplessensel2
Selections / Promote Selection to Layer
Selections / Modify / Contract / 10 px
Preencha a seleção com a cor do Primeiro Plano
Mantenha a seleção!!!!
11- Effects / Plugins / AP [Lines] / Lines - SilverLining
Effects / Plugins / Graphics Plus / Cross Shadow
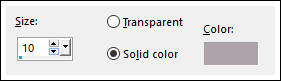
Effects / 3D Effects / Drop Shadow: 0 / 0 / 50 / 10 / #000000
Effects / 3D Effects / Chisel / Cor do primeiro Plano
Selections / Select None
12- Effects / 3D Effects / Chisel / Cor do Segundo Plano
Effects / Plugins / Alien Skin Eye Candy 5 / Impact / Perspective Shadow / Drop Shadow Blurry
Layers / Merge / Merge All Flatten
Resultado:
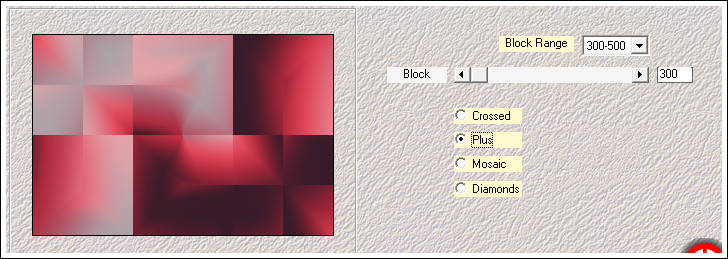
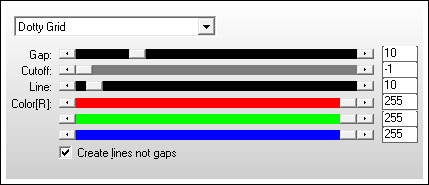
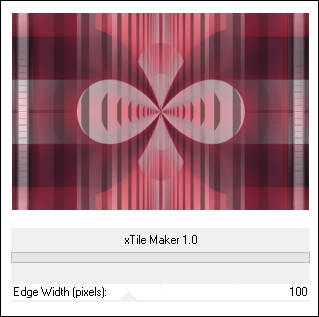
13- Effects / Plugins / Filters Unlimited 2.0 / &<Bkg Kaleidoscope> / xTile Maker 1.0
Layers / Duplicate
Effects / Reflection Effects / Kaleidoscope / Foregroundcolor
14- Magic Wand:
Clique nas áreas planas:
Selections / Invert
Edit / Cut (ou Delete no teclado)
Selections / Select None
Blend Mode / DodgeOpacidade / 30
15- Layers / Duplicate
Image / Resize / 25% / Resize All Layers desmarcado
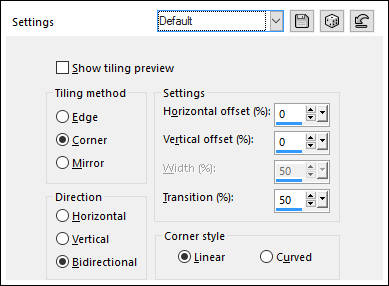
Effects / Plugins / MuRa's Meister / Perspective Tiling
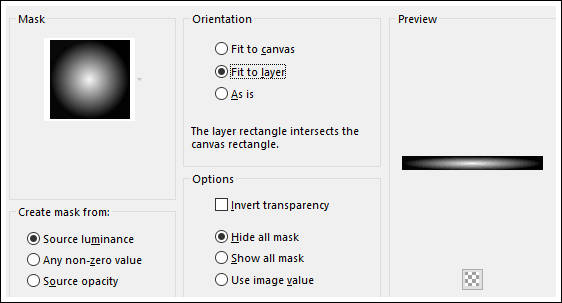
Layers / Load/Save Mask / Load Mask From Disk: 20-20
Layers / Duplicate
Layers / Merge / Merge Group
Blend Mode/ Hard LightOpacidade / 85
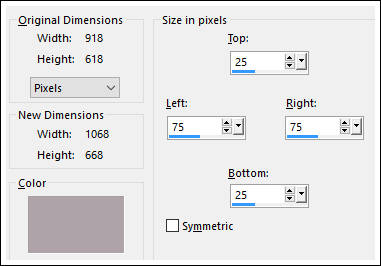
16- Image / Add Borders / Symmetric Marcado / 2 pixels cor do Segundo PlanoImage / Add Borders / Symmetric Marcado / 5 pixels cor do Primeiro Plano
Image / Add Borders / Symmetric Marcado / 2 pixels cor do Segundo Plano
Selections / Select All
Image /Add Borders / Symmetric desmarcado:
Selections / Invert
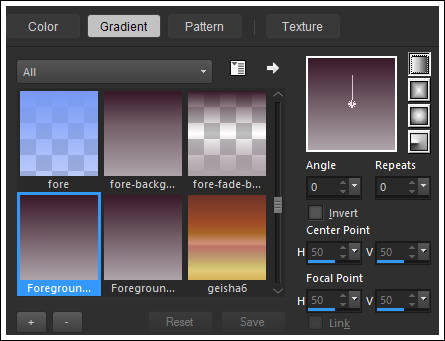
17- Forme um Gradiente estilo <<Linear>>
Preencha a seleção com o Gradiente
Effects / Plugins / Filters Unlimited 2.0 / &<Bkg Kaleidoscope> / xTile Maker 1.0
Selections / Invert
Effects / 3D Effects / Drop Shadow: 10 / 10 / 50 / 50 / #000000
Repita a sombra com os valores de Vertical e Horizontal: (menos) -10
Selections / Select None
18- Layers / New Raster Layer
Primeiro Plano cor #aea3a9
Preencha a layer com a cor do Primeiro Plano
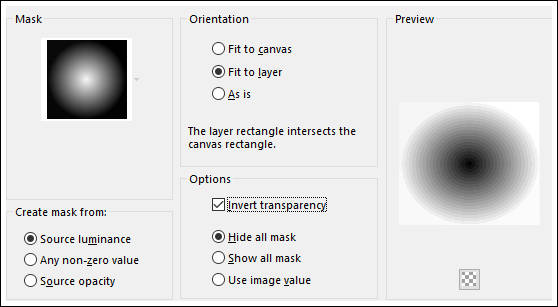
Layers / New Mask Layer / From Image / aditascreations_mask_25
Layers / Merge / Merge Group
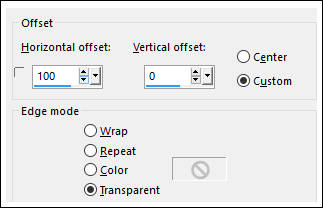
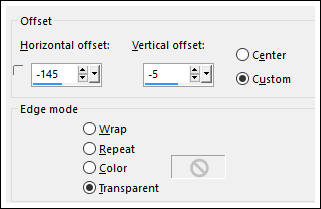
Effects / Image Effects / Offset
Bend Mode / Overlay
19- Effects / Plugins / Alien Skin Eye Candy 5 / Impact / Perspective Shadow / Preset Drop Shadow LowEffects / Geometric Effects / Perspective Horizontal
Adjust / Sharpness / Sharpen
20- Layers / Duplicate
Image / Mirror / Mirror Horizontal (Image / Mirror )
Layers / Duplicate
Blend Mode / Multiply
Layers / Load/Save Mask / Load Mask From Disk: 20-20
Layers / Duplicate
Layers / Merge / Merge Group
21- Layers / Duplicate
Image / Mirror / Mirror Horizontal (Image / Mirror)
Selections / Load/Save Selections / Load Selection From Disk: Rinoa-yvonnespsplessensel3
Layers /New Raster Layer
Preencha a seleção com a cor do Primeiro Plano
Selections / Select None
Adjust / Sharpness / Sharpen
22- Effects / Plugins / Alien Skin Eye Candy 5 / Impact / Perspective Shadow / Preset - Drop Shadow LowBlend Mode / Overlay
Layers / Duplicate
Blend Mode / ScreenOpacidade / 60
23- Maximize o tube <<Alies 10VR48-woman 24092012>>Copie e Cole como nova layer
Effects / Image Effects / Offset
Effects / 3D Effects / Drop Shadow: 10 /8 / 50 / 35 / #000000
Image / Add Borders / Symmetric Marcado / 2 pixels cor do Segundo Plano24- Opcional: Image / Resize / Width 900 Pixels / Resize all Layers Marcado
Adicione seu nome ou marca d'água
25- Layers / Merge / Merge All
Salve como jpeg
Versão com tube de Karine Dreams:
©Tutorial traduzido por Estela Fonseca em 15/08/2016.
Não alterar nem repassar sem autorização.