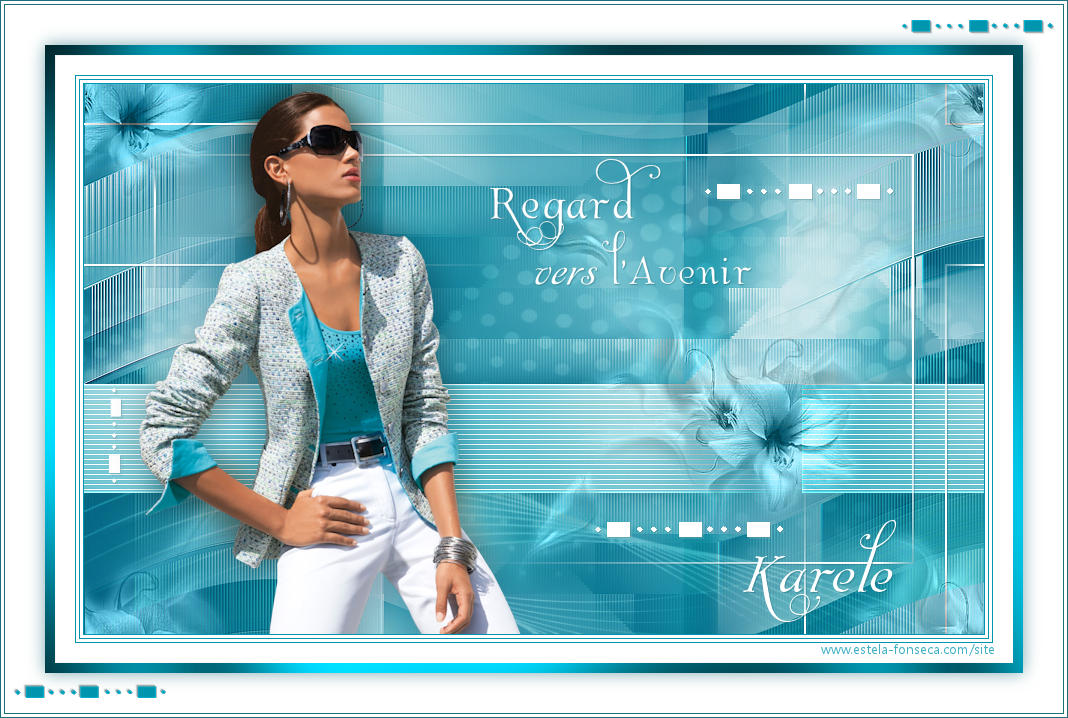
KERÈLE
Tutorial de Violette Graphic , original, Aqui.

Tutorial realizado no PSP X9 mas pode ser feito em versões anteriores do PSP.
Materiais Necessários:
Tube de Babete
Masks de Narah_mask_Abstract63.jpg
Seleções: Vyp_Alpha_Karele.PspImage
Demais materiais de @Violette
Plugins Utilizados:Mehdi/Wavy lab 1.1/Sorting Tiles
Unlimited/Toadies/Weaver
Carolaine & Sensibility /CS-LDots
AP Lignes/ Silverlining /Horizontal
Preparação:Abra os tubes no PSP, duplique e feche os originais. Remova a Assinatura do autor apenas da cópia!
Abra as Masks no PSP e Minimize.
Tabela de Cores:
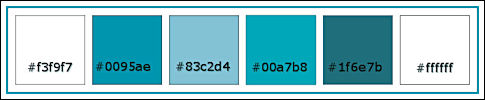
1- Primeiro Plano cor #f3f9f7 / Segundo Plano cor #0095ae
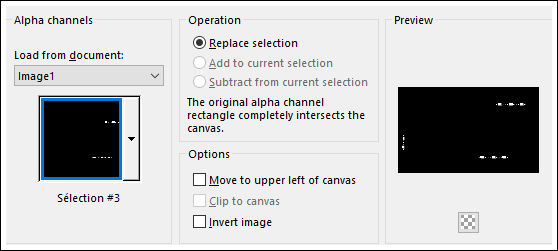
2- Abra o arquico <<Vyp_Alpha_Karele.pspimage>>
Nota: Esse arquivo contem seleções em canal alfa.
Window / Duplicate
Feche o original
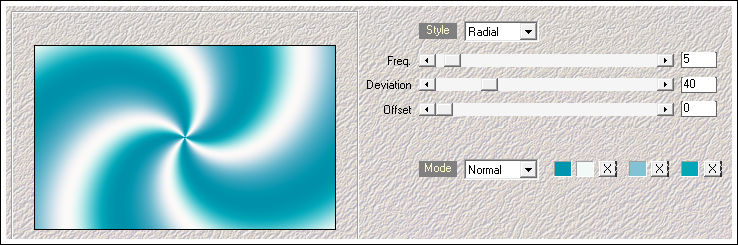
3- Effects / Plugins / Mehdi / Wavy lab 1.1 :
Nota: Cores dos quadradinhos coloridos: #f3f9f7 / #0095ae / #83c2d4 / #00a7b8
Adjust / Blur / Gaussian Blur / Radius 50
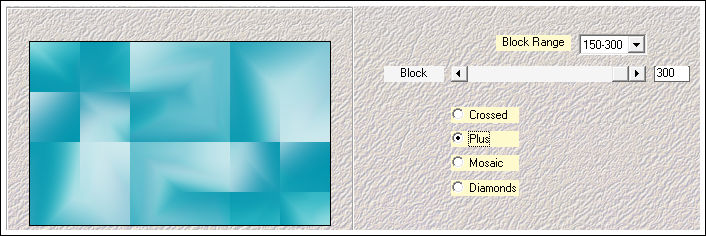
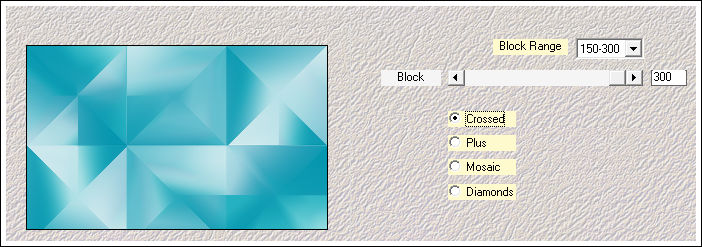
4 - Effects / Plugins / Medhi / Sorting Tiles:
5 - Effects / Plugins / Medhi / Sorting Tiles:
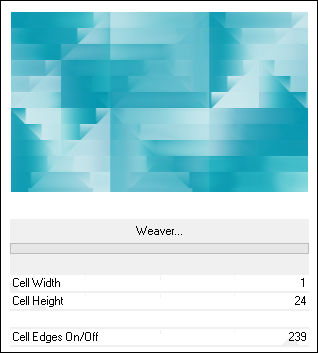
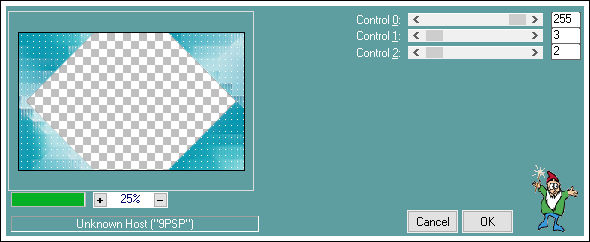
6 - Effects / Plugins / <I.C.NET Software> Filters Unlimited 2 / Toadies /Weaver:
Adjust / Sharpness / Sharpen
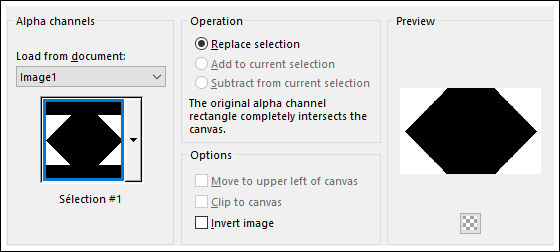
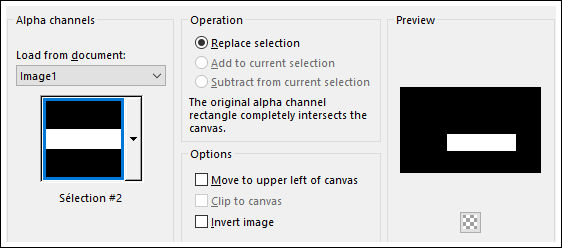
7 - Selections / Load-Save selection / Load Selection from Alpha Chanel: sélection #1
Selections / Promote Selection to Layer
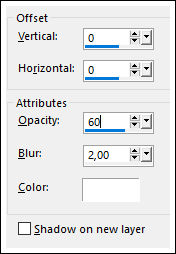
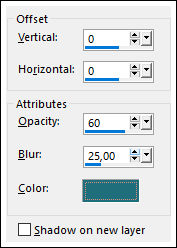
Effects / 3D Effects / Drop Shadow: 0/0/60/2/cor #ffffff
Selections / Select None
Effects / Edge Effects / Enhance
8 - Effects / Plugins / Carolaine & Sensibility /CS-LDots:
9 - Effects / <I.C.NET Software> Filters Unlimited 2 /Toadies/Weaver:
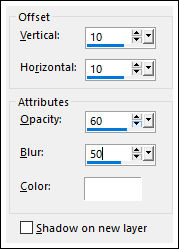
Effects / 3D Effects / Drop Shadow: 10/10/60/50/cor #ffffff
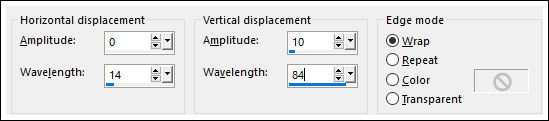
10 - Effects / Distortion Effects / Wave:
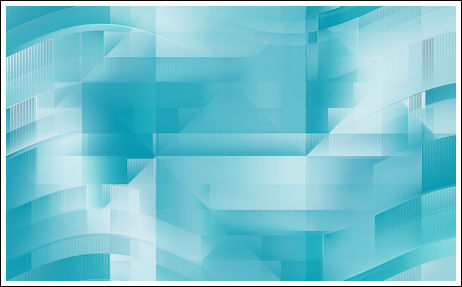
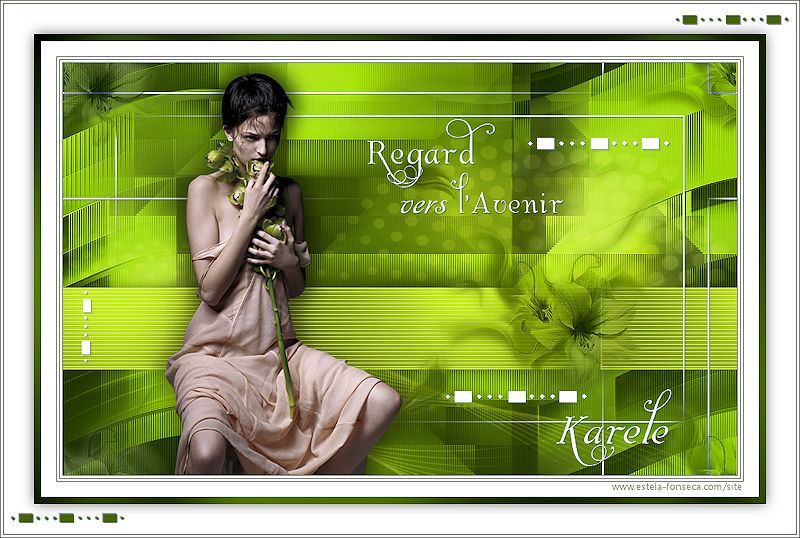
Resultado:
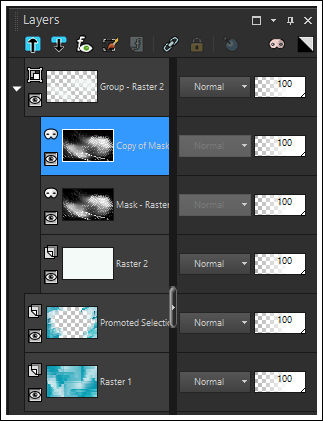
11 - Layers / New Raster Layer
Preencha com a cor #f3f9f7
Ative a Mask <<Narah_mask_Abstract63.jpg>> Minimize
Layers / new Mask layer / From Image: Narah_mask_Abstract63.jpg
Layers / Duplicate
Layers / Merge / Merge Group
Blend Mode / Soft Light
12 - Ative a Layer <<Raster 1>>
Selections / Load-Save selection / Load Selection from Alpha Chanel: sélection #2
Selections / Promote Selection to layer
Layers / Arrange / bring to top
Adjust / Blur / Gaussian Blur / Radius 50
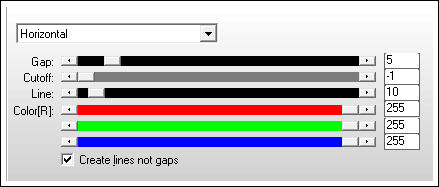
Effects / Plugins / AP Lines/ Lines - Silverlining /Horizontal
Selections / Select None
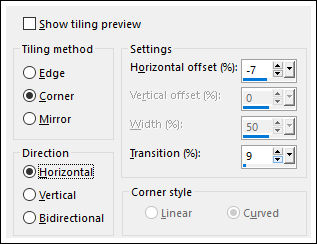
13 - Effects / Image Effects / Seamless Tiling:
Adjust / Sharpness / Sharpen More
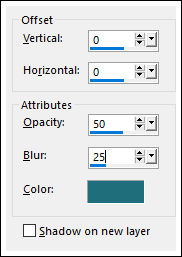
Effects / 3D Effects / Drop Shadow: 0/0/50/25/cor #1f6e7b
14 - Layers / New Raster Layer
Selections / Select All
Selections / Modify / Contract 70 pixels
Preencha com a cor #ffffff
Selections / Modify / Contract / 2 pixels
Delete no TecladoSelections / Select None
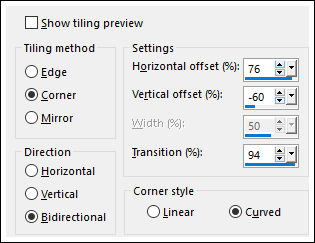
15 - Effects / Image Effects / Seamless Tiling
Layers / Duplicate
Layers / Merge / Merge Down
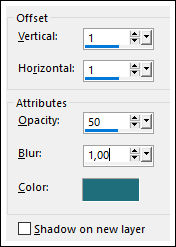
Effects / 3D Effects / Drop Shadow: 1/1/50/1/cor #1f6e7b
16 - Layers / New Raster Layer
Selections / Load-Save selection / Load Selection from Alpha Chanel: sélection #3
Preencha com a cor #ffffff
Selections / Select NoneEffects / 3D Effects / Drop Shadow: 1/1/50/1/cor #1f6e7b
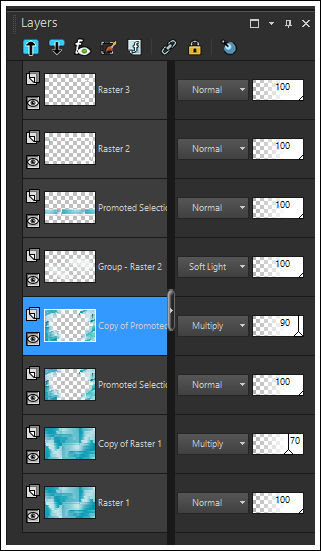
17 - Ative a Layer <<Raster 1>>
Layers / Duplicate
Blend Mode / Multiply
Opacidade / 70%
18 - Ative a Layer <<Promoted Selection>>
Layers / Duplicate
Blend Mode / Multiply
Opacidade / 90%
19 - Ative a Layer do topo
Ative o tube <<Vyp_Karèle_Deco1.pspimage>>
Copie / Cole como nova layer
Blend Mode / Luminance (Legacy)
Opacidade / 75
20 - Maximize o tube << Vyp_Karèle_text1.pspimage>>
Copie / Cole como nova layer
Posicione como a imagem final
21 - Maximize o tube <<Vyp_Karèle_text2.pspimage>>
Copie / Cole como nova layer
Posicione como a imagem final
22 - Maximize o tube << babette - 518 - 14.png>>
Copie / Cole como nova layer
Image / Resize / 60%... Resize All Layers ... Desmarcado
Image / Resize / 70%... Resize All Layers ... Desmarcado
Ferramenta <<Pick Tool>> Modo: Escala / Posição de X= 55 / Posição de Y= 7
Tecle em qualquer tecla para sair da Ferramenta
Layers / Duplcate
Ative a Layer imediatamente abaixo dessa
Adjust / Blur / Gaussian Blur / Radius 15
Blend Mode / Multiply
Opacidade / 75%
23 - Image/Add Borders / Symmetric Marcado / 1 pixel cor #0095ae
Image/Add Borders / Symmetric Marcado / 3 pixels cor #ffffff
Image/Add Borders / Symmetric Marcado /1 pixel cor #0095ae
Image/Add Borders / Symmetric Marcado / 3 pixels cor #ffffff
Image/Add Borders / Symmetric Marcado / 1 pixel cor #0095ae24 - Image/Add Borders / Symmetric Marcado / 20 pixels cor #ffffff
Image/Add Borders / Symmetric Marcado / 10 pixels cor #0095ae
Selecione essa borda com a varinha mágicaEffects / Plugins / Graphic Plus / Cross Shadow / Default
25 - Selections / Select All
Image / Add Borders / Symmetric Marcado /40 pixels cor #ffffff
Effects / 3D Effects / Drop Shadow: 0/0/60/25/cor #1f6e7b
Selections / Select None
26 - Image/Add Borders / Symmetric Marcado / 1 pixel cor #1f6e7b
Image/Add Borders / Symmetric Marcado / 3 pixels cor #ffffff
Image/Add Borders / Symmetric Marcado / 1 pixel cor #1f6e7b27 - Maximize o tube <<Vyp_Karele_Deco02.pspimage>>
Copie / Cole como nova layer
28 - Assine seu trabalho
29 - Layers / Merge / Merge All
30 - Salve Como JPG
Versão com tube de Nicole:
©Tutorial traduzido por Estela Fonseca em 12/04/2018.
Não alterar nem repassar sem autorização.