AZÉLIE
Tutorial original criado por ©Vérone
Materiais Necessários:
Tubes:Tube Femme d'Annelies
Plugins Utilizados:
Mura's Meister_Cloud
DC Special
Simple
Emboss 3
VideoRave
Image__vector-flowers-n-dots-preview-by-dragonart sur Google Images
ETAPA 1 : O fundo
1.Paleta de Estilos e TexturasForeground cor branca e ackground cor #877569
2. Abra uma nova imagem transparene de 900 x 600 pixels.Effects / Plugin / Mura's Meister_Cloud
3. Adicione uma nova layer
Preencha com a cor branca
Effects / Plugin / DC Special_Book
Blend Mode / Soft Light4. Effects / Plugin / Simple /Diamonds
5. Effects / Plugin / Simple / Zoom Out and FlipEffects / User Defined filters / Emboss 3
6. Effects / Plugin / Transparency / Eliminate White
7. Layers / DuplicateImage / Mirror
Image / Negative Image
Blend Mode / Screen
Opacidade / 50
ETAPA 2 : a mask
1.Adicione uma nova layer.Preencha com a cor branca.
2. Layers / New mask layer from image :
Layers / Merge / Merge GroupEffects / 3D Effects / Drop Shadow: 0 / 0 / 60 / 20 / preta
Blend Mode / Overlay
Effects / 3D Effects / Drop shadow: 1 / 1 / 60 /1 /preta
Effects / Edge Effects / Enhance
ETAPA 3 : Os triângulos
1. Layers / Merge / Merge All
Image / Add Borders / Symmetric / 20 pixels / cor branca
2.Adicione uma nova layer
Preencha com a cor branca
Effects / Plugin / DC Special / Book
3. Effects / Plugin / Transparency / Eliminate White
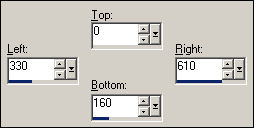
4. Ative a Ferramenta de Seleção e faça uma seleção personalizada:
Edit / Cut
Selections / Select None
5.Effects / Plugin / Simple / Diamonds
6. Effects / Plugin / Simple / Pizza Slice Mirror
7. Image / Negative ImageEffects / 3D EFfects / Drop Shadow: 0 / 0 / 60 / 20 / preto
Blend Mode / Luminance Legacy
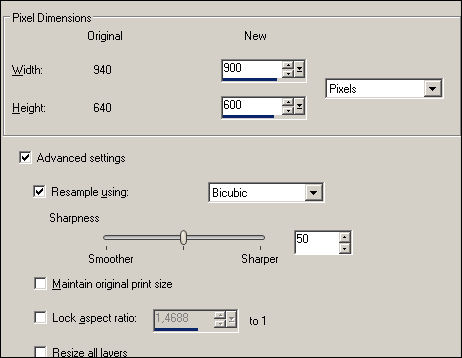
8. Image / Resize : 900 x 600 pixels
ETAPA 4 : A personagem
1. Abra o tube << Alies 770-woman dressed in drapes-05022012>>
Copie e cole como nova layer
Image / Resize / 90%
Resize all layers, desmarcado
Coloque no centro
Layers / Arrange / Move Down
2. Ative a layer dos triângulos
Seleção personalizada
Edit / Cut
( O triângulo foi excluido, mas ele continua na memória da área de transferência)
3.Adicione uma nova layerLayers / Arange / Move Down. ( 2 vezes)
Cole na seleção (edit paste as into selection)
Selections / Select None
ETAPA 5 : A Frame
1. Layers / Merge / Merge AllSelections / Select All
Selections / Modify / Contract / 20 pixels
Selections / Invert
Selections / Modify / Contract / 2 pixels
Preencha com a cor #aea29a
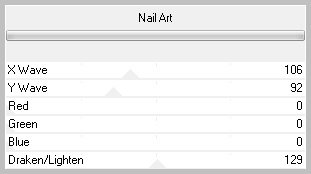
2. Selections / Promote Selection to layerEffects / Plugin / VideoRave / Nail Art
Blend Mode / ScreenEffects / User Defined filters / Emboss 3
3.Selections / InvertEffects /3D Effects / Drop Shadow: 0 / 0 / 60 / 20 / preta
Selections / Select None
4.Adicione a sua assinatura, merge all e exporte como Jpeg
©Tutorial Traduzido por Estela Fonseca 09/03/2012.
Obrigada Vérone por me permitir traduzir seu trabalho.