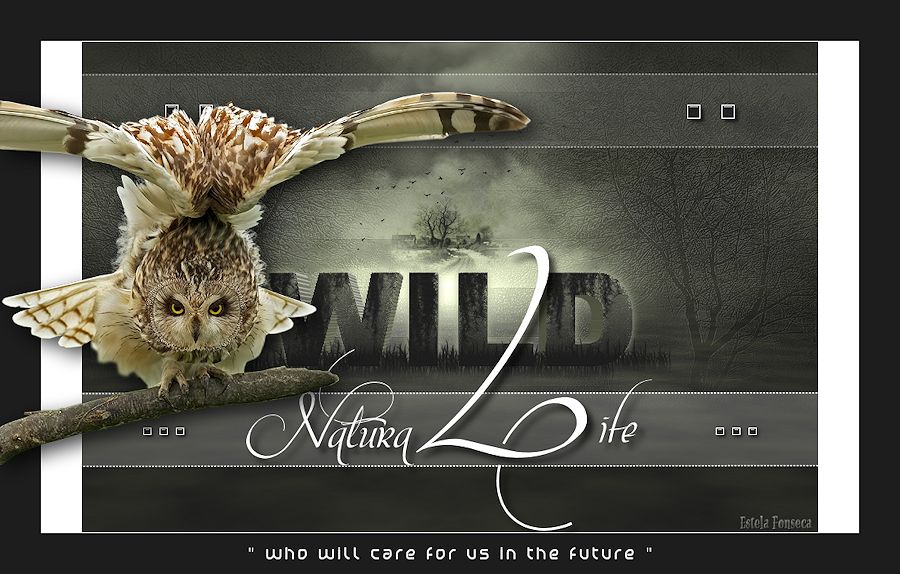
NATURAL LIFE
Tutorial de ©Tamer - Original Aqui
Tutorial realizado no Psp 16
O tube de animal é de Yoka
Plugins Utilizados:
Mura's Meister - Cloud
Filter Factory Gallery A - Mirror Mirror
Mura's Meister - Perspective Tiling
L&K - Trouble
Eye Candy 5 Impact - Extrude
Eye Candy 5 Impact - Glass
Abra os Tubes e a Mask no PSP
Salve o preset FloodColoque a Texture na pasta de texturas
Salve os Brushes no Psp
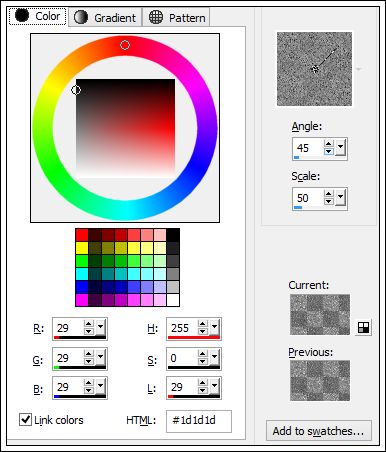
Você pode mudar os Blend Modes de acordo com suas coresForeground Cor #32342a
Background Cor #1d1d1d
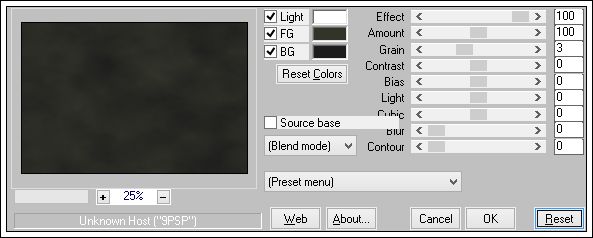
1 - Abra uma imagem transparente de 900/600 pixels2 - Effects / Plugin / Mura's Meister / Cloud ( Default )
3 - Effects / Plugin /Factory Gallery A / Mirror Mirror ( Default )
4 - Layers / Duplicate [ Copy of Raster 1 ]
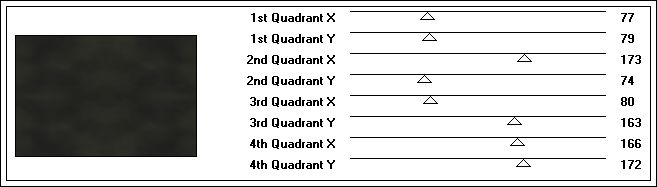
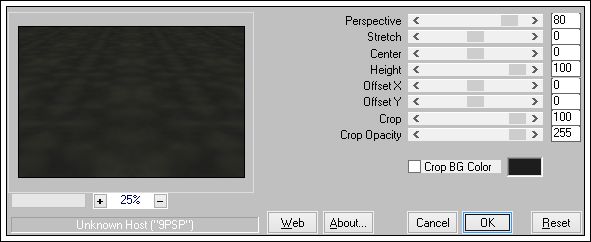
5 - Effects /Plugin / Mura's Meister / Perspective Tiling ( Default )
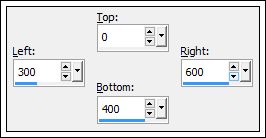
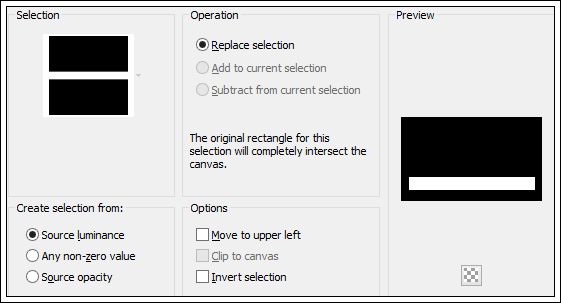
6 - Ative a ferramenta Pick Tool / Arraste até 300 px
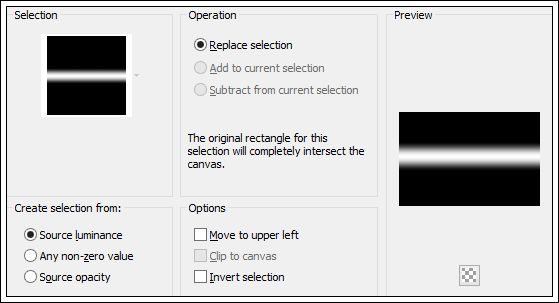
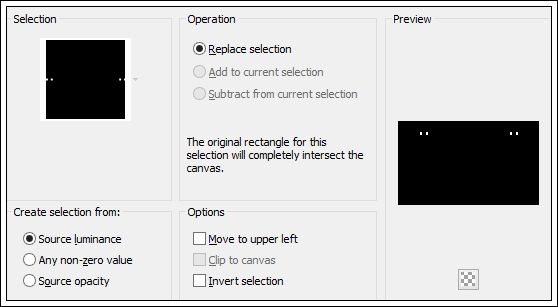
7 - Seections / Load/Save Selection / Load Selection from Disk / NaturalLifeSelection1
8 - Pressione DELETE
9 - Selections / Select None
10 - Ative a layer Raster 111 - Layers / New Raster Layer [ Raster 2 ]
12 - Mude a cor do foreground para a cor #acb297
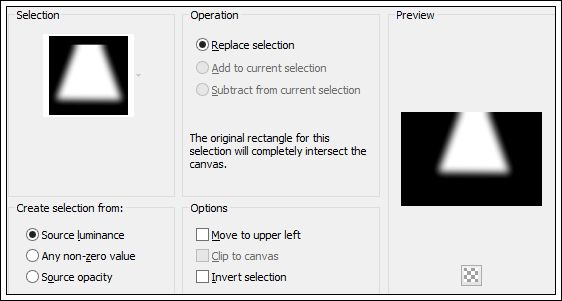
13 - Selections / Load/Save Selections / Load Selection from Disk / NaturalLifeSelection2
14 - Preencha com a cor do foreground
15 - Selections / Select None
16 - Adjust / Blur / Gaussian Blur 50
17 - Layers / New Raster Layer [ Raster 3 ]
18 - Mude a cor do foreground para #32342a
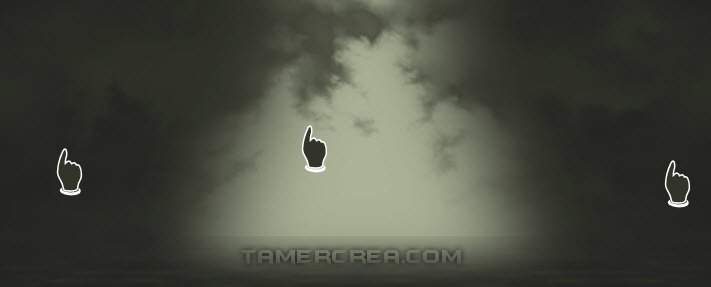
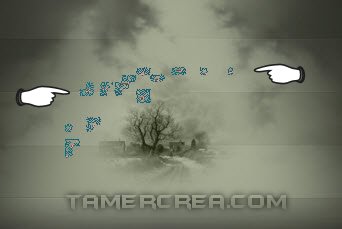
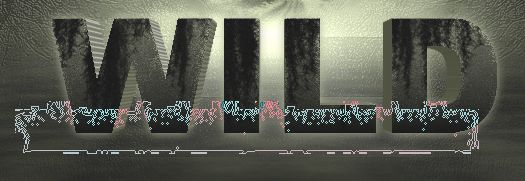
19 - Ative a ferramenta Paint Brush tool / Brush Cloud / Carimbe com a cor do foreground
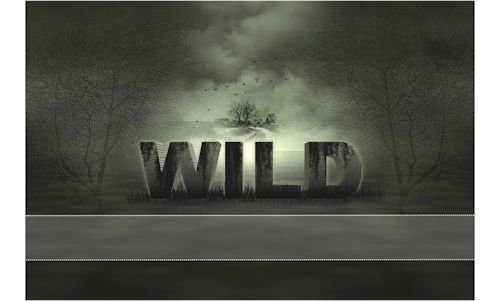
Veja os locais a ser aplicado o brush na imagem de Tamer.
20 - Ative a layer superior ( Copy of Raster 1 )
21 - Abra o tube <<downonthefarm>>Copie22 - Cole como nova layer [ Raster 4 ]
23 - Image / Resize 35% (resize all layers desmarcado)24 - Blend Mode LUMINANCE (L)
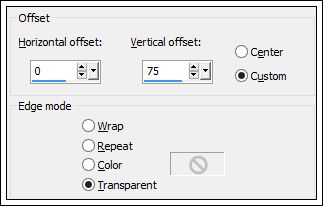
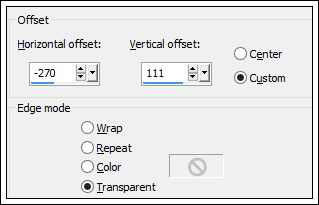
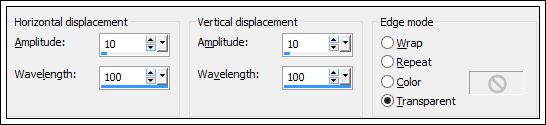
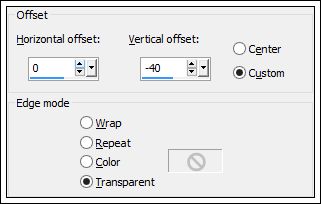
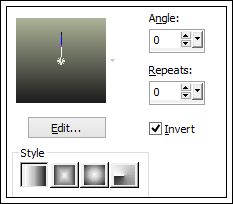
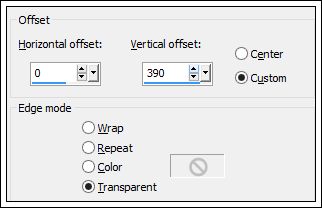
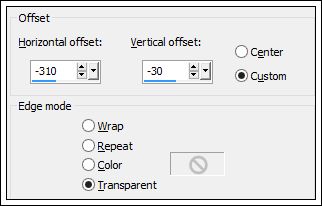
25 - Effects / Image Effects / Offset:
26 - Layers / New Raster Layer [ Raster 5 ]
27 - Mude a cor do foreground para #acb297
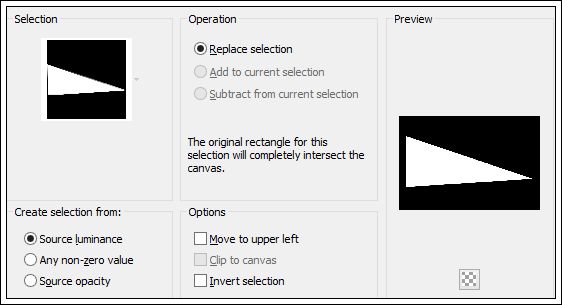
28 - Custom Selection
29 - Preencha com a cor do foreground
30 - Selections / Select None
31 - Adjust / Blur / Gaussia Blur 50
32 - Efects / Plugin / L&K Trouble ( Default )
33 - Opacidade 15
34 - Effects / Edge Effects / Enhance
35 - Foreground cor #1d1d1d
36 - Layers / New Raster Layer [ Raster 6 ]
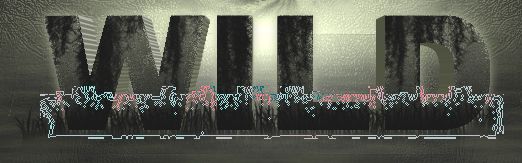
37 - Ative a ferramenta Paint Brush Tool / BrushBirds / Carimbe com a cor do foregroundComo mostra à imagem de Tamer:
38 - Abra o tube Tree / Copie
39 - Cole como nova Layer [ Raster 7 ]
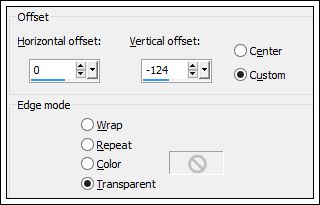
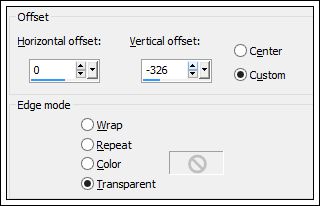
40 - Effects / Image Effects / Offset:
41 - Blend Mode LUMINANCE (L)
42 - Effcets / 3D Effects / Drop Shadow: 0,0,100,0 /#000000
43 - Layers / Duplicate [ Copy of Raster 7 ]
44 - Image / Mirror
45 - Layers / New Raster Layer [ Raster 8 ]
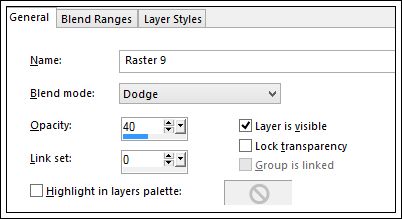
46 - Mude a cor do foreground para #ffffff
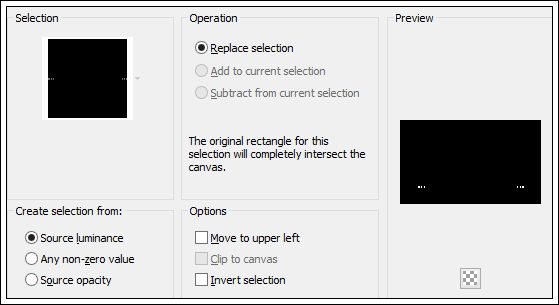
47 - Selection / Load/Save Selection / Load Selection from Disk: NaturalLifeSelection3
48 - Preencha com a cor do foreground
49 - Selections / Select None
50 - Effects / Distortion Effects / Wave
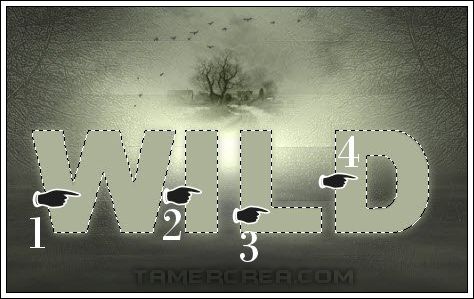
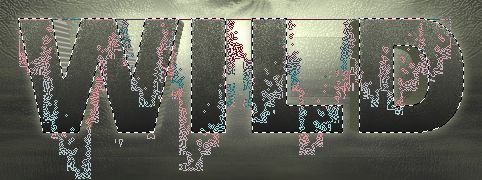
51 - Adjust / Blur / Gaussian Blur 30
52 - Blend Mode DODGE
53 - Opacidade 40
54 - Layers /Duplicate [ Copy of Raster 8 ]
55 - Image / Mirror
56 - Opacidade 3057 - Abra o tube Text Wild / Copie
58 - Cole como nova layer [ Raster 9 ]
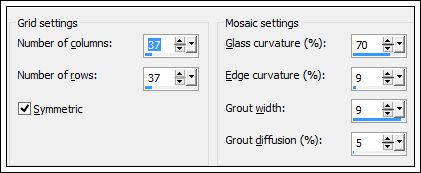
59 - Effects / Image Effects / Offset:
60 - Layers / Duplicate [ Copy of Raster 9 ]
61 - Ative a layer original ( Raster 9 )62 - Adjust / Blur / Gaussian Blur 5
63 - Ative novamente a layer superior ( Copf of Raster 9 )64 - Ative a ferramenta Magic wand e selecione as letras: W - I - L - D
65 - Preencha com o gradiente:
Foreground Cor #acb297
Background Cor #1d1d1d
Mantenha a Seleção !!!
66 - Effects / Eye Candy 5 Impact / Extrude ( NaturalLifeExtrude )67 - Layers / New Raster Layer [ Raster 10 ]
68 - Mude a Cor do foreground para #1d1d1d
69 - Preencha com a Texture Cork ( Corel 15-037 )
70 - Effects / Texture Effects / Mosaic Glass
71 - Opacidade 80
72 - Layers / New Raster Layer [ Raster 11 ]
73 - Foreground cor #1d1d1d
74 - Ative a ferramenta Paint Bursh Tool / NaturalLifeivyBrush / Carimbe com a cor do foreground
75 - Selections / Select None
76 - Layers / New Rater Layer [ Raster 12 ]
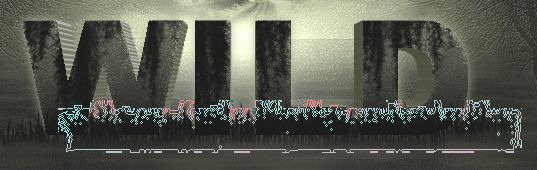
77 - Ative a ferramenta Paint Brush Tool / NaturalLifeGrassBrush / Carimbe com a cor do foreground #1d1d1d
Carimbe duas vezes
Arraste um pouco para a direita e carimbe novamente o brush, duas vezes.
Novamente arraste um pouco para a direita e carimbe duas vezes:
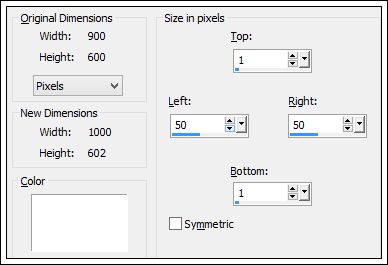
78 - Image Add Borders:
79 - Layers / New Raster Layer [ Raster 1 ]
80 - Selections / Load/Save Selection / Load Selection from Disk / NaturalLifeSelection4
81 - Foreground cor #ffffff
82 - Flood Fill Opacidade 20
83 - Preencha com a cor do Foreground
( Mude a opacidade do flood Fill para 100 )
84 - Selections / Select None
85 - Ative a ferramenta Pen Tool Styled Line : Dot, Width : 2
Crie duas linhas:
86 - Layers / Merge/ Merge Down [ Raster 1 ]
87 - Layers / Duplicate [ Copy of Raster 1 ]
88 - Effects / Image Effects / Offset:
89 - Opacidade 50
90 - Abra o Tube NaturalLifeText1 / Copie
91 - Cole como nova Layer [ Raster 2 ]
92 - Effects / Image Effects / Offset:
93 - Effcets / 3D Effects / Drop Shadow: 8,8,68,11 #000000
94 - Layers / New Raster Layer [ Raster 3 ]
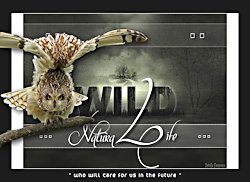
95 - Selections / Load/Save Selection / Load Selection from Disk / NatıralLifeSelection5
96 - Preencha a seleção com a cor #ffffff
97 - Selection / Modify / Contract 1
98 - Preencha a seleção com a cor #1d1d1d
99 - Effects / Plugin /Eye Candy 5 Impact Glass / Preset: NaturalLife-Glass100 - Selections / Select None
101 - Effects / 3D Effects / Drop Shadow: 4,4,76,6 #000000
102 - Layers / New Raster Layer [ Raster 4 ]
103 - Selections / Load/Save Selection / Load Selection from Disk/ NaturalLifeSelection6
104 - Preencha a seleção com a cor #ffffff
105 - Selections / Modify / Contract 1
106 - Preencha a seleção com a cor #1d1d1d
107 - Effects / Plugin / Eye Candy 5 Impact / Preset: naturalLife Glass108 - Selections / Select None
109 - Effects / 3D Effects / Drop Shadow: 2,2,76,6 #000000
110 - Image / Add Borders 50 pixels #1d1d1d
111 - Abra o Tube Yoka-OWL-on-Branch-240314 / Copie112 - Cole como nova Layer [ Raster 1 ]
113 - Image / Resize / 60% (All layers desmarcado)114 - Effects / Image Effects / Offset:
115 - Effects / 3D Effects / Drop Shadow: 8,8,76,35 #000000
116 - Abra o Tube NaturalLifeText2 / Copie117 - Cole como nova layer [ Raster 2 ]
118 - Effects / Image Effects / Offset:
119 - Coloque a sua marca d'água
120 - Image / Add Borders / 1 px #000000
121 - Image / Resize / 900 pixels de larguraSalve como jpg
©Tutorial Traduzido por Estela Fonseca 29/05/2014.
Obrigada Tamer por me permitir traduzir seu trabalho.