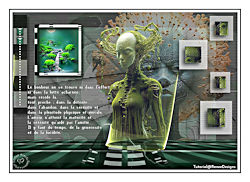
SÉRÉNITÉ
Tutorial de Renée Graphic , original, Aqui.
O tutorial foi traduzido na versão Corel Paint shop Pro 2022 Ultimate, mas ele pode ser feito com outras versões.
Materiais Necessários:
Tubes de Renée...
ATENÇÃO:
Não compartilhe os tubes de Renée em sites ou blog ...etc
Eles estão a disposição em seu site: AQUI.
PLUGINS
Atenção
Lembrete Se você usar o Filter Unlimited 2.3, de Renée, ele consiste em 3 pastas
Dê uma olhada nas pastas antes de adicionar uma predefinição.
AP Tous
Mirror Rave
Filter Meister
MuRa's Meister
Alien Skin – Xenofex 2
Dragon Fly - Sinedots 2
Alien Skin Eye Candy 5 – Impact
Filter Meister – FM Sample
**
Página de Plugins de Renée ... AQUI.
As cores podem variar significativamente dependendo do PSP usado.
Primeiro Plano cor Nº 1 e Plano de Fundo Nº 2
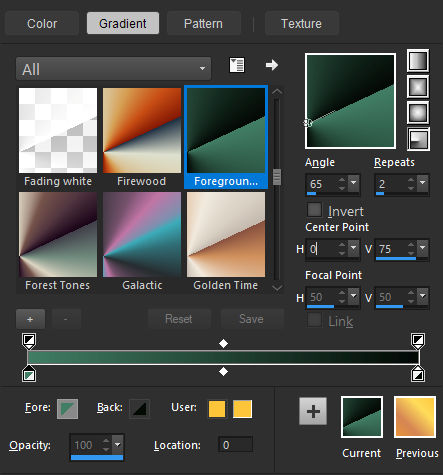
Forme no Primeiro Plano um Gradiente - Radial - Configure como segue:
1. Abra uma nova imagem transparente de 1050 x 750 Pixels2. Preencha com o Gradiente
3. Effects - Plugins - Filters Unlimited 2.0 - Filter Factory Gallery N – Circulator... Default
4. Layers – Duplicate
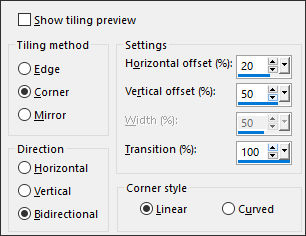
5. Effects – Image Effects – Seamless Tiling - Default
6. Effects - Plugins - AP[Lines] - Lines - Silverlining
7. Effects - Plugins - Filters Unlimited 2.0 - Mock – Windo - Default
Ative a Layer RASTER 1
8. Layers - Arrange - Bring to top
9. Effects - Plugins - Filters Unlimited 2.0 - Filter Factory Gallery N – Yage: 19/194
10. Effects - User Defined filters – Emboss 4 - Default11. Blend Mode –Luminance ... Opacidade 37
Ative a Layer do Fundo (Copy of Raster 1)
12. Effects – Plugins - Mirror Rave – Quadrant Flip - Default
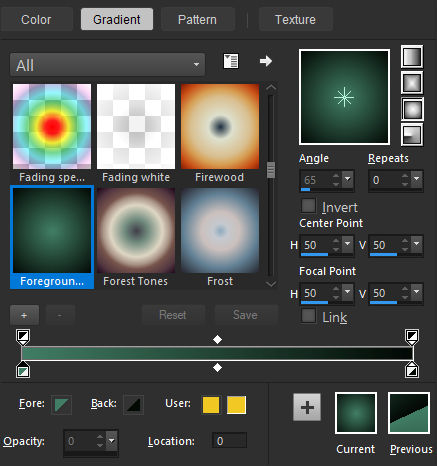
Ative a Layer do TopoMude o Gradiente para - Sumburst – Configurado como segue:
13. Layers - New Raster Layer
14. Preencha com o Gradiente formado
15. Effects - Plugins - Filters Unlimited 2.0 - Buttons & Frames - Rectangular Button: 100/117/40 - Outline marcado
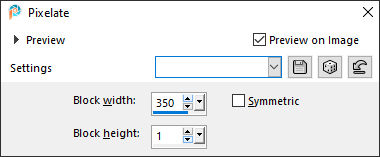
16. Effects – Distortion Effects – Pixelate
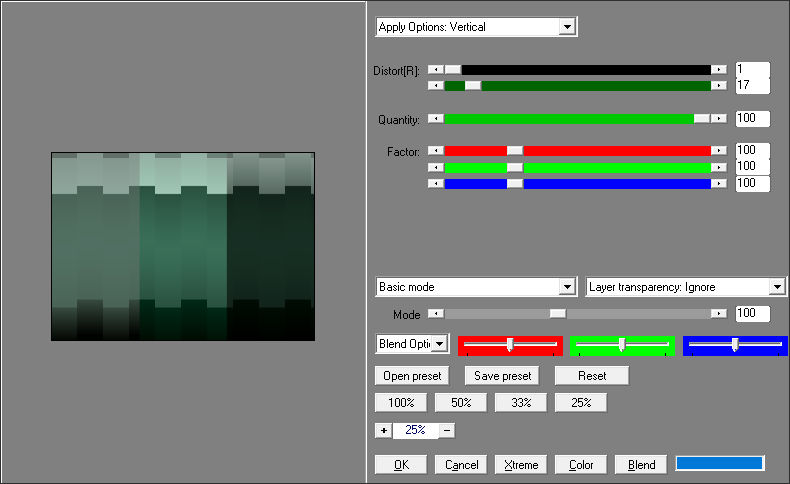
17. Effects - Plugins – AP [Distort] – Distort-Lineup
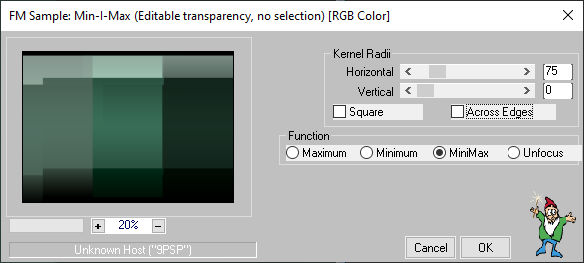
18. Effects – Plugins – FilterMeister – FM Sample :Min I Max (espere que este filtro seja executado)
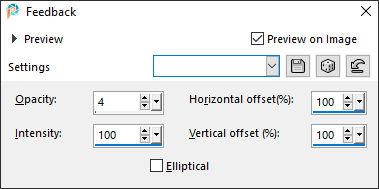
19. Effects – Reflection Effects – Feedback
20. Effects – Edge Effects – Enhance More
21. Effects – Reflection Effects – Rotating Mirror - Default
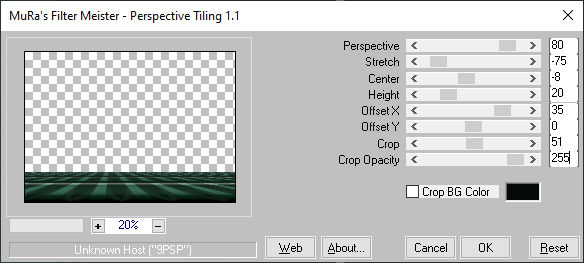
22. Effects – Plugins – MuRa’s Meister – Perspective Tiling
23. Varinha Mágica com Feather em 20 – Clique na parte transparente - Delete no teclado 4 Vezes
Selections - Select None24. Layers – New Raster Layer
25. Selections - Load/Save selection - Load selections from disk: Serenite-126. Effects – 3D Effects – Drop Shadow: 0/0/100/55 Preto
Selecttions - Select None
27. Effects – Image Effects – Seamless Tiling - Default
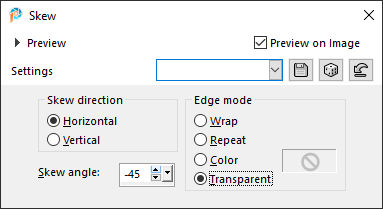
28. Effects – Geometric Effects – Skew
29. Effects – Image Effects – Seamless Tiling
30. Layers – Duplicate
31. Image – Mirror - Mirror Horizontal
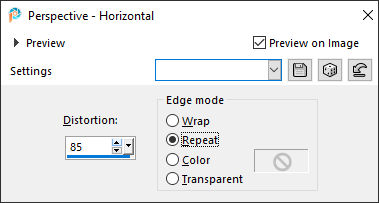
32. Effects – Geometric Effects – Perspective Horizontal
Layers - Merge - Merge Down
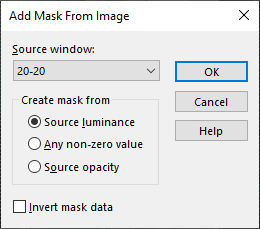
33. Layers - New Mask Layer- From Image: Mask 20/20
Layers – Merge - Merge Group
34. Blend Mode – Hard Light
35. Ative e Copie "Renee-Serenite-Image-1" Cole como nova layer
36. Objects - Align - Left
37. Layers - Duplicate
38. Effects - Plugins - Filters Unlimited 2.0 - &<Bkg Kaleidoscope>- @Mirrored & Scaled
39. Effects - Plugins - Filters Unlimited 2.0 - &<Bkg Kaleidoscope>-4 QFlip UpperL
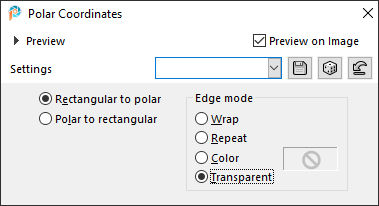
40. Effects – Distirtion Effects – Polar Coordinates
41. Image – Mirror - Miroir Vertical
42. Selections - Load/Save selection - Load selections from disk: Serenite-2
Delete no TecladoSelections / Select None
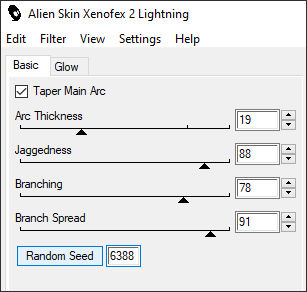
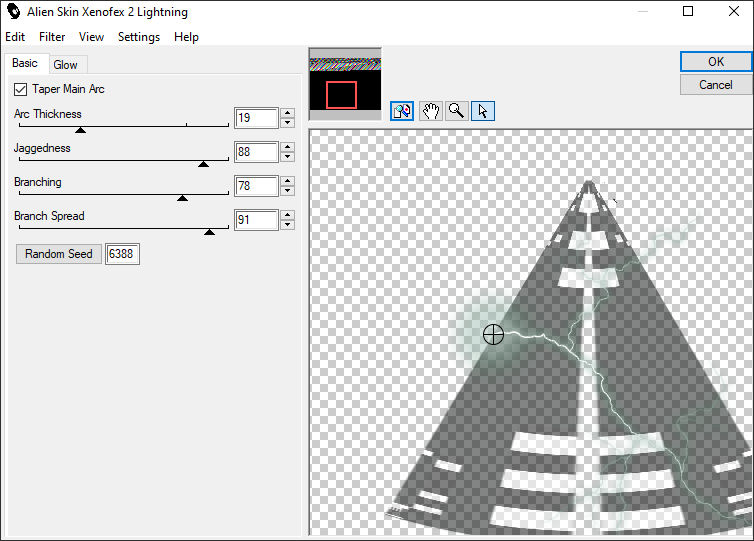
43. Effects – Plugins – Alien Skin Xenofex 2 - Lightning - Cores Branca e cor #75b59c
44. Layers - Arrange - Move DownAtive a Layer do fundo "Copy of Raster 1"
45. Selections - Load/Save selection - Load selections from disk: Serenite-3
46. Selections – Promote selection to layer
47. Layers - Arrange - Bring to top
48. Adjust - Blur - Gaussian Blur - Radius 50
49. Ative e Copie "Serenite-paysage-1" ( ou outro de sua escolha) Copie e Cole na seleção.50. Effects - Plugins – FM Tile Tools – Saturation Emboss - Default
Selections - Select None
51. Layers - Arrange - Move Down
Ative a Layer do Topo ( Raster 3)
52. Effects – 3D Effects - Drop Shadow: 10/10/65/12 Preto
53. Layers - New Raster Layer
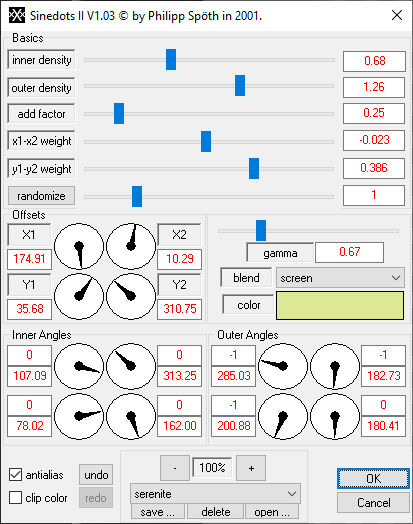
54. Effects – Plugins – Dragon Fly – Sinedots II- Preset : ''serenite''
Coloque o preset dentro da pasta de presets do plugin Sinedot II
Clique em Abrir – clique no preset “Sserenite” na lista de presets do filtro – altere a cor se necessário
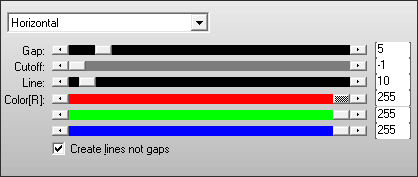
O efeito ficará okOu configure manualmente:
PS: Para quem não sabe ajustar seus filtros, o efeito está na pasta tube!
55. Ative o tube "Renee-TUBES-Avril-2024-12" e ative a layer ''Serenite-tuto'' do tube
Copie e Cole como nova layer56. Pick Tool (K) - Position X (405,00) Position Y (47,00) Para desativar a Pick Tool letra M.
57.Layers - Arrange - Move Down
Ative a Layer do Topo58. Layers - New Raster Layer
59. Selections - Load/Save selection - Load selections from disk: Serenite-4
60. Preencha com a cor No 1
Selections - Select None
61. Effects - Plugins - Alien Skin Eye Candy 5 – Impact – Glass – Default
Cor branca no primeiro plano62. Ative a Ferramenta Pen Tool (V) – Line Style – "Corel_13_020.PspStyledLine"- Largura 6
Tecla Shift pressionada desenhe uma linha reta – assim:
Convert Vector to Raster Layer
Ative a Layer Raster 663. Layers - Duplicate
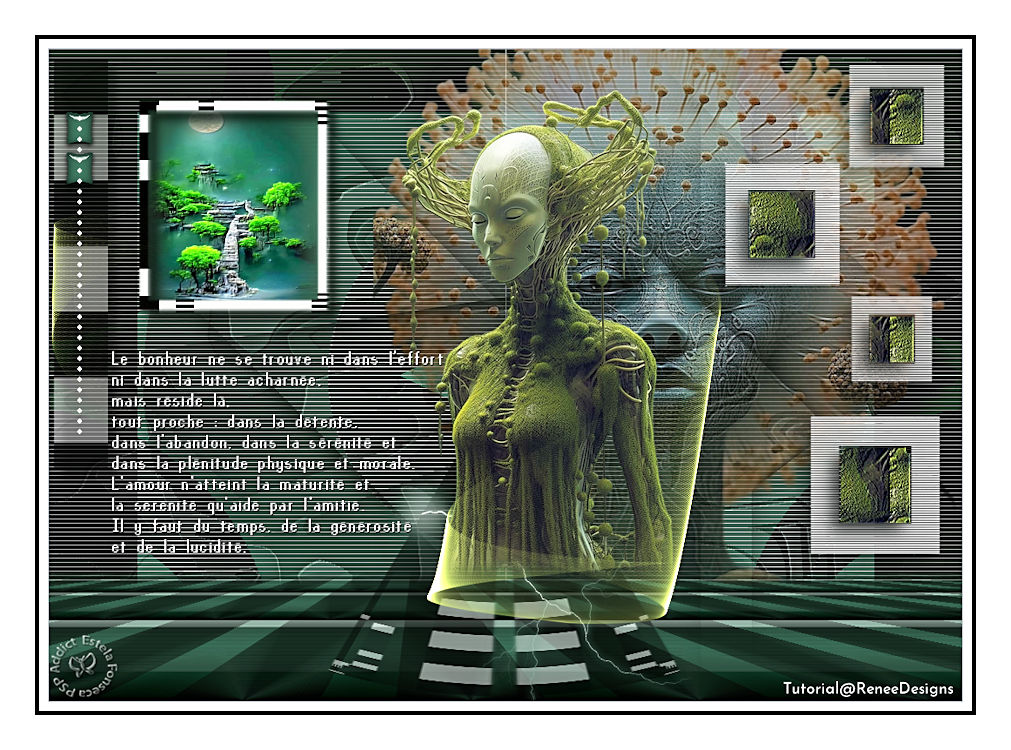
Posicione como na imagem final (ajuste o posicionamento da sua linha se necessário)
porque um pedaço do efeito Sinedot deve ser visto à esquerda
Ative a Layer do Topo64. Layers - Merge - Merge Down
65. Ative e Copie "Texte SERENITE" Cole como nova layer - Posicione como na imagem final.66. Ative e copie ‘’Renee-Serenite-Image-2.’’ Cole como nova layer
67. Pick Tool(K) - Posição X (776,00) Posição Y (19,00) - Tecla M desativa a Pick Tool
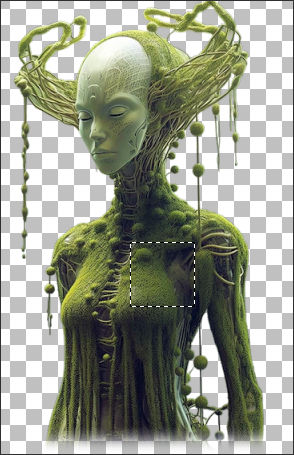
Tenha cuidado aqui – Abra o tube do personagem que você está usando para sua criação - Renée usoui ‘’Renee-TUBES-Avril-2024-12 ‘’
68. Selecione uma parte do tube que você gosta – assim
Copie e cole como nova imagem - Salve esta Pattern "Pattern-Serenite"69- Layers - New Raster Layer
70. Selections - Load/Save selection - Load selections from disk: Serenite-5
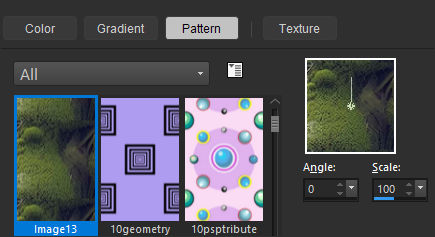
Estilos e texturas - Abra o primeiro plano na Pattern – Localize sua ''Pattern-Serenidade''
71. Preencha a seleção com a pattern
72. Effects - User Defined Filters – Emboss 3 - Default
73. Effects – 3D Effects – Drop Shadow: 10/ -10 /65 /25 Preto
Selections - Select None
Ative a layer imediatamente abaixo - Layer dos quadros brancos (raster 8)
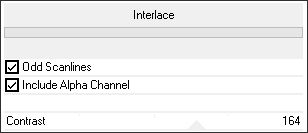
74. Effects - Plugins - Filters Unlimited 2.0 - Video – Interlace
75. Effects – 3D Effects – Drop Shadow: 10/ -10 /65 /25 Preto
76. Ative o tube "Renee-TUBES-Avril-2024-11" - Image - Resize - 85% ... Resize All Layers - Marcado
Copie e cole como nova layerObjects - Align - Right
77. Arraste esta layer para baixo da Layer "Raster 1"
78. Opacidade 57
79. Image – Add Borders - Symmetric Marcado - 1 Pixel cor Nº 3
Image – Add Borders - Symmetric Marcado - 10 Pixels cor Nº 4
Image – Add Borders - Symmetric Marcado - 5 Pixels Cor No 2
Image – Add Borders - Symmetric Marcado - 40 Pixels em Branco
80. Coloque a sua assinatura e a assinatura de Renée
81. Layers - Merge - Merge All
82. Image - Resize - 85% ... Resize All Layers ... Marcado.Salve como JPG
©Tutorial traduzido por Estela Fonseca em 17/03/2024.
Não alterar nem repassar sem autorização.
