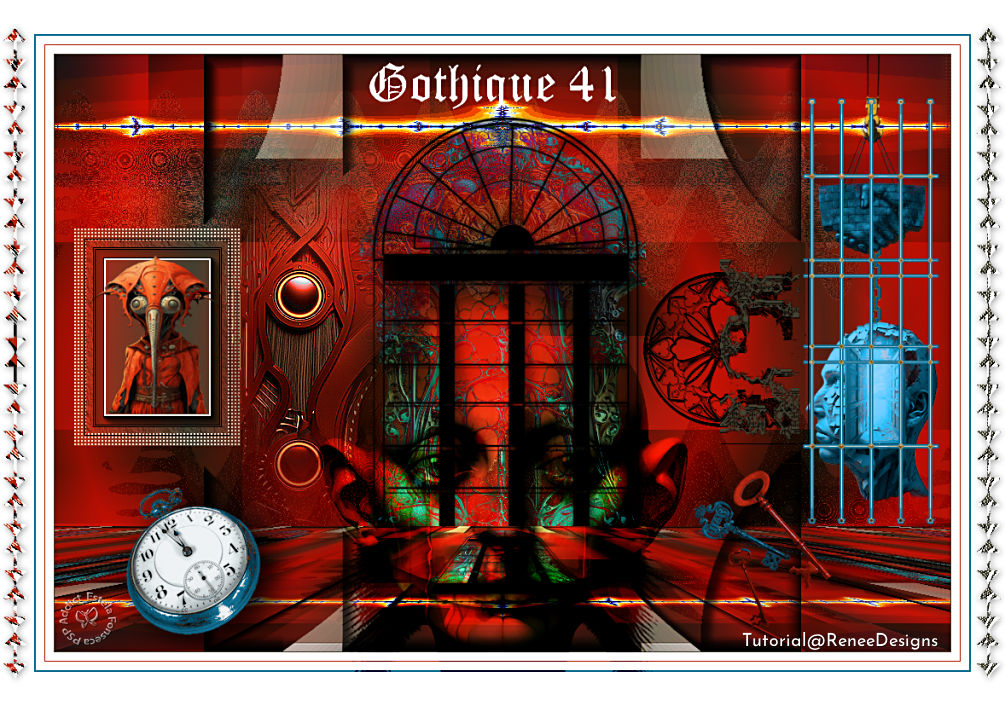
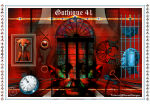
GOTHIQUE 41
Tutorial de Renée Graphic , original, Aqui.
O tutorial foi traduzido na versão Corel Paint shop Pro 2022 Ultimate, mas ele pode ser feito com outras versões.
Materiais Necessários:
Tubes de Renée...
ATENÇÃO:
Não compartilhe os tubes de Renée em sites ou blog ...etc
Eles estão a disposição em seu site: AQUI.
PLUGINS
Atenção
Lembrete Se você usar o Filter Unlimited 2.3, de Renée, ele consiste em 3 pastas
Dê uma olhada nas pastas antes de adicionar uma predefinição.
Medhi
AP[Lines] Lines
Vanderlee – Unplugged X
FM Tile Tools
Alien Skin EyeCandy 5 - Impact
Transparency
Mura’s Meister
AAA Frame – Texture Frame
AAA Frame – Foto Frame
**
Página de Plugins de Renée...AQUI.
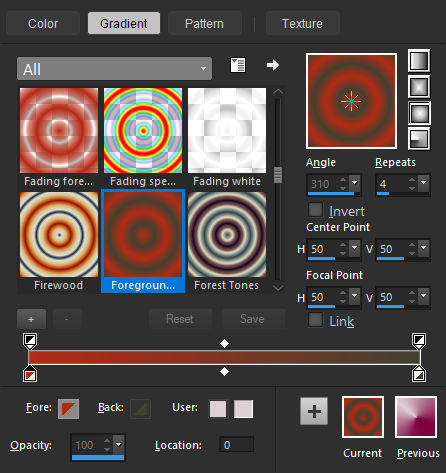
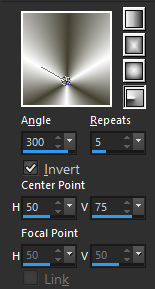
Primeiro Plano cor Nº1 #b62a14 - Plano de Fundo Cor Nº2 #424231Forme no Primeiro Plano um Gradiente Sunburst - Configure como segue:
1. Abra uma nova imagem Transparente de 1050 x 700 Pixels
2. Preencha com o Gradiente
3. Layers – Duplicate
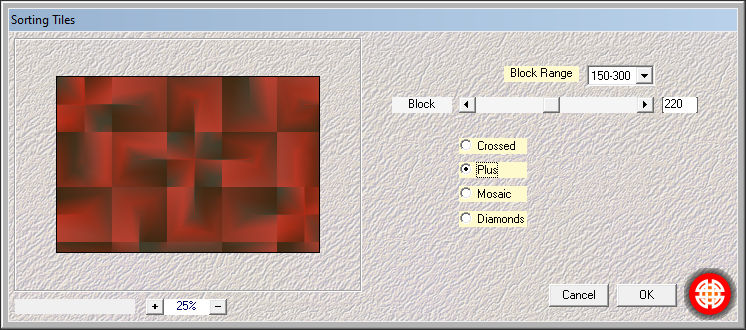
4. Effects – Plugins – Mehdi – Sorting Tiles:
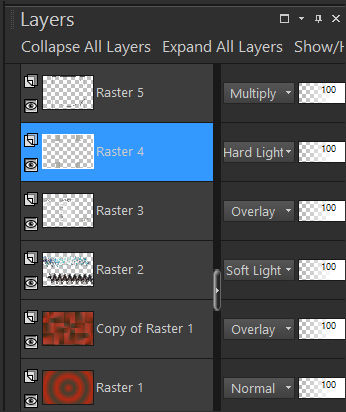
5. Blend Mode - Overlay
6. Layers - New Raster Layer
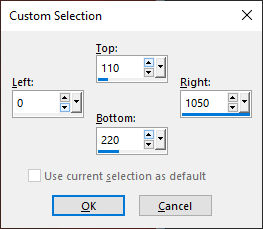
7. Selection Tool (S) Rectangle - Custom Selection:
8. Flood Fill Tool – Opacidade 40% – Preencha a seleção com o Gradiente.Selections - Select None
9. Effects- Plugins - <I.C.NET Software> Filters Unlimited 2.0 - It@lian Editors Effect - Effetto Fantasma: 19/19
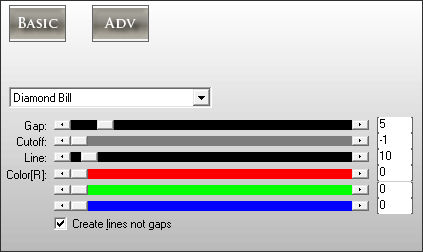
10. Blend Mode - Screen11. Effects- Plugins - AP [Lines] - Lines – Silverlining:
12. Layers - Duplicate
13. Image - Mirror - Mirror vertical
14.Layers - Merge - Merge Down
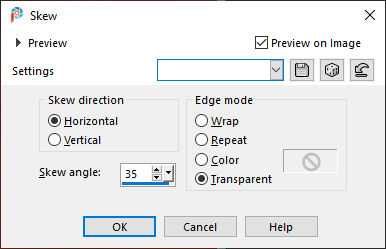
15. Effects – Geometric Effects - Skew :
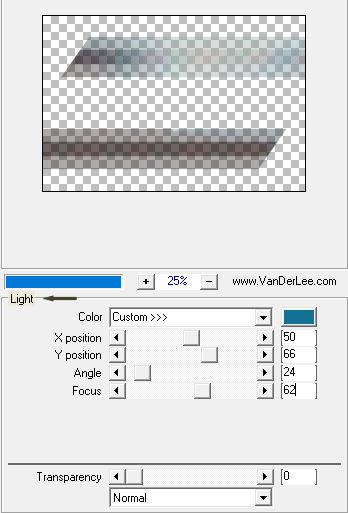
16. Effects – Plugins – Vanderlee – Unplugged X – Light - Cor #137194=4
17. Image - Mirror - Mirror Horizontal
Repita: Effects – Plugins – Vanderlee – Unplugged X – Light (mesmos valores de antes)
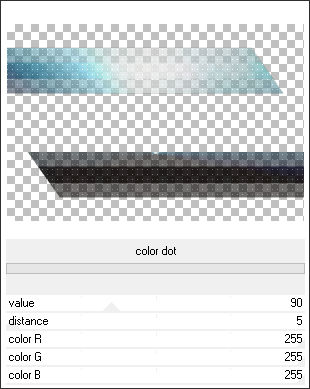
18. Effects - Plugins - <I.C.NET Software> Filters Unlimited 2.0 – Penta Com – Color Dot
19. Effects – Edge Effects – Enhance
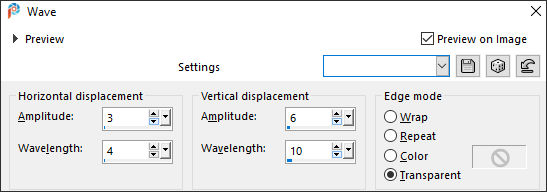
20. Effects – Distortion Effects – Wave:
21. Blend Mode - Soft Light
Primeiro Plano cor Nº3: #ffffff22. Layers - New Raster Layer
23. Selections – Load/Save selection – Load selection from disk: Gothique-41-1
24. Flood Fill Tool – Opacidade 40% – Preencha a seleção com a cor do Primeiro Plano Cor Nº 3: #ffffffSelections - Select None
25. Effects – Distortion Effects – Wind – Wind Strength 100 % – Wind Direction from Right
Repita: Effects – Distortion Effects– Wind – Mesmas configurações
26. Effects - Plugins - <I.C.NET Software> Filters Unlimited 2.0 - Tramages - Cirquelate... 20
27. Blend Mode - Overlay
28. Effects - Plugins - FM Tile Tools – Saturation Emboss - DefaultPrimeiro Plano cor Nº2: #424131 - Plano de Fundo cor Nº3:#ffffff
Forme no Primeiro Plano um Gradiente Radial - Configure como segue:
29. Layers - New Raster Layer
30. Flood Fill Tool – Opacidade 100% – Preencha com o Gradiente
31. Adjust - Blur - Gaussian Blur - Radius 20%
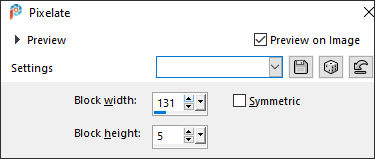
32. Effects – Distortion Effects – Pixelate:
33. Effects – Edge Effects – Enhance
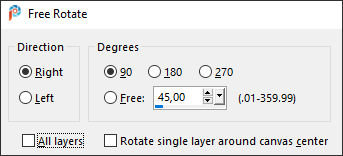
34. Image – Free Rotate - Degrees 90 - Right
Ative a Layer Raster 1 – Selections - Select All
35. Image - Crop to Selection
Ative a Layer do Topo (Raster 4)
36. Effects - Plugins - <I.C.NET Software> Filters Unlimited 2.0 – Scribe – Doughnutz : 20
37. Selections – Load/Save selection – Load selection from disk: Gothique-41-2Delete no Teclado - Selections - Select None
38. Effects- Plugins - <I.C.NET Software> Filters Unlimited 2.0 – Scribe - 4way mirror : 125/125
39. Selections –Load/Save selection – Load selection from disk: Gothique-41-3Delete no Teclado
40. Layers - New Raster Layer
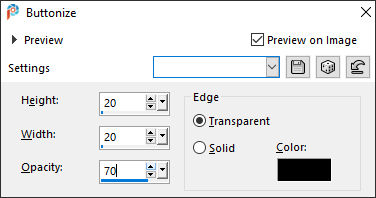
41. Effects – 3D Effects – Buttonize: Cor Preta
42. Selections – Invert
43. Effects- 3D Effects - Drop Shadow: 10/10/48/12 Cor Preta
Selections - Select None
44. Blend Mode - Multiply
Ative a Layer imediatamente abaixo desta (Raster 4)
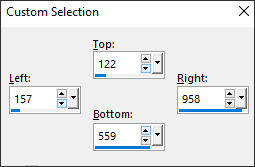
Selection Tool (S) Custom Selection:
Delete no Teclado
Selections / Select None
45. Blend Mode - Hard Light
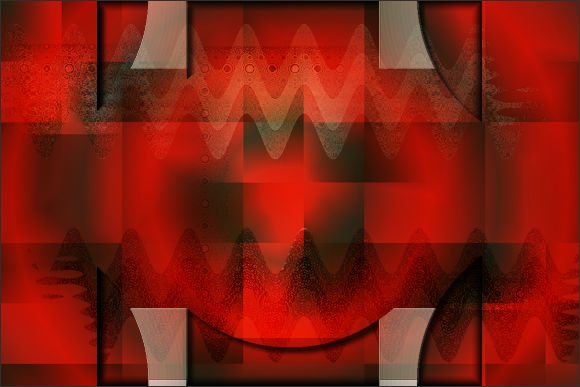
Chegamos (ajuste o Modo das suas camadas e as opacidades de acordo com a escolha das suas cores)
para mim veja abaixo
Resultado:
Ative a Layer do Topo
46. Abra o Tube "Renee-Tubes- Gothique-41-Image1" - Copie e Cole como nova layer47. Pick Tool (K) - Position X (355,00) Position Y (71,00) Pressione a Letra M para desativar a Pick Tool
48. Blend Mode - Difference
49. Effects – Plugins – FM Tile Tools – Metallic Emboss - Default
50. Layers - New Raster Layer
51. Selections – Load/Save selection – Load selection from disk: Gothique-41-4
52. Primeiro Plano cor Nº5 : #000000Flood Fill Tool – Opacidade 100% – Preencha a seleção com a cor Nº5: #000000
Selections / Select None
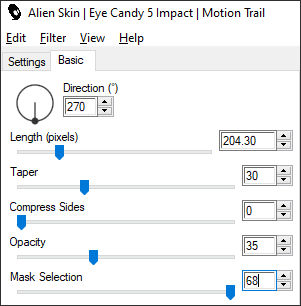
53. Effects - Plugins - Alien Skin Eye Candy 5 - Impact - Motion Trail :
Ative a Layer Raster 1
54. Selections – Load/Save selection – Load selection from disk: Gothique-41-5
55. Selections – Promote Selection to Layer
56. Effects - Plugins - <I.C.NET Software> Filters Unlimited 2.0 - [AFS IMPORT] - sqborder2 : 255/34/215
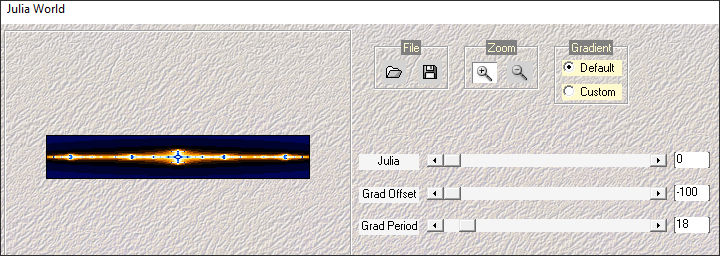
57. Effects – Plugins – Mehdi- Julia Word :
58. Effects – Plugins – Transparency – Eliminate Black
Selections / Select None
Ative a Layer do Topo59. Edit - Copy Special - Copy Merged
60. Paste as New Layer
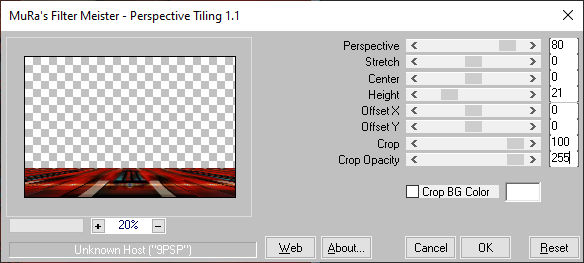
61. Effects – Plugins – MuRa’s Meister – Perspective Tiling:
62. Layers - Arrange - Move Down ... (embaixo da layer Raster 5)
Ative a Layer Promoted Selection Layer (segunda a partir da layer do fundo )
63. Image - Mirror - Mirror vertical
Ative a Layer Raster 1
64. Selections – Load/Save selection – Load selection from disk: Gothique-41-6
65. Selections – Promote Selection to Layer
66. Layers - Arrange - Bring to Top
67. Effects -Plugins <I.C.NET Software> Filters Unlimited 2.0 -[AFS IMPORT] - sqborder2: 40/34/215 (Demais valores 0)
68. Selections – Modify – Contract - 12 Pixels
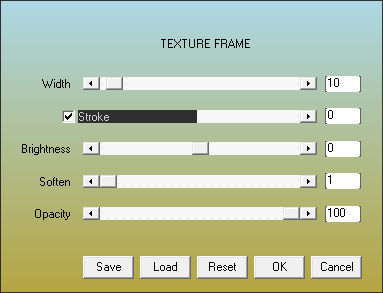
69. Effects – Plugins - AAA Frame – Texture Frame:
70. Selections - Modify - Contract- 12 Pixels
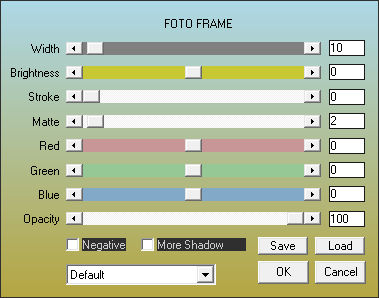
71. Effects – Plugins - AAA Frame – Foto Frame:
Selections / Select None
72. Abra o Tube "Renee-TUBES- Decembre3-2023-47"
Ative a layer ''Gohique-41'' no Tube
Copie e Cole como nova layer no seu trabalho em andamento - Coloque dentro do quadro
Primeiro Plano cor Nº4 (#137194) - Plano de Fundo Cor Nº3 (#ffffff)73. Layers- New Raster Layer
74. Selections – Load/Save selection – Load selection from disk: Gothique-41-7
75. Preencha a seleção com a cor (4) #13719476. Selections – Modify– Contract - 2 Pixels
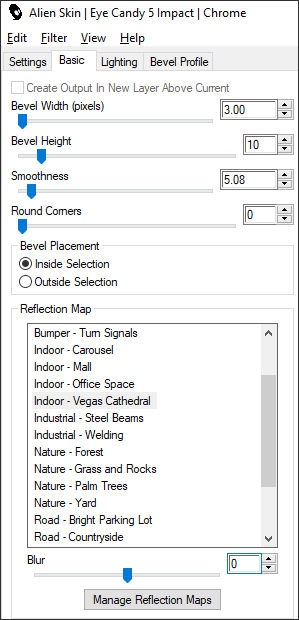
77. Preencha a seleção com a cor (3) #ffffff78. Effects - Plugins - Alien Skin Eye Candy 5 – Impact – Chrome:
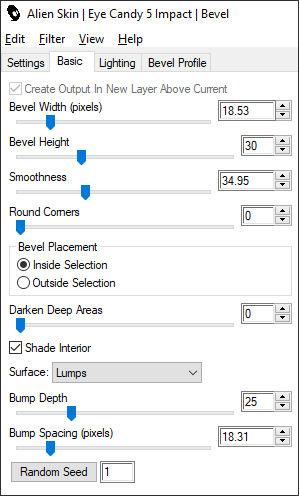
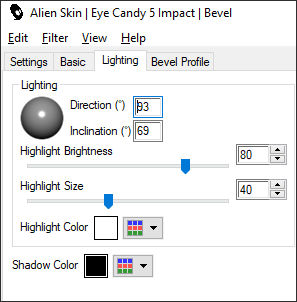
79. Effects- Plugins - Alien Skin Eye Candy 5 – Impact – Bevel - Preset: «Renee-Gothique41- Bevel»
80. Abra o tube «Renee-Tubes- Gothique-41-Image2» Copie e Cole como nova layer
Posicione do lado direito ( Veja imagem final )
81. Layers - Arrange - Move Down
Ative a Layer do Topo82. Layers- New Raster Layer
83. Selections – Load/Save selection – Load selection from disk: Gothique-41-8
84. Preencha a seleção com a cor Nº5 (#000000) ( 3 ou 4 cliques)Selections - Select None
85. Effects- 3D Effects- Drop Shadow: 1/1/100/1 Cor #000000
86. Selections – Load/Save selection – Load selection from disk: Gothique-41-987. Effets – Modules externes - Alien Skin Image Doctor – Smart Fill
Se você tiver problema com este plugin ... não entre em pânico.Copie e cole como nova layer a imagem que está na pasta do material «Effet- Skin Doctor»
( não esqueça de unir as layers)
88. Effects - 3D Effects - Drop Shadow: 1/1/100/1 Cor #000000
89. Ative «Emboss Brush» – ( Configurações default - clic na setinha)
Configure como segue – Blend mode = Dodge
E APLICAMOS PEQUENOS CLIQUES para obter um resultado semelhante(se não conseguir um bom resultado, apague a sua e cole minha imagem da pasta «Effet-Skin Doctor»)
90. Abra o Tube « Renee-Tubes- Gothique-41-Image3» - Copie e cole como nova layer
91. Pick Tool: (K) - Position X (165,00) Position Y (97,00) - Tecla M para desativar a Pick
92. Abra os dois Tubes « Renee-Tubes- Gothique-41-montre» e «Renee-Tubes- Gothique-41-clefs»
Copie e cole como nova layer - Posicione como no modelo93. Image - Add Borders - Symmetric Marcado - 1 Pixel cor (2) # 424131
Image - Add Borders - Symmetric Marcado - 10 Pixels cor (3) #ffffff
Image - Add Borders - Symmetric Marcado - 1 Pixel cor (1)#b62a14
Image - Add Borders - Symmetric Marcado - 10 Pixels cor (3) #ffffff
Image - Add Borders - Symmetric Marcado - 2 Pixels cor (4) # 137194
Image - Add Borders - Symmetric Marcado - 40 Pixels cor (3) #ffffff
94. Ative o Tube – «Novembre-2023-bis-11»
Image / Resize / 76 % ... Resize All Layers ... Marcado
Copie e Cole como nova layer
95. Objects – Align – Bottom
96. Blend Mode - Overlay97. Abra o Tube «Deco-cadre» Copie e Cole como nova layer
Não Mova!
98. Escreva o texto com a Fonte (Olde Englisch ttf) – Tamanho 72
Copie e cole como nova layer a marca d'água de Renée99. Layers- Merge- Merge All ( flatten)
100. Image - Resize - 1005 Pixels width - Resize all layers- Marcado
Salve como JPG
©Tutorial traduzido por Estela Fonseca em 03/03/2024.
Não alterar nem repassar sem autorização.
