MAXYRAN
Original Aqui
Esta lição foi traduzida em PSP X2, mas pode ser feita em outras versões
Material Necessário:
Tube Maxyran_16_03_10 women 216
https://tech.groups.yahoo.com/group/Maxyran_Top_Tubes/
Tube Suzi sgai _ SS_83
Masker Narah_abstract035
Plaatje 3D_99
Plugins Utilizados:FM Tile Tools
Filter Factory Gallery H
Mura's seamless
Eye candy impact
Graphic plus
01. Foreground cor #2B2223 / Background cor #FEFCB7
02. Abra uma nova imagem transparente de 750 x 550 px
Preencha com a cor do foreground
03. Layers - New Raster Layer
Selections - Select all
04. Abra a imagem 3d_99 - Edit - Copy
Edit - Paste into selection.
Selections - Select None.
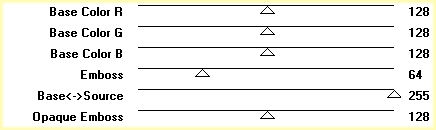
05. Blend Mode - Luminance ( Legacy)
06. Effects - Plugins - FM Tile Tools - Blend Emboss - Default.07. Layers - New Raster Layer.
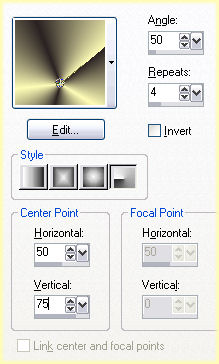
Forme no foreground um gradiente com essas configurações:
Preencha com o gradiente.
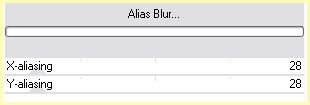
08. Effects - Plugins - Filter Factory Gallery H - Alias Blur.
09. Effects - Edge Effects - Enhance. Opacidade da layer 75.
10. Effects - Plugins - FM Tile Tools - Blend Emboss - Default.11. Layers - New Raster Layer. Preencha com a cor do background
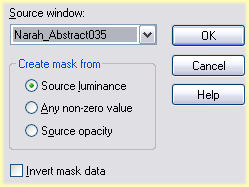
12. Layers - New Mask Layer - From Image:
Layers - Merge - Merge Group.
13. Effects - 3d Effects - Drop shadow : 5 - 5 - 50 - 15 - cor preta
Opacidade 72 - Blend Mode Overlay.
14. Effects - Plugins - Mura's Seamless - Emboss at alpha:
15. Layers - New Raster Layer.
16. Selections - Load/Save Selections - Load selection from Disc - npw_maxyran17. Preencha a seleção com a cor do background.
18. Selections - Select None.
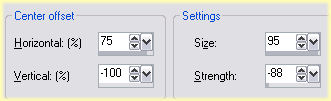
19. Effects - Distortion Effects - Warp
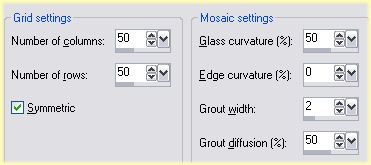
19. Effects - Texture Effects - Mosaic Glass:
20. Layers - Duplicate
21. Layers - Merge - Merge Down.
22. Effects - 3d Effects - Drop shadow: 0 - 0 - 65 - 10 - preta
23. Repita o drop shadow com os mesmos valores.24. Abra o tube SS_83 - Edit - Copy
Edit - Paste as new layer
25. Mova para o canto inferior direito26. Baixe a opacidade para 90
27. Abra o tube maxyran_16_03_10 women216 - Edit - Copy
Edit - Paste as new layer.
28. Image - Resize - 90% - Resize all layer desmarcado.
29. Image - Mirror.
30. Mova o tube para a esquerda.
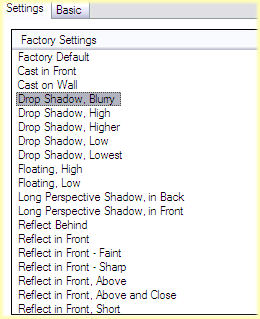
31. Effects - Plugins - Eye Candy 5 - Impact - Perspective Shadow - Drop Shadow Blurry:
32. Layers - Merge - Merge All (Flatten)
33. Layers - Duplicate.
34. mage - Resize - 90% - Resize all layer , desmarcado
35. Ative a layer inferiorAdjust - Blur - Gaussian Blur - 15
36. Effects - Plugins - Graphic Plus - Cross Shadow - Default36. Clique na layer superior
Selections - Select all
Selections - Float
Selections - Defloat
Selections - Modify - Select selection borders
37. Preencha a seleção com a cor do foregroundSelections - Select None.
38. Effects - Plugins - Eye Candy 5 - Impact - Perspective ShadowDrop Shadow Blurry -nas mesmas configurações anteriores.
39. Image - Add Borders - Symmetric - 1px - cor do foreground.
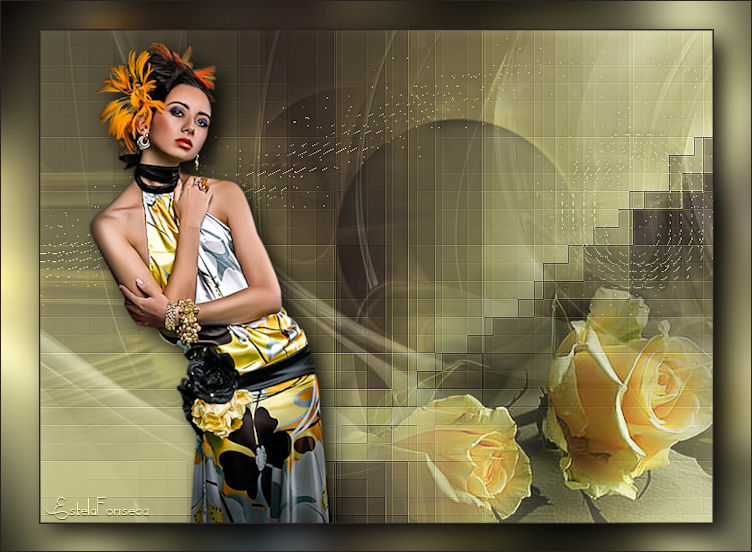
40. Coloque a sua marca d'água ou o seu nomeSalve seu trabalho em JPG!
©Tutorial traduzido por Estela Fonseca em 16/11/2010.
Não alterar nem repassar sem autorização.