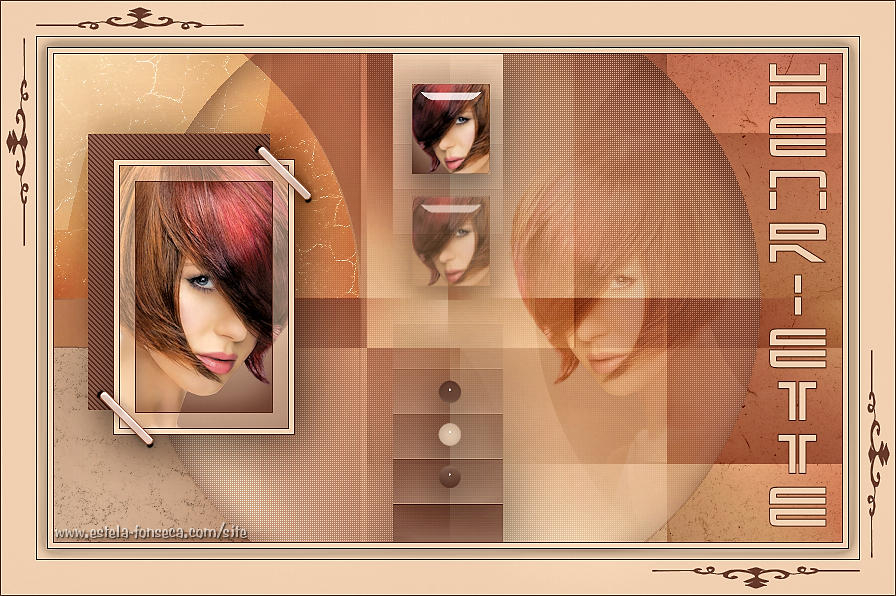
HENRIETTE
Tutorial de ©Monaliza, original, AQUI.
Tutorial traduzido no PSP X8, mas pode ser feito com outras versões.
Material Necessário:
Tube de Nena Silva.
Ela compartilha seus tubes , AQUI.
Plugins Utilizados:
<I.C.NET Software> Filters Unlimited 2.0&Bkg Kaleidoscope> - Cake Mix & Nomads Rug **
Mehdi - Sorting Tiles
Photo Aging Kit - Cracked Paper, Dirt & Hairs & Dust **
Penta.com - color dot
Alien Skin Eye Candy 5 Impact - Perspective Shadow & Glass
MuRa's Meister - Copies
Carolaine and Sensibility - CS-DLines
Nik Software - Color Efex Pro 3.0
** Importados para o Filters Unlimited
Preparations:
Abra os tubes no PSP, Minimize.Duplo clique nos presets do Eye Candy Presets
Copie o Gradiente para a Pasta de Gradientes do PSP
Copie as seleções para a pasta de Seleções do PSP
Nota: Se trabalha com outras cores, mude o Blend Mode e/ou a Opacidade conforme seu gosto.
Primeiro Plano Cor #f0d5bb
Segundo Plano Cor #613b2f
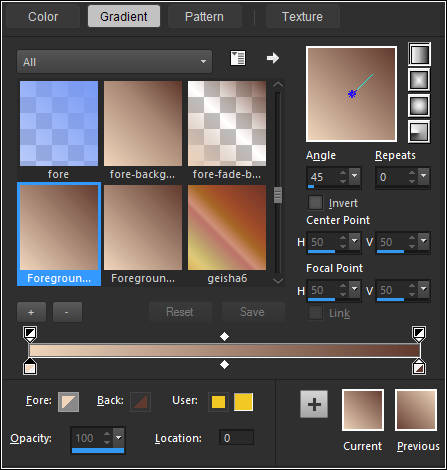
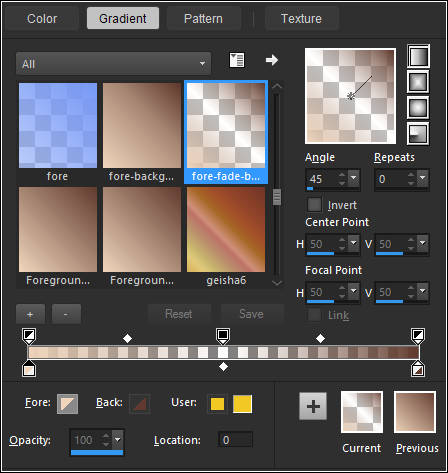
Forme um Gradiente no Primeiro Plano (Corel_06_029) / Estilo <<Linear>>
01- Abra uma nova imagem transparente de 800/500 pixels
Preencha com o Gradiente
Effects / Plugins / <I.C.NET Software> Filters Unlimited 2.0 / &Bkg Kaleidoscope> / Cake Mix / Default
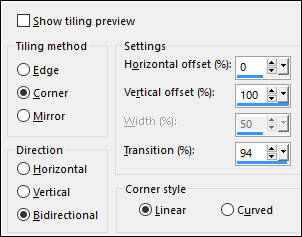
Effects / Image Effects / Seamless Tiling
Effects / Edge Effects / Erode
02- Layers / Duplicate
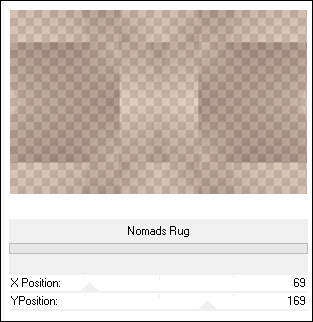
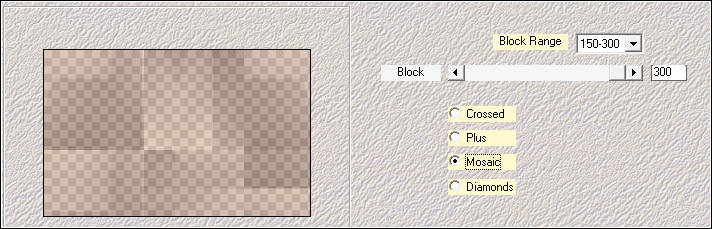
Effects / Plugins / <I.C.NET Software> Filters Unlimited 2.0 / &Bkg Kaleidoscope> / Nomads Rug / Default
Effects / Plugins / Mehdi / Sorting Tiles
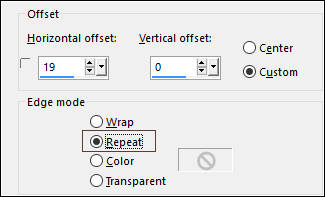
Effects / Image Effects / Offset
Blend Mode / Overlay
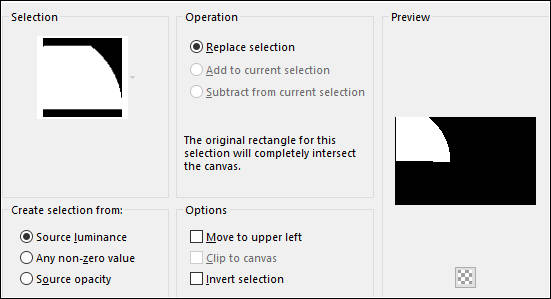
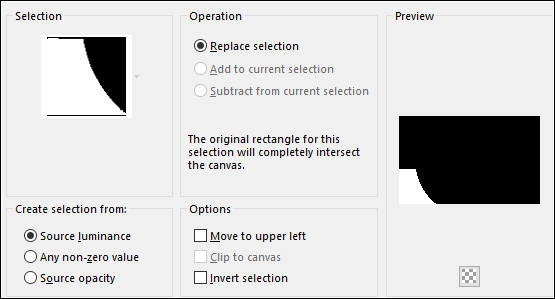
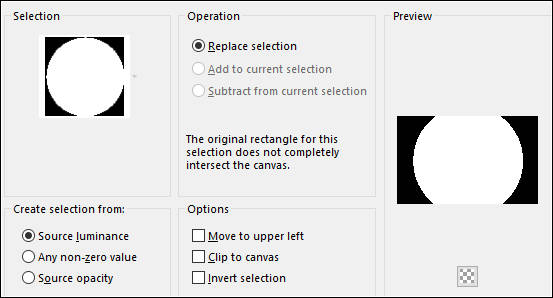
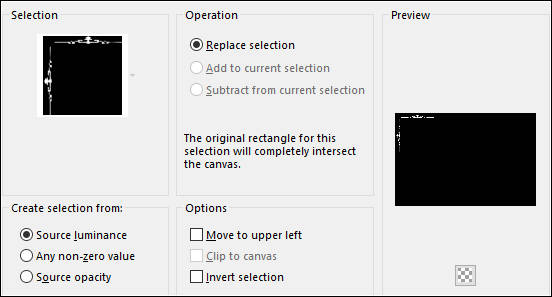
03- Selections / Load/Save Selection / Load Selection From Disk: mz_sel_henriette1
Selections / Promote Selection to Layer
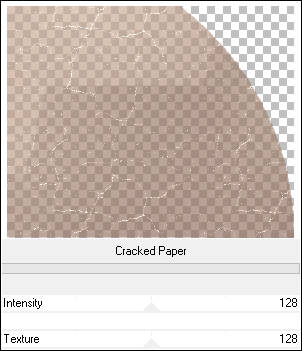
Effects / Plugins / <I.C.NET Software> Filters Unlimited 2.0 / Photo Aging Kit / Cracked Paper/ Default
Selections / Select None
Blend Mode / Hard Light04- Ative a Layer do Meio (Copy of Raster 1)
Selections / Load/Save Selection / Load Selection From Disk: mz_sel_henriette2
Selections / Promote Selection to Layer
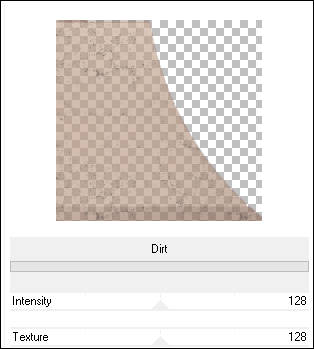
Effects / Plugins / <I.C.NET Software> Filters Unlimited 2.0 / Photo Aging Kit / Dirt / Default
Selections / Select None
05- Ative a Segunda layer à partir da layer do fundo (Copy of Raster 1)
Selections / Load/Save Selection / Load Selection From Disk: mz_sel_henriette3
Selections / Promote Selection to Layer
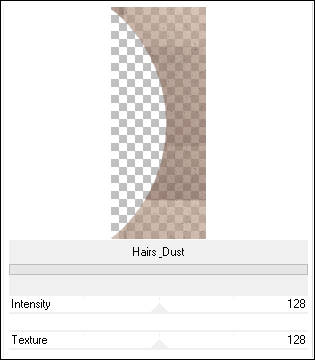
Effects / Plugins / <I.C.NET Software> Filters Unlimited 2.0 / Photo Aging Kit / Hairs & Dust
Selections / Select None
Blend Mode / Luminance (Legacy)
06- Maximize o tube <<vvs-woman0343>>Copie e Cole como nova layer
Image / Resize / 50% ( Resize all Layers desmarcado)
Mova para à direita:
Layers / Arrange / Move Down
Opacidade / 45 ( dependendo do tube Blend Mode/ Soft Light)
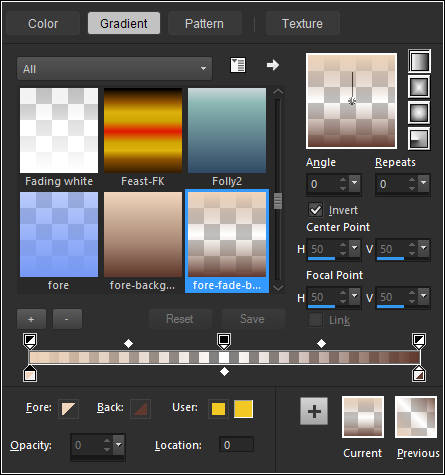
07- Mude o Gradiente para << fore-fade-background >> Estilo <<Linear>>
Ative a layer do topo
Layers / New Raster Layer
Selections / Load/Save Selection / Load Selection From Disk: mz_sel_henriette4
Preencha a seleção com o Gradiente
Layers / New Raster Layer
Effects / 3D Effects / Cutout / Cor do Segundo Plano #613b2f
Selections / Select None
08- Ative a Segunda layer à partir da layer do topo (Raster 3)
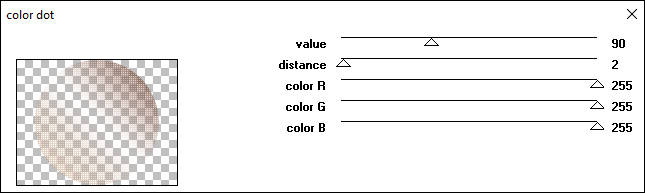
Effects / Plugins / Penta.Com / Color Dot / Default
09- Mude o Gradiente << fore-fade-background >> estilo <<Linear>>:
Ative a Layer do Topo
Layers / New Raster Layer
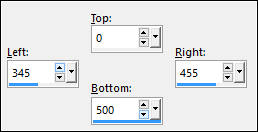
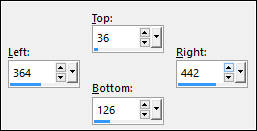
Selection Tool / Rectangle / Custom Selection:
Preencha a Seleção com o Gradiente
Effects / Texture Effects / Blinds - Cor do Primeiro Plano #f0d5bb
Effects / Edge Effects / Enhance
Selections / Select None
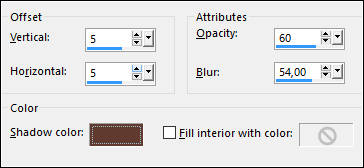
Effects /Plugins /Alien Skin Eye Candy 5/ Impact /Perspective Shadow /Preset <<mz_shadow_henriette>>
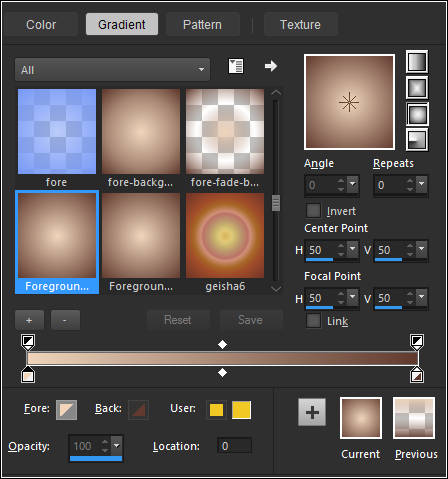
10- Mude o Gradiente para << fore-background >> (Corel_06_029) Estilo <<Sunburst>>
Layers / New Raster Layer
Selections / Load/Save Selection / Load Selection From Disk: mz_sel_henriette5
Preencha a Seleção com o Gradiente
Selections / Select None
Effects / Plugins / Alien Skin Eye Candy 5 Impact / Glass / Preset <<mz_glass_henriette>>11- Layers / New Raster Layer
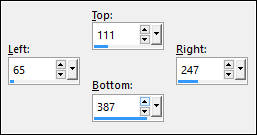
Selection Tool / Rectangle / Custom Selection:
Preencha a Seleção com o Gradiente
Maximize o tube <<vvs-woman0343>>
Copie e Cole como nova layer
Image / Resize / 50% ( Resize all Layers desmarcado)
Image / Resize / 45% ( Resize all Layers desmarcado)
Mova para dentro da seleção como segue:
Selections / Invert
Edit / Cut (Ou Delete no teclado)
Selections / Invert
Effects / Plugins / Alien Skin Eye Candy 5 Impact / Glass / Preset <<mz_glass_henriette>>Selections / Select None
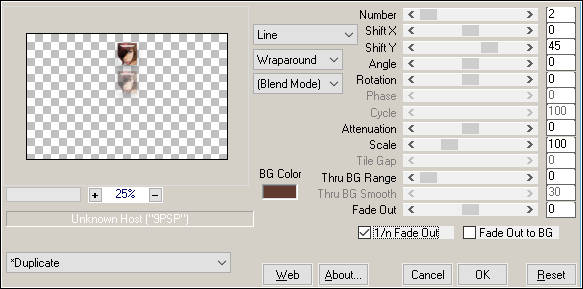
Effects / Plugins / MuRa's Meister / Copies
Layers / Merge / Merge Visible
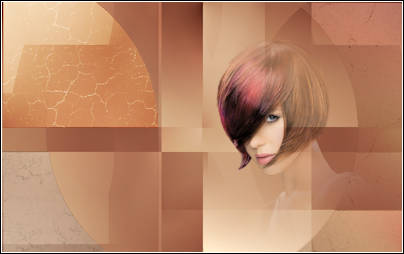
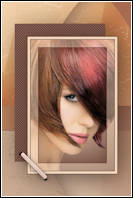
Seu trabalho deve estar assim agora
12- Layers / New Raster Layer
Selection Tool / Rectangle / Custom Selection:
Preencha a Seleção com o Gradiente
Maximize o tube <<vvs-woman0343>>Image / Mirror / Mirror Horizontal ( Image / Mirror em versões anteriores do PSP)
Copie e Cole como nova layerImage / Resize / 45% ( Resize all Layers desmarcado)
Posicione sobre a seleção
Selections / Invert
Edit / Cut (Ou Delete no teclado)
Selections / InvertLayers / New Raster layer
Preencha com a cor do Segundo Plano
Selections / Modify / Contract 1 pixel
Delete no teclado
Preencha a Seleção com a cor do Primeiro Plano
Selections / Modify / Contract 5 pixels
Delete no teclado
Preencha a seleção com a cor do Segundo Plano
Selections / Modify / Contract 1 pixel
Delete no teclado
Baldinho de Pintura com opacidade 50
13- Preencha a Seleção com a cor do Primeiro Plano
Selections / Modify / Contract 15
Delete no teclado
Volte a opacidade do Baldinho de Pintura para 100%
Preencha a Seleção com a cor do Segundo Plano
Selections / Modify / Contract 1 pixel
Mantenha a Seleção
Layers / New Raster layer
Effects / 3D Effects / Cutout (Mesma configuração de antes)
Selections / Select None
14- Oculte a layer do Fundo e Mantenha ativa a layer do topoLayers / Merge / Merge Visible
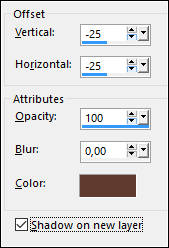
Torne visivel a layer do Fundo <<Merged>>Effects / 3D Effects / Drop Shadow / Cor: #613b2f - Shadow on new marcado!
Effects / Plugins / Carolaine and Sensibility / CS-DLines / Default
Ative a layer do topo
Effects /Plugins /Alien Skin Eye Candy 5 /Impact /Perspective Shadow/Preset <<mz_shadow_henriette>>
15- Maximize o tube <<scrap_nietje>>Copie e Cole como nova layer
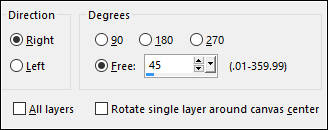
Image / Free Rotate
Posicione como segue:
Adjust / Hue and Saturation / Colorize : Hue 12 / Saturation 88 (cores do meu tube)
Layers / Duplicate
Posicone
16- Layers / New Raster Layer
Preencha coma cor do Primeiro PlanoSelections / Select All
Selections / Modify / Contract / 5 pixels
Edit / Cut (Ou Delete no teclado)Preencha a Seleção com a cor do Segundo Plano
Selections / Modify / Contract / 1 pixel
Edit / Cut (Ou Delete no teclado)
Selections / Select None
17- Image / Add Borders / Symmetric Marcado / 1 pixel cor #5a372c
Image / Add Borders / Symmetric Marcado / 10 pixels cor f0d5bb
Image / Add Borders / Symmetric Marcado / 1 pixel cor #5a372cImage / Add Borders / Symmetric Marcado / 35 pixels cor f0d5bb
Image / Add Borders / Symmetric Marcado / 1 pixel cor #5a372c
Selections / Select All
Selections / Modify / Contract / 48 pixelsEffects / 3D Effects / Drop Shadow: 0 / 0 / 60 / 20,00 / Cor #000000
Desmarque << Shadow on New Layer!!!>>
Selections / Select None
18- Layers / New Raster Layer
Selections / Load/Save Selection / Load Selection From Disk: mz_sel_henriette6
Preencha a Seleção com a cor do Segundo Plano
Selections / Select None
Layers / Duplicate
Image / Mirror / Mirror Horizontal ( Image / Mirror versões anteriores)
Image / Mirror / Mirror Vertical ( Image / Flip versões anteriores)
19- Maximize o tube <<Text_Henriette>>Copie e Cole como nova layer
Posicione na lateral direita
20- Layers / Merge / Merge Visible
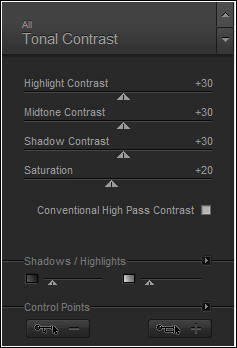
Effects / Plugins / Nik Software / Color Efex Pro 3.0 / Tonal Contrast / Default
21- Adicione a sua assinatura ou Marca d'água.
Layers / Merge / Merge All
Salve como JPG
Versão com tube de Yoka:
©Tutorial Traduzido por Estela Fonseca 11/03/2017.
Obrigada Monaliza por me permitir traduzir seu trabalho.