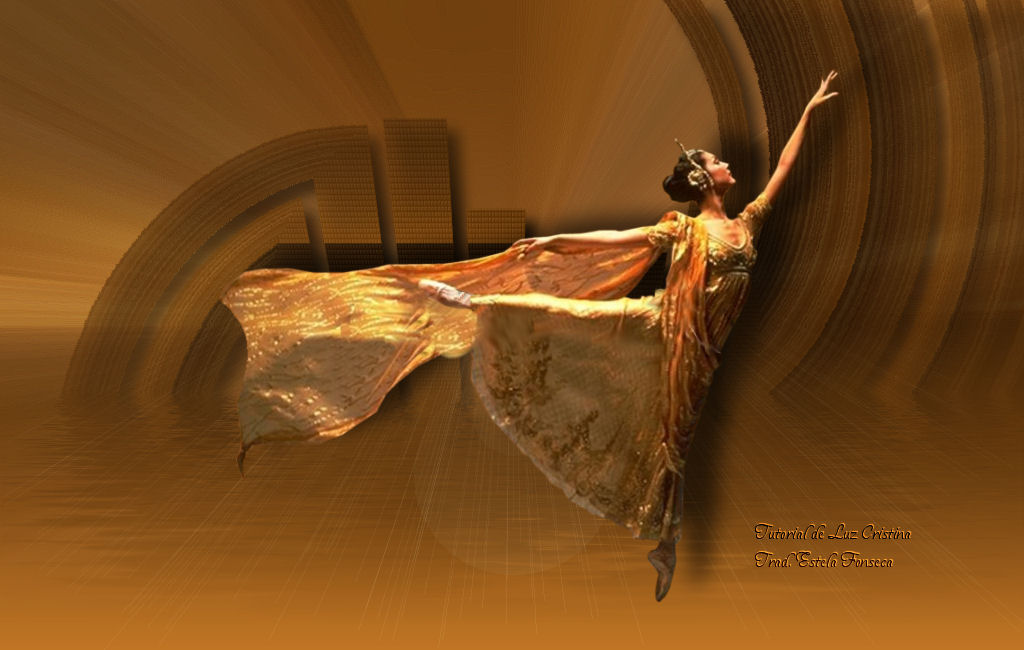
TOP VOLARÉTutorial de Luz Cristina - Original Aqui .Obrigada Luz Cristina, por sua autorização.
Materiais Necessários:
Materiais: 1 tube, Mask 20 20 e Gradiente DW. Plugins Utilizados: Xero VM Extravaganza.
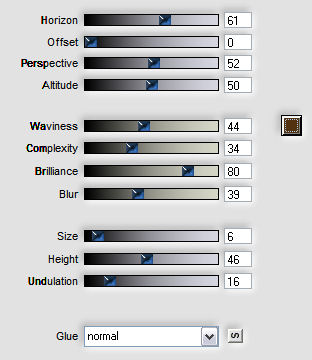
2- Foreground cor #BF7423 / Background cor #3F2001. 3- Forme um gradiente linear angle 45 repeats 0. -Preencha a imagem transparente com ele. 4- Effects texture/ Blinds:150/60/cor preta/horizontal marcado. 5- Plugin VM Extravaganza/ shoutin' : 22/55/71/112/52/52/255/255. 6- Com a varinha mágica , selecione a parte branca e delete. select none. 7- Image/ canvas size: 1024 X 650 px. /0/ 50/ 0/ 0. 8- Plugin Xero/ fritillary : 4/30/10/0. -Adjust/ sharpness / sharpen. 9- Geometric effects / perspective vertical 50 transparente. 10- Aplicar a mask 20 20 e merge group. 11- Plugin Vm Extravaganza / James Bondage/104/152/0. 12- Aplicar a Mask gradiente DW e merge group. 13- Aplique a sombra:12/12/ 80/ 20/ preta. 14- Plugin Flaming pear/ flood:
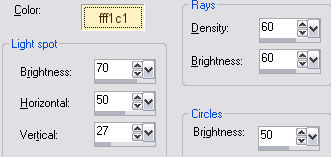
15- Layers/ new raster layer /Layers / arrange send to bottom. -Preencha com o mesmo gradiente. -Selections / Select all. 16- Copie o tube e cole na seleção . selections / Select none. 17- Effects/ image effects/ seamless tiling / default. 18- Adjust Blur/ radial blur:Zoom/100/eliptical marcado/0/0/0. 19-Effects / Edge effects / enhance more. 20- Layers / Merge /Merge visible. -Aplique a mask gradiente DW / Merge group. 21- Layers/ new raster layer / arrange send to bottom. - Preencha com o gradiente linear angle 0 repeats 1. 22- Ative a layer de cima, copie o tube e cole como nova layer. 23- Aplique a sombra: -16/ 36/ 60/ 30/ preta. 24- Na palete das layers , pare na layer 1 . -Effects/ ilumination effects/ sunburs:
25- Layers /Merge Visible / exportamos como JPG.
© Tutorial traduzido por Estela Fonseca
em 16/06/2009. |