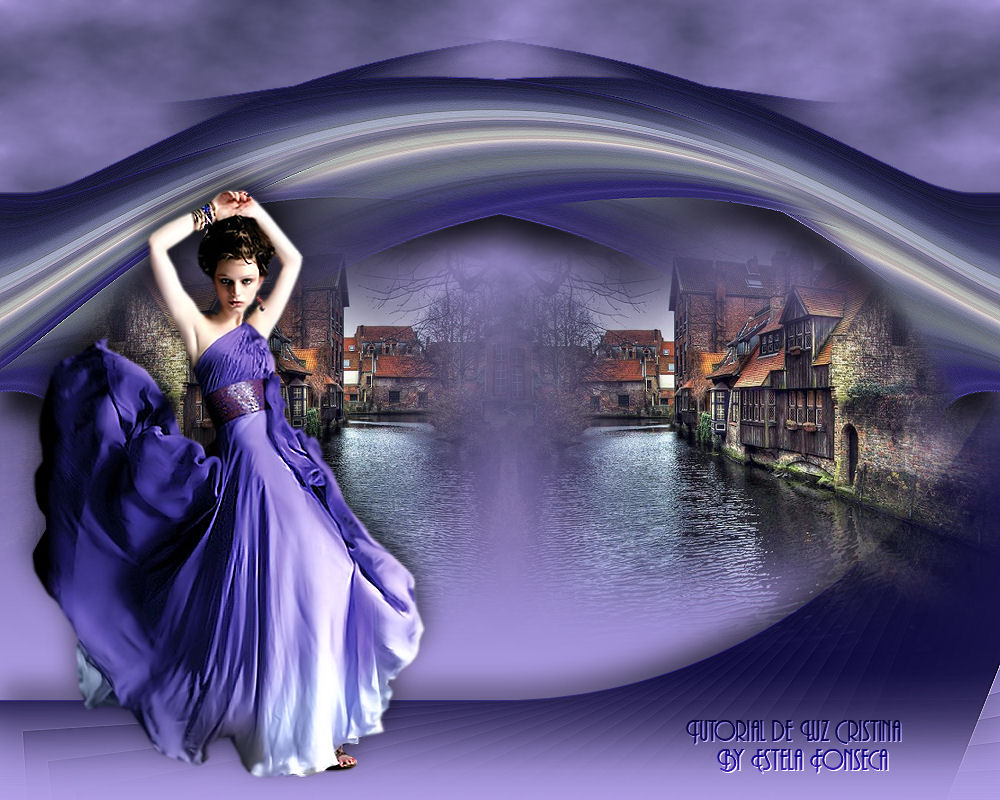
TOP VIOLETATutorial de Luz Cristina - Original Aqui .Obrigada Luz Cristina, por sua autorização.
Materiais Necessários:
Mura's Meister cloud e copies
2. Palete de cores : Foreground cor #af9fe6 / Background cor#100c3d. -Forme um gradiente linear Angle 0 / Repeats 0. -Preencha a imagem com ele. 3.- Selections / Select all. - Copie o tube da Mulher e cole na seleção. - Selections / Select none. 4.Effects Image Seamless tiling default. 5. Adjust Blur /Radial blur :
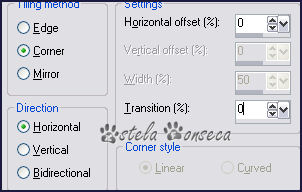
6.Effects Geometric effects / perspective horizontal /-95 / transparente. 7.Effects Image Seamless tiling :
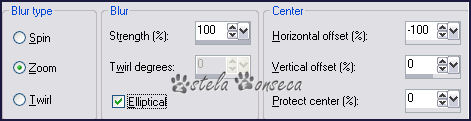
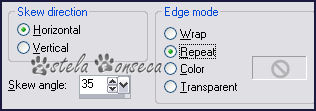
8.Effects Distortion effects / pinch 100. 9. Effects Geometric effects / skew:
10.Effects Distortion effects/ warp:
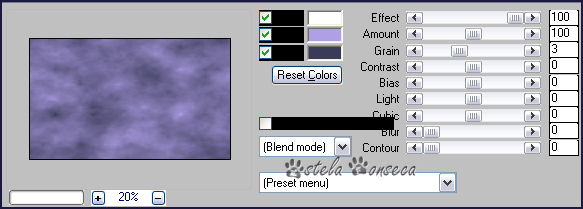
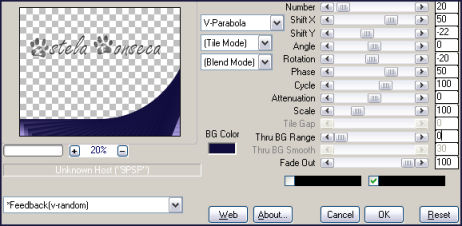
11. Layers / duplicate / Image / mirror / layers, merge visible. 12.Effects Edge / enhance. 13.Effects 3d drop shadow: 25/0/85/40/#000000. 14. Layers, New raster layer . - Layers, arrange - send to bottom . -Preencha com o mesmo gradiente. 15. Plugin - Mura's Meister / cloud valores:
16.Aplique a mask marge_topfade - 2 vezes. - Layers, merge group. 17.Image Canvas size 1000 X 700 px. 0/100/0/0. 18.Copie o tube da paisagem e cole como nova layer. - Arraste para a esquerda. 19. Layers / duplicate / image / mirror. 20. Layers/ new raster layer. - Layers, arrange send to bottom. - Preencha com o mesmo gradiente. 21.Image Canvas size : 1000 X 800 px. 0/100/0/0. 22. Com a "Varinha Mágica" selecione a parte transparente. - Layers, New raster layer. -Preencha com o mesmo gradiente. -Slections, select none. 23.Plugin Mura's Meister / copies:
24. Aplique a mask fade-suave - 2 vezes. -Layers, merge group. 25.Effects, edge enhance. 26.Effects 3d Drop shadow: -15/ 0/ 70/ 40/#000000. 27.Ative a layer "rastr 2"- Preencha com o mesmo gradiente. 28. Copie o tube da mulher e coloque sobre o trabalho. -Aplique uma sombra a seu gosto. 29. Layers Merge all e exporte como JPG.
© Tutorial traduzido por Estela Fonseca
em 24/07/2009. |