TOP aÑORANZAS
Tutorial de ©Luz CristinaGarcia Ruiz - Original AQUI
Tutorial escrito com no PSP 9 e Traduzido no PSP X8
Materiais Necessários:

Tube de Luz Cristina
Mask
Plugins Utilizados:
BKg designer sf 10
VM Experimental
Alien skin xenofex 2
Simple
Alien skin candy 5 impact
Muras Copies.
Preparação:
Abra o tube, duplique e feche o original
01- Abra uma nova imagem transparente de 850 / 700 pixels
02- Primeiro Plano cor #42100f / Segundo Plano cor #b07869
Forme um Gradiente <<Linear>> Angle 45 /Repeats 3
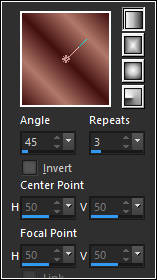
Preencha a Layer com o gradiente
Selections / Select All
03- Abra o tube <<3942-luzcristina >>
Copie e Cole na seleção
Selections / Select None
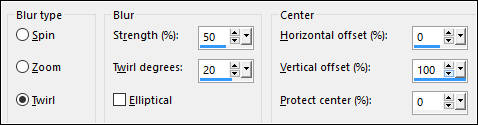
04- Adjust / Blur/ Radial Blur
04- Effects / User Defined Filter / Emboss 3
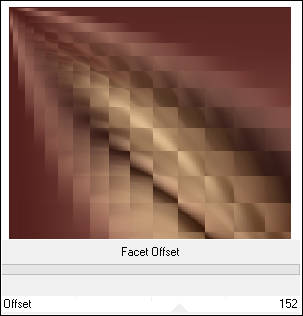
05- Effects / Plugin / I.C.NET Software / Unlimited 2.0 / BKg Designer sf 10II / facet offset
06- Effects / Plugin / VM Experimental / Guess What?

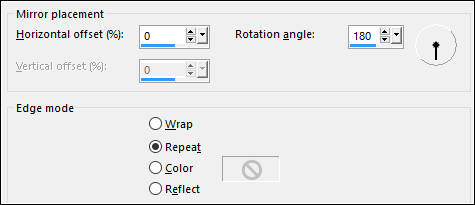
07-Effects / Reflection Effects/ Rotating Mirror
08- Ative a Varinha Mágica

Selecione todas as partes pretas
Layers / New Raster Layer
Cole na seleção (O tube ainda está na memória)
09- Ative a Layer <<Raster 1>>
Delete no teclado
Selections / Select None
10- Layers / New Raster Layer
Layers / Arrange Send to Bottom
Preencha com o mesmo Gradiente
11- Ative a layer <<Raster 1>>
Effects / 3D Effects / Drop Shadow: 5 / 5 / 80 / 11,00 / #000000
12- Layers / New Raster Layer
Preencha com a cor clara do Gradiente (#b07869)
Layers / Arrange / Bring to Top
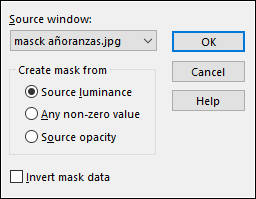
13- Abra a Mask <<masck añoranzas >> Minimize
Layers / New Mask layer / From Image:
Layers / Duplicate
Layers / Merge / Merge Group
14- Effects / 3D Effects / Drop Shadow: 5 / 5 / 80 / 11,00 / #000000
15- Adjust / Add Remove Noise / Add noise

Blend Mode / Screen
16- Layers / Duplicate
Effects / Plugin / Simple / Top Left Mirror
Blend Mode / Soft Light
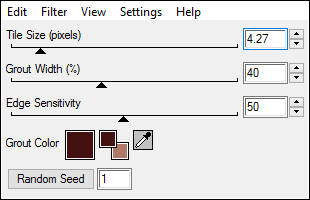
17- Effects / Plugin / Alien Skin Xenofex 2 / Classic Mosaic
18- Effects / 3D Effects / Drop Shadow: 5 / 5 / 80 / 11,00 / #000000
19- Effects / Plugin / Simple / Left Right Wrap
20- Abra novamente o mesmo tube Copie e Cole como nova layer
Posicione à esquerda
21- Adjust / Brightness and Contraste / Clarify / 5
22- Layers / Duplicate
23- Adjust / Blur/ Radial Blur
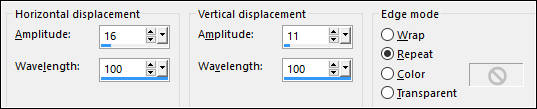
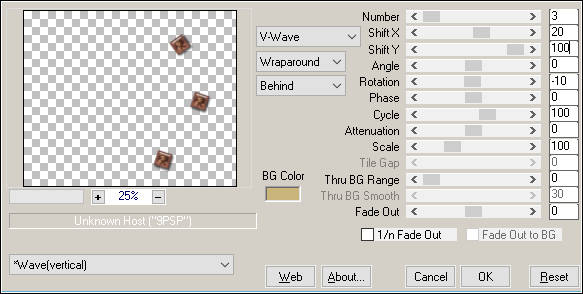
24- Effects / Distortion Effects / Wave
25 Image / Mirror / Mirror Horizontal (Image-Mirror)
Blend Mode / Screen
26- Effects / Art Media Effects / Brush Stokes

27- Layers / New Raster Layer
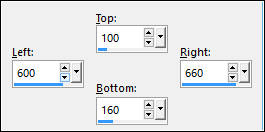
Selection / Rectangle / Custom Selection:
28- Preencha a seleção com a cor clara do gradiente #b07869
Cole na seleção (o tube ainda está na memória)
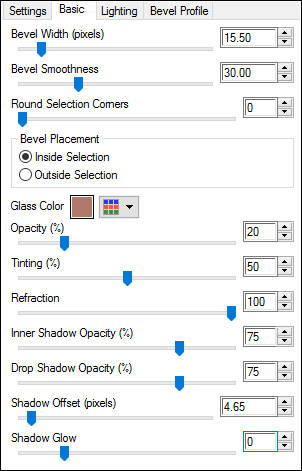
29- Effects / Plugin / Alien Skin Eye Candy 5 / Impact / Glass / Cor do Segundo Plano
30- Effects / 3D Effects / Drop Shadow: 5 / 5 / 80 / 11,00 / #000000
Selections / Select None
31- Effects / Plugin / Mura's Meister / Copies
32- Layers / Duplicate
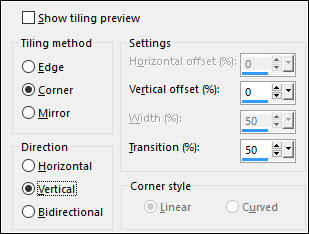
33- Effects / Image Effects / Seamless Tiling
Blend Mode / Luminance (Legacy)
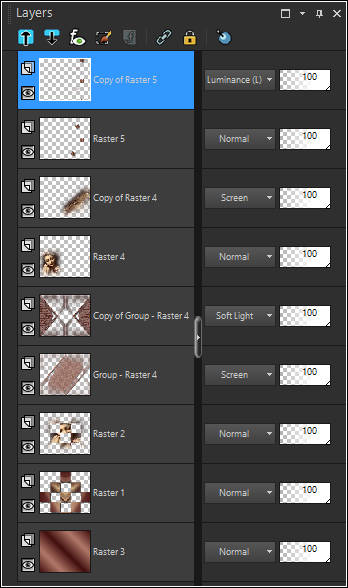
34- Veja se sua paleta das layers estão assim:
35- Layers / Merge / Merge Visible
36- Copie
37- Image / Add Borders / Symmetric Marcado / 3 pixels cor #b07869
Image / Add Borders / Symmetric Marcado / 3 pixels cor #42100f
Image / Add Borders / Symmetric Marcado / 3 pixels cor #b07869
Image / Add Borders / Symmetric Marcado / 45 pixels cor #42100f
38- Ative a Varinha Mágica e selecione essa última borda
Cole na seleção ( a imagem copiada está na memória)
39- Effects / Art Media Effects / Brush Stokes
Selections / Select None
40- Image / Add Borders / Symmetric Marcado / 5 pixels cor #b07869
Image / Add Borders / Symmetric Marcado / 5 pixels cor#42100f
Image / Add Borders / Symmetric Marcado / 5 pixels cor #b07869
Image / Add Borders / Symmetric Marcado / 5 pixels cor #42100f
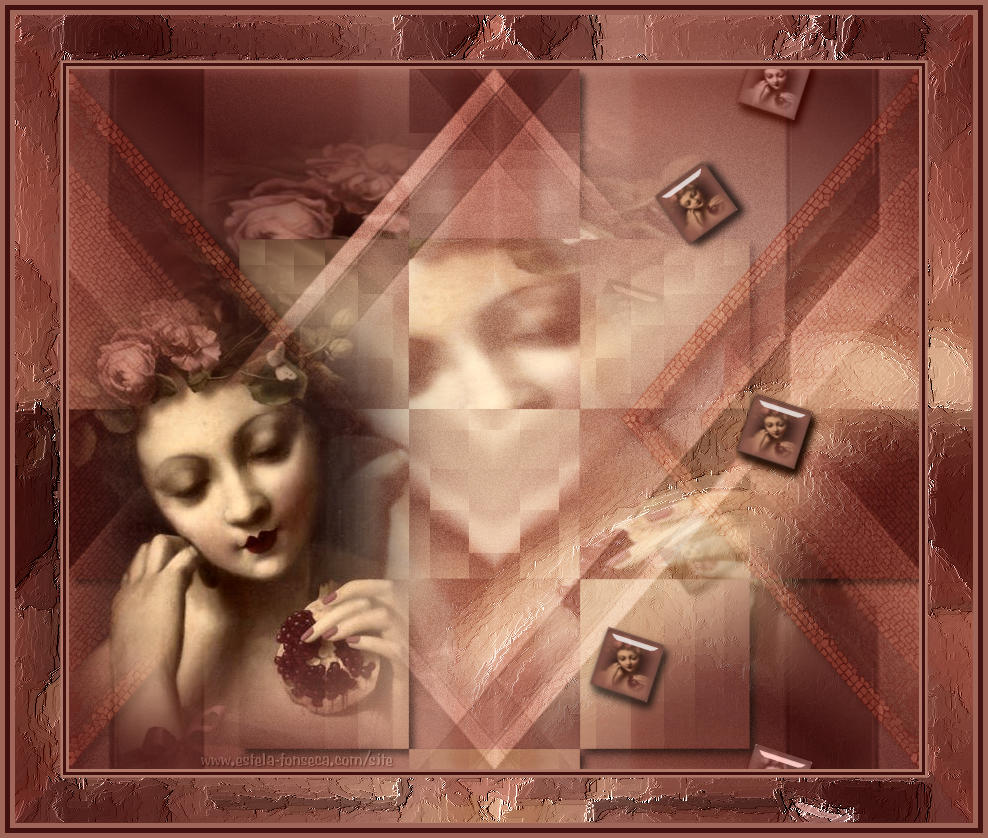
41- Assine seu trabalho
Salve como JPG
©Tutorial traduzido por Estela Fonseca
em: 17/02/2017.
Não alterar nem repassar sem autorização.