 |
REDES DE OROTutorial de ©Luz CristinaGarcia Ruiz - Original AQUI Tutorial escrito com no PSP 9 e Traduzido no PSP X8
Plugins Utilizados: DCspecial Transparency Flood.
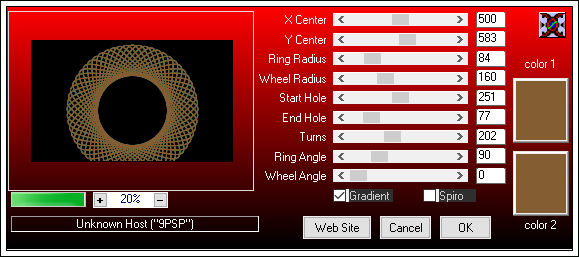
2- Primeiro Plano Cor #845e32 Segundo Plano Cor #000000. Preencha a magem transparente com a cor #000000 3- Effects / Plugin / DCspecial / spiroFX:
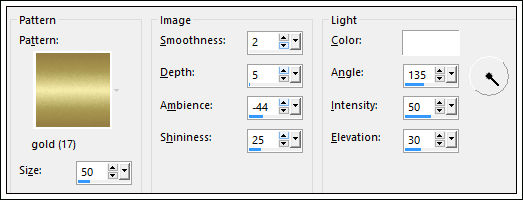
4- Effects / Plugin / Transparency / Eliminate Black. 5- Layers / Duplicate. Layers / Merge / Merge visible. 6- Layers / Duplicate 7- Effects /Texture Effects / Sculpture:
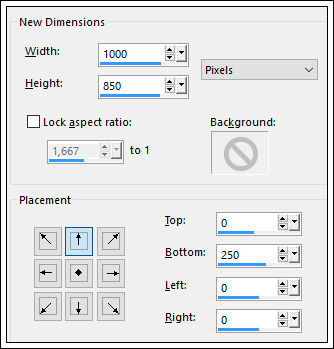
8- Adjust / Sharpness / Sharpen. 9- Effects / 3D Effects /Drop Shadow: 1/1/80/1,00/ #000000 10- Selecione o centro do Círculo com a Varinha mágica Ative o tube misted 1466 Cole na seleção Selections / Select None 11- Image / Canvas Size: 1000 X 850 pixels. 0 250 0 0.
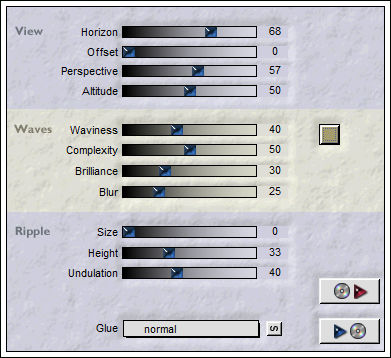
12- Layers / New raster layer Layers / Arrange Send to bottom Preencha com a cor #000000 13- Effects / Plugin / Flaming Pear / Flood
14- Ative a Layer Merged Effects / Plugin / Flaming Pear / Flood (Mesmas Configurações) 15- Ative a layer Raster 1 Copie o tube misted 3036 e Cole como nova layer Mova para a esquerda Adapte o tamanho com a ferramenta Raster Deform Tool Oculte a layer Merged para melhor trabalhar 16- Posicione como preferir Layers / Duplicate Image / Mirror Layers / Merge / Merge down 17- Ative novamente a layer Raster 1 Layers / New mask layer from image: masck fadesuave Layers / Duplicate Layers / Merge / Merge group. 18- Na Layer Merged layers / New mask layer from image: masck fadesuave 19- Copie o tube 1488 e Cole como nova layer Acomode. 20 Layers / Merge / Merge All Salve como jpg otimizado.
©Tutorial traduzido por Estela Fonseca
em: 27/09/2015. |