 |
NIDO VACIOTutorial de Luz Cristina - Original AQUI
Materiais Necessários:
Plugins Utilizados: FM Tile Tools VM Toolbox Nick Software Mura's Meister Two Moon
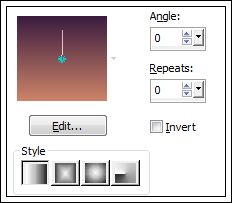
2- Foreground #cd8368 / Background #3b1d3f Forme um gradiente linear: Angle e Repeats: 0
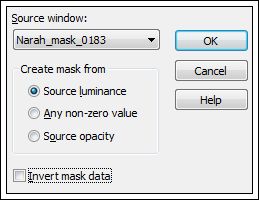
Preencha a imagem com o gradiente 3- Layer / duplicate. 4- Image / flip. 5- Layers / New mask layer from image: Narah-0183
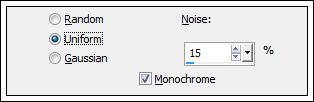
Layers / Merge / Merge group. 6- Adjust / Add Remove Noise /Add noise:
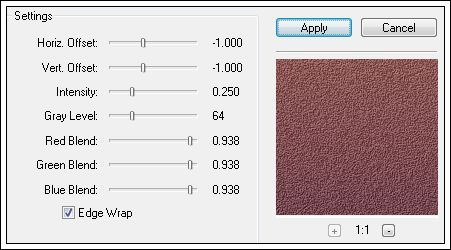
7- Effects / Plugin / FM Tile Tools / Blend emboss.
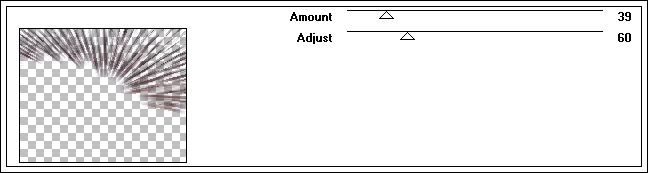
8- Effects / 3D Effects / Drop shadow: 1 / 2 / 80 / 1,00 / #000000 Repita esta sombra mais uma vez 9- Layers / duplicate Image / flip. 10- Effects / Plugin / VM Toolbox / zoom blur: 39 / 60.
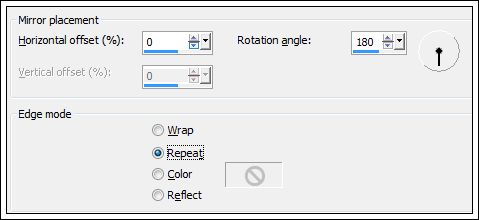
11- Effects / Geometrics effects / skew: vertical 45 repeat, marcados. 12- Effects /Reflection effects / rotating mirror: 0 /180 / repeat.
13- Effects / Plugin / Nick software / color efex pro 3.0 / Bi color filters:
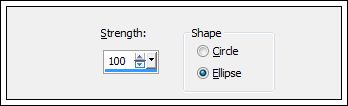
14- Effects / Edge effects / Enhance (Opcional) 15- Effects / Geometrics effects / spherize /circle: 100.
16- Effects / 3D Effects / Drop Shadow: 1 / 2 / 80 / 1,00 / #000000 Effects / Plugin / FM Tile Tools / saturation emboss
17- Abra o tube <<rw-catching_a_morning_breeze~misted>> Copie Cole como nova layer Ative a Ferramenta Deform Tool e aumente até o tamanho do semi-círculo que formamos... 18- Layer / arrange / move down Blend Mode / hard light. 19- Ative a layer do fundo ( Raster 1) Effects / Plugin / Mura's Meister / Perspective tiling:
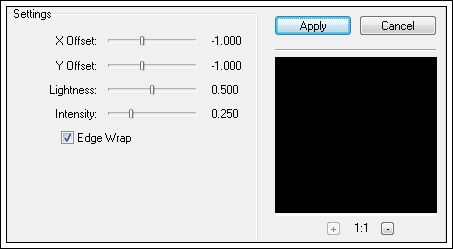
20- Effects / Distortion effects / warp:
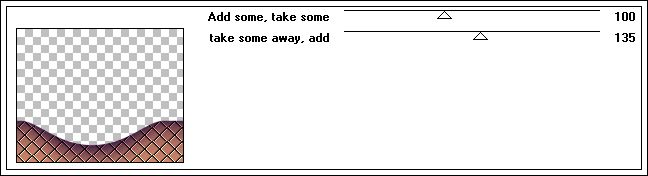
21- Effects / Plugin / Two Moon : Quilt
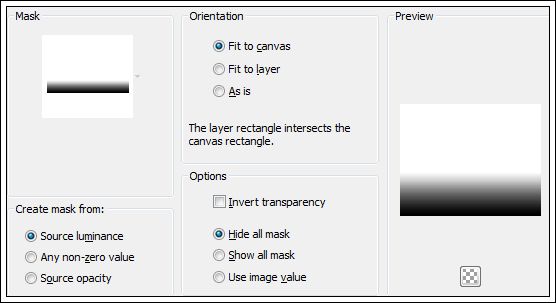
22- Effects / Plugin / FM Tile Tools / blend emboss / Default 23- Effects / Image effects / offset: Horizontal: 0 /Vertical: 100 / Custom e transparente. 24- Layers / Load save mask / Load mask from disk:marge-topfade ( ou qualquer outra semelhante)
Layers / Merge / Merge Group 25- Effects / 3D Effects / Drop shadow: -10 / 6 / 80 / 60 / #000000 Blend mode / Hard light ( Opicional) 26- Ative a layer ( Copy of Raster 1 ) Repita o passo 24 27- Layers / New raster layer Layers / Arrange / Send to bottom Preencha a layer com o mesmo gradiente do começo. 28- Ative o tube <<Tocha23612>> copie e cole como nova layer Layers / Arrange / Bring to top Posicione como no exemplo. Effects / 3D Effects / Drop shadow: -6 /12 / 80 /60,00 / #000000. 29- Layers / Merge / Merge visible Exporte como JPG. Tutorial de Luz Cristina Tube de Tocha
©Tutorial traduzido por Estela Fonseca
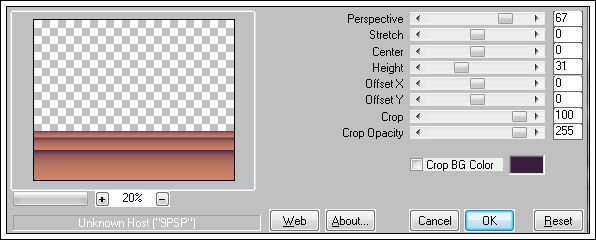
em 01/04/2014. |