 TOP ANTIFAZ GALÁCTICO
Tutorial de Luz Cristina. Original - AQUI
Material Necessário:
1 Tube, mask Gradiente DW e 2020
VM Instant Art Transparency VM Natural Tutorial Traduzido no PSP X2
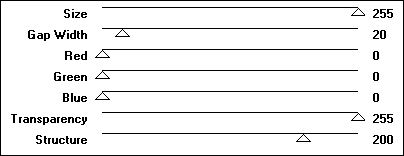
Preencha com a cor preta 2- Effects / Plugin / VM Instant Art/ Steel Mesh :
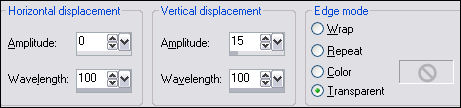
3- Effects / Plugin / Transparency/ eliminate black / default. 4- Effects / Edge effects / enhance. 5- Effects/ image effects / offset : horizontal 0 / vertical 50 / Custom / transparente. 6- Effects / Distortion effects/ wave :
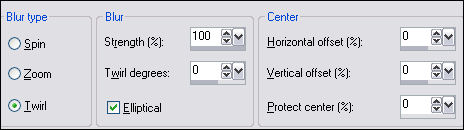
Image / mirror. 8.- Layers/ merge visible. 9- Repita o passo 5. 10- Layers / New raster layers Layers / Arrange/ send to bottom. 11- Preencha com um gradiente prateado Estilo Linear / Angle 45 / Repeats 0. 12- Layers /New raster layers Preencha com a cor #000000 Na Paleta das Layers Baixe a opacidade para 98 Blend Mode / Dissolve 13- Oculte a layer Merged Layers / Merge / Merge Visible 14- Aplique a mask gradienteDW. Layers, Merge /Merge group. 15- Layers /New raster layer Layers / arrange send to bottom Preencha com a cor preta 16- Na layer do meio Layers, New raster layer Preencha com a cor preta Selections, Select All Abra o tube, copie e cole na seleção Selections / Select none. 17- Effects / Image effects/ seamless tiling /default. 18- Adjust/ Blur / radial blur :
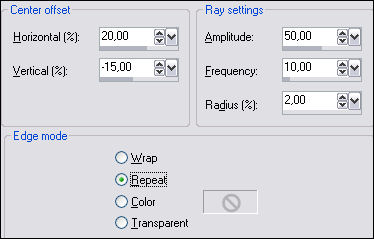
19- Effects / Geometric effects/ circle /transparente. 20- Image / resize / 70%. All layers, desmarcado 21- Effects/ distortion effects/ spiky halo :
23- Layers/ duplicate image/ mirror. 24- Layers, Merge / Merge Down Aplique a mask 2020 Layers / Merge group. 25- Effects / Edge effects/ enhance. 26- Abra o tube da mulher, copie e cole como nova layer 27- Effects / 3D Effects / Drop Shadow : 0 15 100 30. 28- Ative a layer da mask gradiente DW Effects / Plugin / VM Natural/ sparkle ( mude apenas o primeiro valor Max Size para 67) 29- Ative a Ferramenta Symmetric Shape , preset estrela e aplique quantas estrelas desejar Use o gradiente prateado no foreground e no background
30- Layers / Merge / Merge All Exporte como JPG.
©Tutorial traduzido por Estela Fonseca em 06 de
Janeiro de 2011. |