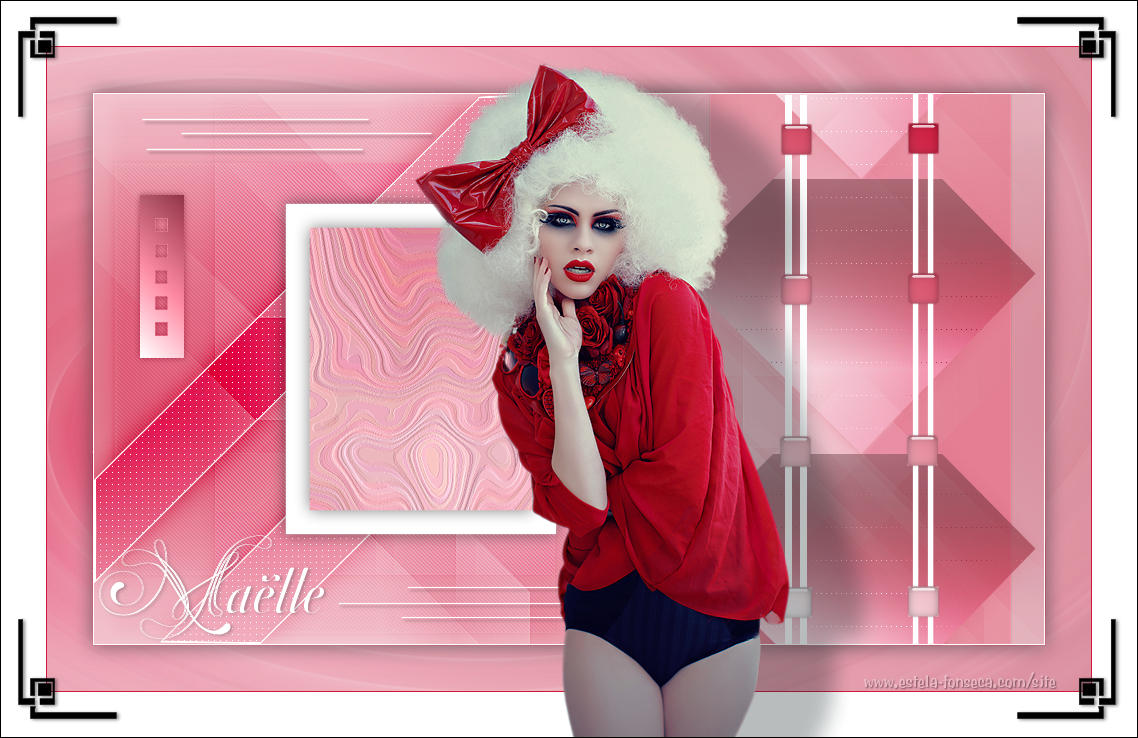
MAËLLE
Tutorial de ©Crealine Graphic Original Aqui
Traduzido no PSP X8
Materiais Necessários:
Tube de Linette
Plugins Utilizados:
Alien Skin Eyes Candy 5 /Impact 5/Glass e Perspective Shadow
Medhy /Wavy Lab 1.1
Unlimited/&<Bkg Designers sf10 IV>/@BlueBerry Pie
Toadies /What are YouSimple Blintz
AP Innovation 01 / Line… Silverliling
Vanderlee/Unplugged X/Vertical Tile
L & K /Zitah
Unlimited/&<Bkg Designer sf10 I>/Cruncher
Penta Com/Jeans
Preparação:
Duplo clique sobre o preset <<Linette-tuto-maelle >> ele será automaticamente instalado.
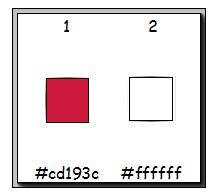
Abra a Paleta de cores no PSP.
Nota: Se trabalhar com outras cores, lembre-se que dependendo das cores os blends
e as opacidades das layers podem ser outras.
Primeiro Plano cor #cd193c
Segundo Plano cor #ffffff
01- Abra a layer <<Alpha_240_Maelle>>
Window / Duplicate ou Shift D para duplicar
Feche o original
Effects / Plugin / medhi / Wavy Lab 1.1
Layers / Duplicate
Image / Mirror / Mirror Vertical
Opacidade / 55%
Layers / Merge / Merge Down
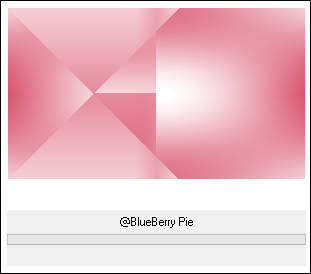
Effects / Plugin / <I.C.NET Software> Filters Unlimited 2 / &<Bkg Designers sf10 IV> / @BlueBerry Pie
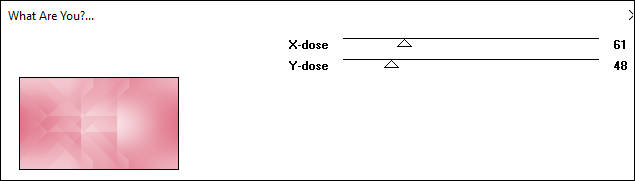
Effects /Plugin / Toadies / What are You?
Adjust / Sharpness / Sharpen More
02- Layers / Duplicate
Na Layer <<Copy of Raster 1>>
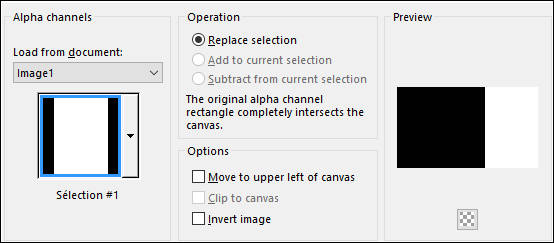
Selections / Load Save Selection / Load Selection From Alpha Channel: Selection #1
Effects / Plugin / Simple / Blintz (Repita mais uma vez)
Edit / Cut
Cole Como Nova LayerSelections / Select None
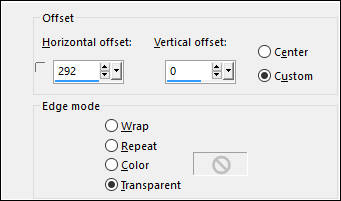
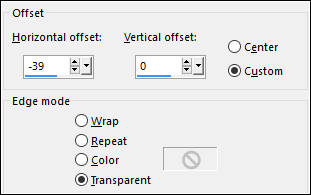
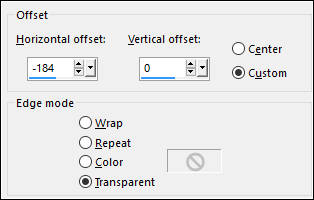
Effects / Image Effects / Offset
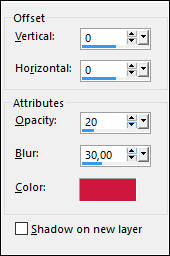
Effects / 3D Effects / Drop Shadow: 0/0/50/40 /#000000
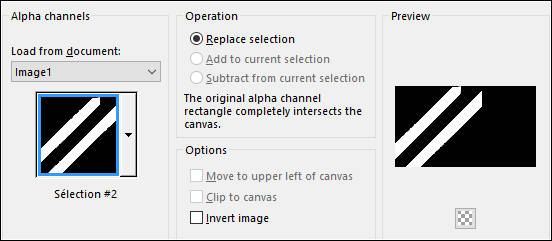
03- Ative a layer do Meio <<Copy of Raster 1>>Selections / Load Save Selection / Load Selection From Alpha Channel: Selection #2
Selections / Promote Selection to Layer
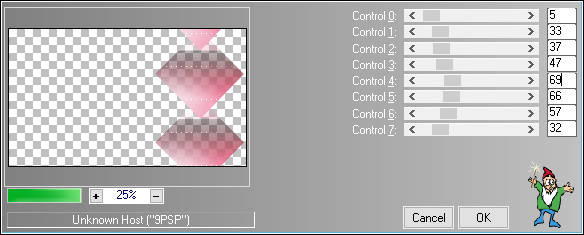
Effects / Plugin / AP 01 [Innovation] / Line -Silverliling
Mantenha a Seleção
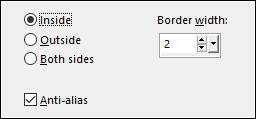
Selections / Modify / Select Selection Borders
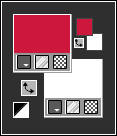
Preencha com a cor do Segundo Plano (#ffffff)
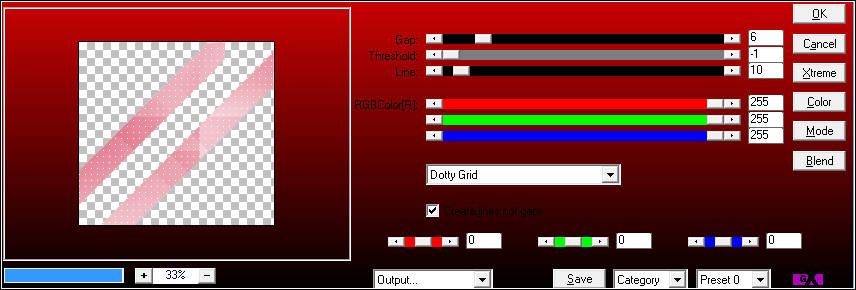
Baldinho de Pintura configurado como segue:
Selections / Select None
Layers / Duplicate
Blend Mode / Burn
Effects / 3D Effects / Drop Shadow: 0/0/50/40 /#000000
04- Ative a layer do topo (Raster 2)
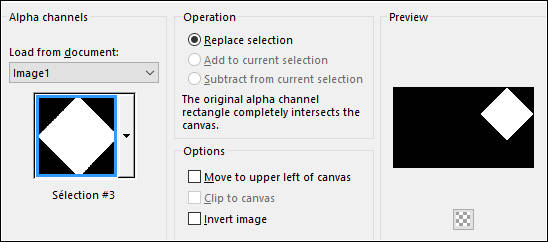
Selections / Load Save Selection / Load Selection From Alpha Channel: Selection #3
Selections / Promote Selection to Layer
Selections / Select None
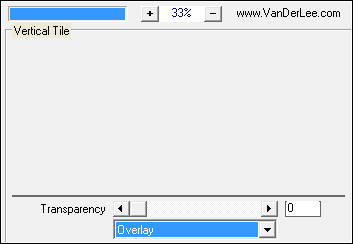
Effects / Plugin / Vanderlee / Unplugged X / Vertical Tile
Effects / Plugin /L & K / Zitah
Effects / 3D Effects / Drop Shadow: Cor do Primeiro Plano
05- Ative a Segunda Layer a partir da Layer do Fundo (Copy of Raster 1)
Layers / Duplicate
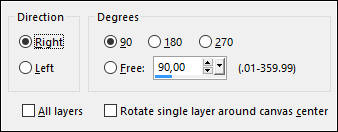
Image / Free Rotate
Image / Resize / 80%... Resize all layers desmarcado
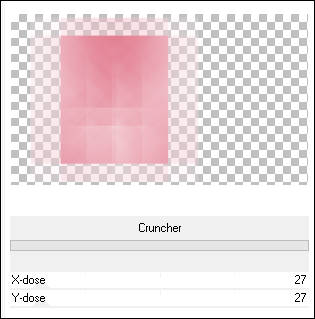
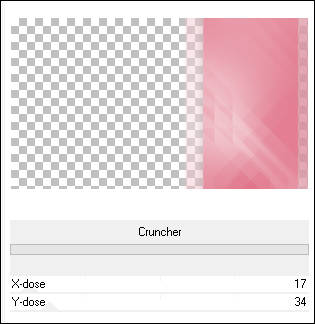
Effects / Plugin / <I.C.NET Software> Filters Unlimited / &<Bkg Designer sf10 I> / Cruncher
Adjust / Sharpness / Sharpen
Effects / Image Effects / Offset
Blend Mode / Burn
Selections / Load Save Selection / Load Selection From Alpha Channel: Selection #4
Selections / Promote Selection to Layer
Effects / 3D Effects / Drop Shadow: 0/0/50/30 /#000000
Effects / Artistic Effects / Enamel
Mantenha a Seleção
Layers / New Raster Layer
Preencha com a cor do Segundo Plano #ffffff
Selections / Modify / Contract / 30 pixelsDelete no teclado
Effects / 3D Effects / Drop Shadow: 0/0/50/30 /#000000
Selections / Select NoneLayers / Merge / Merge Down
Layers / Arrange / Bring to top
Image / Resize / 80% ... Resize all layers desmarcado
06- Ative a Layer (Copy (2) of Raster 1)
Effects / 3D Effects / Drop Shadow: 0 / 0 / 50 / 30 / #cd193c (cor do Primeiro Plano)
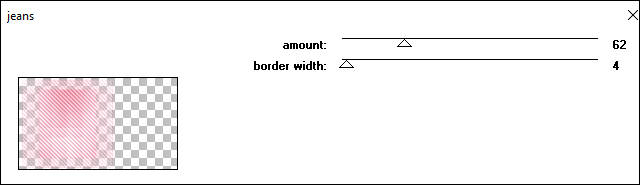
Effects / Plugin / Penta Com / Jeans
Effects / 3D Effects / Drop Shadow: 0/0/50/10 /#000000
07- Ative a Layer do Topo
Ative o tube <<éléménet_1_maelle_linette>>
Colorize se necessárioCopie e Cole como Nova Layer
Effects / Image Effects / Offset:
Blend Mode / Luminance (Legacy)
Effects / 3D Effects / Drop Shadow: 0/0/50/10 /#000000
08- Layers /New Raster Layer
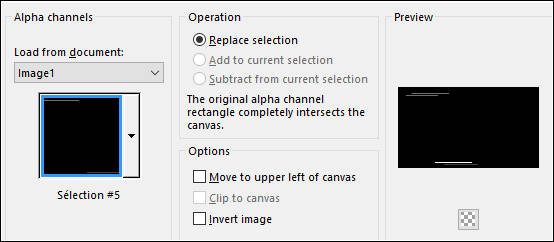
Selections / Load Save Selection / Load Selection From Alpha Channel: Selection #5
Preencha com a cor do Segundo Plano #ffffff
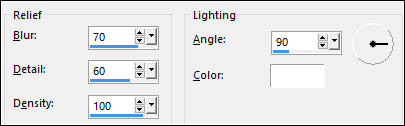
Selections / Select NoneEffects / Plugin / Alien Skin Eye Candy 5 / Impact /Perspective Shadow / preset Linette_tuto_Maelle_1
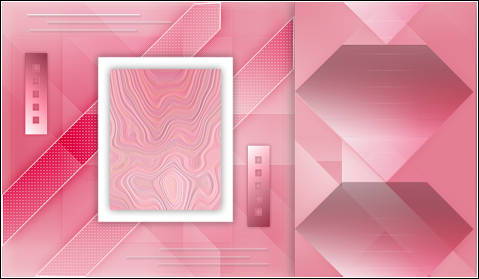
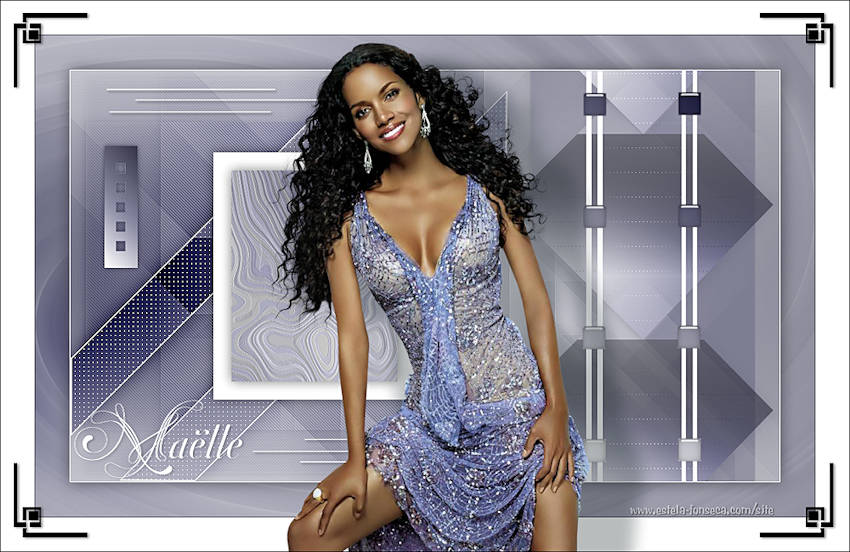
09- Resultado do seu trabalho
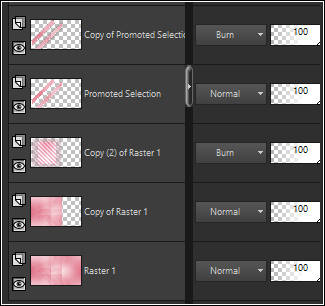
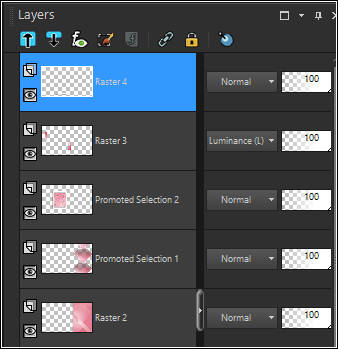
Paleta das Layers
10- Ative a layer (Raster 2)
Effects / Plugin / <I.C.NET Software> Filters Unlimited / &<Bkg Designer sf10 I> / Cruncher
Adjust / Sharpness / Sharpen
11- Ative a Layer do Topo
Layers / New Raster Layer
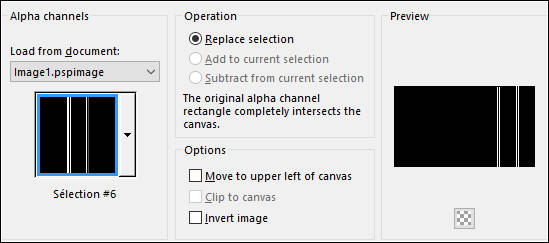
Selections / Load Save Selection / Load Selection From Alpha Channel: Selection #6
Preencha com a cor do Segundo Plano #ffffff
Selections / Select NoneLayers / New Raster Layer
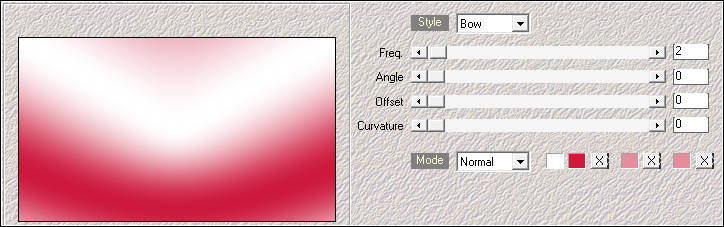
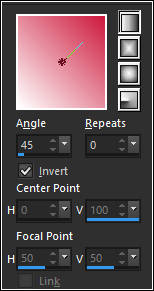
Gradiente - Estilo Linear
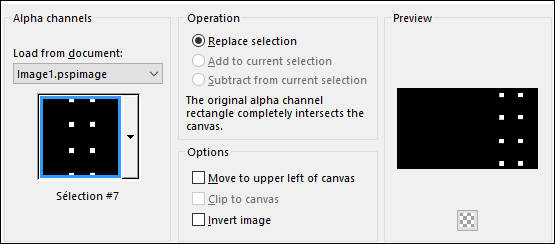
Selections / Load Save Selection / Load Selection From Alpha Channel: Selection #7
Preencha com o Gradiente
Effects / Plugin / Alien Skin / Eye Candy 5 / Impact / Glass / Clear,NO Drop Shadow
Selections / Select NoneLayers / Merge / Merge Down
Effects / 3D Effects / Drop Shadow: 0/0/20/3 /#000000
Layers / Merge / Merge Visible
12- Image / Add Borders / Symmetric Marcado / 1 pixel cor do Segundo Plano (#ffffff)
Copie
Image / Add Borders / Symmetric Marcado / 1 pixel cor do Primeiro Plano (#cd193c)
Image / Add Borders / Symmetric Marcado / 45 pixels cor do Segundo Plano (#ffffff)
Ative a Varinha Mágica e Selecione essa borda:
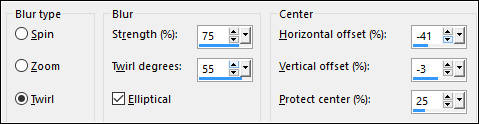
Cole na seleçãoAdjust / Blur / Radial Blur
Adjust / Sharpness / Sharpen
Selections / Invert
Effects / 3D Effects / Drop Shadow: 0/0/55/30 /#000000
Selections / Select None
Image / Add Borders / Symmetric Marcado / 1 pixel cor do Primeiro Plano (#cd193c)
Image / Add Borders / Symmetric Marcado / 45 pixels cor do Segundo Plano (#ffffff)
13- Ative o tube <<Woman _739_exclusif_Crealine>>
Copie e Cole como Nova layer
Image / Mirror / Mirror Horizontal
Posicione:
Effects / 3D Effects / Drop Shadow: 20/75/30/30 /#000000
14- Ative o <<élément_2_maelle_linette>>
Copie e Cole Como Nova Layer
Não o Mova!
Ative o tube <<texte_Maelle>>
Copie e Cole Como Nova Layer
Posicione à esquerda
Effects / 3D Effects / Drop Shadow: 1/2/30/5 / #000000
15- Layers / New Raster Layer
Adicione a sua Marca D'água ou assinatura
Image / Add Borders / Symmetric Marcado / 1 pixel cor #000000
Redimensione se desejar
Salve Como JPG
Outra versão com tubes de Maryse:
©Tutorial Traduzido por Estela Fonseca 29/05/2017.
Obrigada Linnette por me permitir traduzir seu trabalho.