GINETTE
Tutorial criado por Laurette, todos os direitos reservado. Original, Aqui.

Traduzido no Corel PaintShop Pro 2022 ULTIMATE.
Material Necessário:
1 Layer Alpha (esta layer contém 2 seleções)
1 Tube de Mulher
1 Tube Floral
3 Tubes Decos
2 Masks
1 Paleta de cores
PLUGINS:
Alien Skin Eye Candy 5: Impact / Glass
AAA Filters / Custom / Landscape
Abra os tubes no psp duplique e feche os originais. Remova a assinatura das cópias.Abra as masks no psp e minimize-as.
Copie as seleções para a pasta de seleções do PSP.
Cores deste tutorial:
Primeiro Plano cor Nº 1 #7e571Segundo Plano cor nº2 #ffffff
Abra a Layer Alpha (se preferir trabalhar com seleções salvas em canal alfa) ou
Abra uma nova imagem transparente de 900 x 600 pixels.
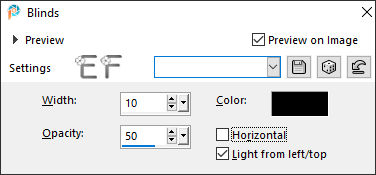
2- Preencha com a cor Nº1Effects/ Texture Effects / Blinds / Preto
Layers / New Raster LayerPreencha com a cor Nº2
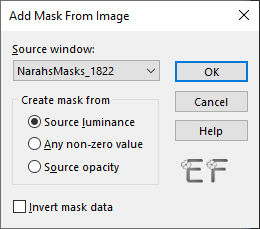
Layers / New Mask Layer / From Image: NarahsMasks_1822
Adjust / Sharpness / Sharpen
Layers / Merge / Merge Group
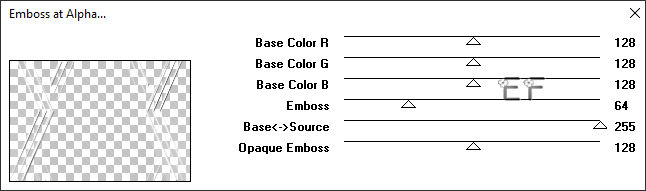
Effects / Plugins / MuRa's Seamless /Emboss at Alpha / Default
Effects / 3D Effects / Drop Shadow: 0 / 0 / 6 / 40 / cor N°1
3- Ative a Layer do Fundo... Raster 1
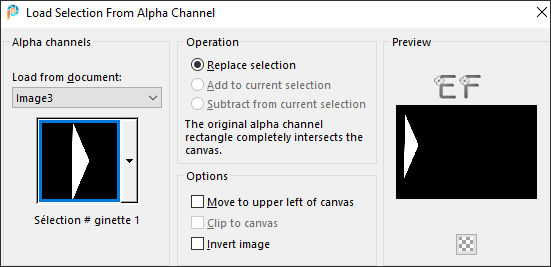
Selections / Load/Save selection / Load selection from alpha channel/ Selection #1
Selections / Promote selection to layer
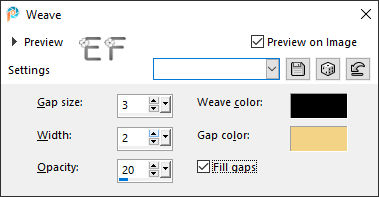
Effects / Texture Effects / Weave: 3/ 2 /20 / cor #000000 / cor n°4
Selections / Invert
Effects / 3D Effects / Drop Shadow: 0 / 0 / 80 / 40 / Cor #000000
Repita a sombra
Selections / Select None
Layers / DuplicateImage / Mirror / Mirror Horizontal
Layers / Merge/ Merge Down
Blend Mode / Screen ou outro que melhor combine com suas cores
4- Ative a Layer do Fundo... Raster 1
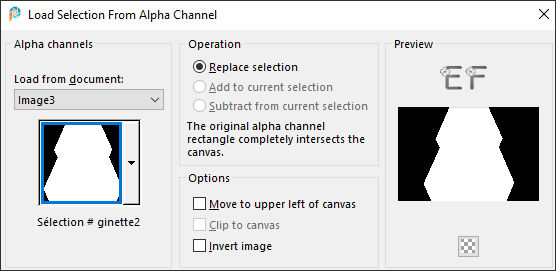
Selections / Load/Save selection / Load selection from alpha channel/ Selection #2
Selections / Promote selection to layer
Selections / Invert
Effects / 3D Effects / Drop Shadow: 0 / 0 / 80 / 40 / Cor #000000
Repita a sombra
Blend Mode / Screen ou outro
Selections / Invert
Mantenha a seleção!!!!
5 - Ative o tube <<Paisagem>> Copie e cole como nova layerSelections / Invert / Delete no teclado
Effects / 3D Effects / Drop Shadow: 0 / 0 / 100 / 80 / Cor #000000
Selections / Invert
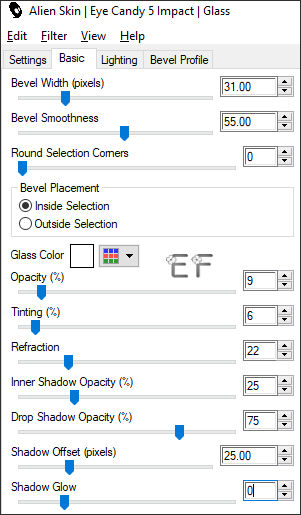
Effects / Plugins / Alien Skin Eye Candy 5 / Impact / Glass
Selections / Select None
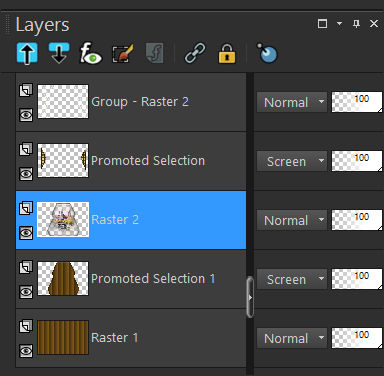
Ordem das Layers:
6- Ative a Layer do Fundo... Raster 1 ... Copie! (Edit/Copy)
Image / Add Borders / Symmetric Marcado / 2 Pixels cor N°2Selections / Select All
Image / Add Borders / Symmetric Marcado / 30 Pixels cor n°2
Selections / Invert
Cole na seleção (a imagem copiada na etapa n°6)
Selections / Invert
Effects / 3D Effects / Drop Shadow: 0 / 0 / 100 / 80 / cor #000000Selections / Select None.
7- Image / Add Borders / Symmetric Marcado / 2 Pixels cor N°2Image / Add Borders / Symmetric Marcado / 2 Pixels cor N°1
Image / Add Borders / Symmetric Marcado / 2 Pixels cor N°3
Image / Add Borders / Symmetric Marcado / 2 Pixels cor N°4
Selections / Select All
Image / Add Borders / Symmetric Marcado / 50 Pixels cor N°2Effects / 3D Effects / Drop Shadow: 0 / 0 / 80 / 40 / cor #000000
Selections / Select None
8- Ative o tube <<Déco-Ginette-1>> (Colorize com suas cores )
Copie e Cole como nova layer
Está no lugar correto.
Effects / 3D Effects / Drop Shadow: 0 / 0 / 60 / 40 / cor #000000
9- Ative o tube <<Déco-Ginette-2>> Copie e cole como nova layer.Não mova ...
Effects / 3D Effects / Drop Shadow: 0 / 0 / 60 / 40 / cor #000000
10- Image / Add Borders / Symmetric Marcado / 3 Pixels cor N°3Selections / Select All
Image / Add Borders / Symmetric Marcado / 50 Pixels cor N°2
Effects / 3D Effects / Drop Shadow: 0 / 0 / 60 / 40 / cor #000000Selections / Select None
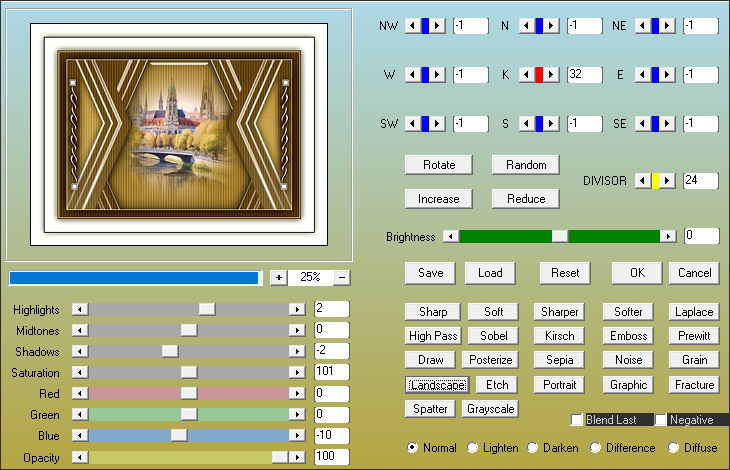
11- Effects / Plugins / AAA Filters / Custom / Landscape
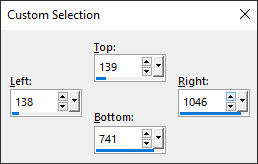
12 Selections Tool(S) / Custom Selection:
Layers / New Raster Layer ... Raster 2
13- Opacidade do Baldinho de Pintura 50%
Preencha com a cor Nº2
Baldinho de Pintura 100%
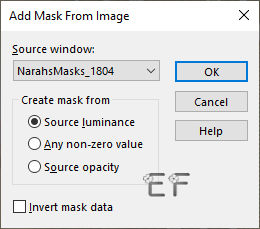
Layers / New Mask Layer / From Image: NarahsMasks_1804
Adjust / Sharpnes / Sharpen
Layers / Merge / Merge GroupSelections / Select None
Opacidade / 70%
14- Ative o tube <<IA-24-laurette>> Copie e cole como nova layerPosicione à esquerda
Effects / 3D Effects / Drop Shadow: 0 / 0 / 60 / 40 / cor #000000
15- Ative o tube <<FLOR>> Copie e Cole como nova layerPosicione à direita
Effects / 3D Effects / Drop Shadow: 0 / 0 / 40 / 40 / cor #000000
16- Ative o tube <<Déco-Ginette-3>> Copie e cole como nova layerPick Tool (K) Posição X (29,00 ) Posição Y (9,00) Letra M para sair da Ferramenta
Effects / 3D Effects / Drop Shadow: 1 / 1 /60 / 1 / Cor #000000
Effects / 3D Effects / Drop Shadow: -1 -1 / 60 / 1 / Cor #000000
Layers / DuplicateImage / Mirror / Mirror Vertical
Image / Mirror / Mirror Horizontal
Image / Add Borders / Symmetric Marcado / 3 Pixels cor Nº3
17- Layers / New Raster LayerAssine seu trabalho
Coloque a licença do tube se estiver usando um tube pago
Coloque a marca d'água de Laurette
Layers / Merge / Merge All
Image / Resize / 950 pixels ... de Largura... Resize All Layers ... Marcado.
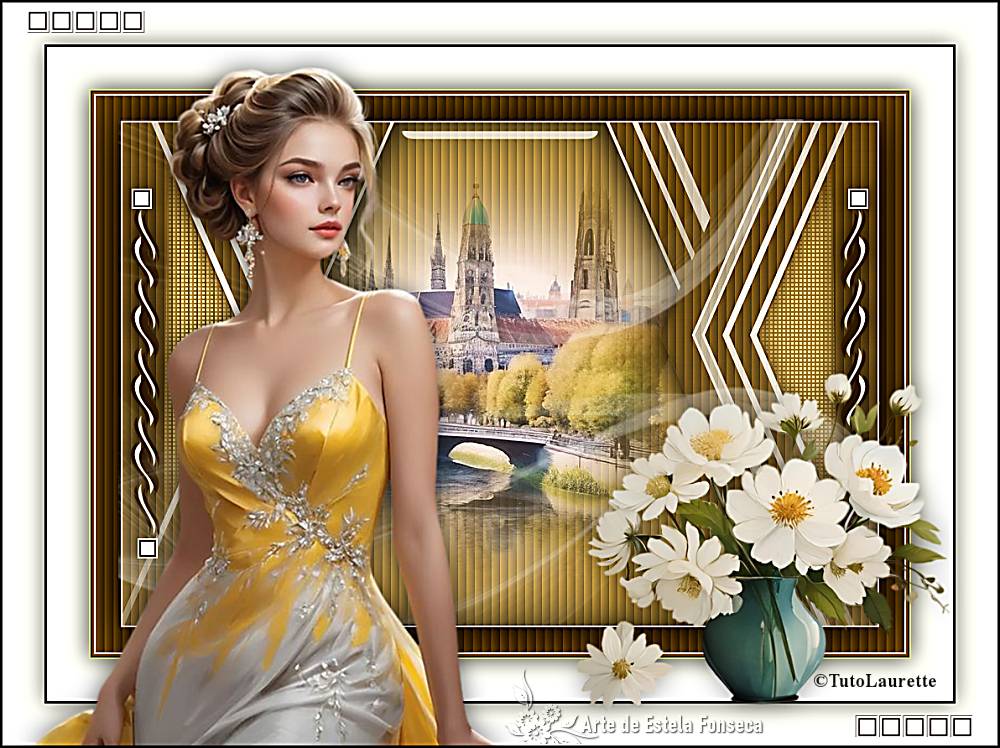
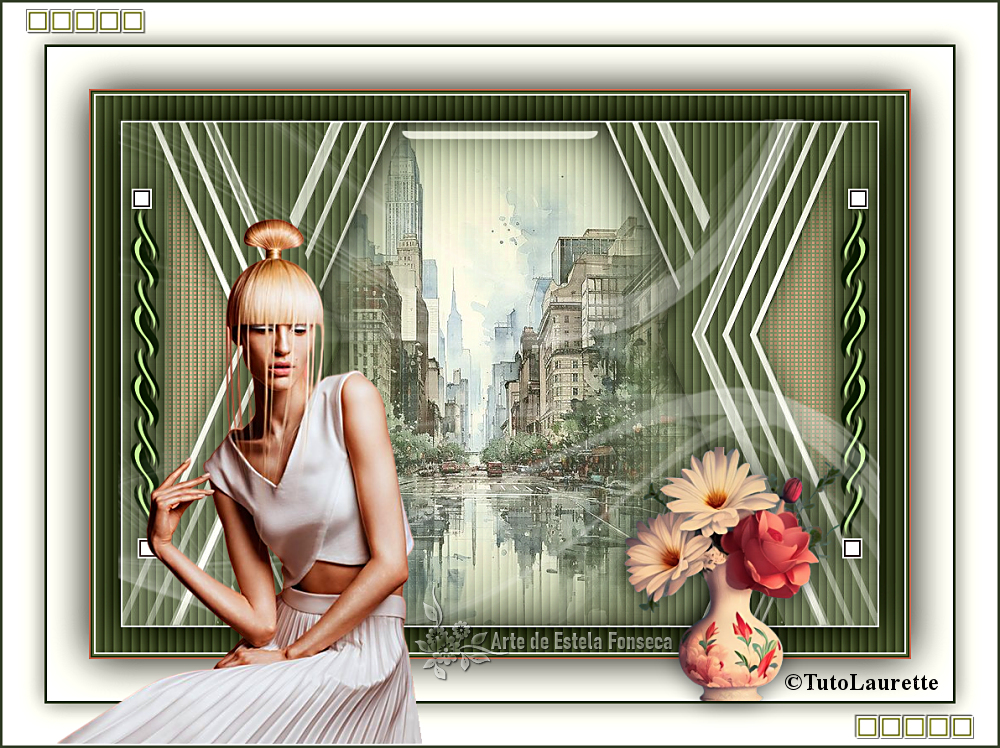
Versão com tube de EF (Personagem) e (Misted Paisagem) e de Vera Mendes (Floral):
©Tutorial traduzido por Estela Fonseca em 19/08/2024.
Não alterar nem repassar sem autorização.