PICTURE IN PICTURE
Tutorial de Korda. Original, Aqui. Traduzido com a permissão da autora.

Este Tutorial foi escrito para PSP X2, porém poderá ser feito em outras versões do programa.
Materiais Necessários:
Para este tutorial eu utilizei um tube de Gerry.
Plugins Utilizados:
Tramages
Border Mania
Abra os tubes, duplique e feche os originais.
Guarde as seleções na pasta de Seleções do PSP
Foreground cor #82634f
Backgroud cor #d3b6a0.
01- Abra uma imagem transparente de 800 / 600 px.
Preencha com a cor do foreground.
Layers / New Raster LayerSelections / Select All
Copie a textura <<untitled_texture_62_by_untitled_stock.jpg>>
Cole na seleção
Selections / Select None
Blend Mode / Luminance
Opacidade / 60%.
Adjust / Brightness and Contrast: -78/0.02- Layers / New Raster Layer
Selections / Load save selection /Load selection from disk: @picture.PspSelection.
Preencha com a cor do background.
Opacidade / 60%Layers / Merge / Merge visible.
Layers / New Raster layerSelections / Load save selection / Load selection from disk : @picture1.PspSelection.
Forme um gradiente estilo Linear angle 1 repeats 0 , não mude as cores.Preencha a seleção com o gradiente.
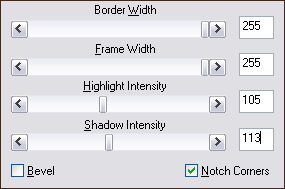
Effects / Plugin / Bordermania / Frame#2.
Selections / Select None
03- Layers / New raster layer.
Selections / Load save selection / Load selection from disk: @picture2.PspSelection.
Paleta de Materiais / Inverta as cores.
Preencha a seleção com o gradiente.
Effects / Plugin / Bordermania / Frame#2. mesmos valores de antes.
Selections /Select none.Layers / New Raster layer
Selections / Load save selection / Load selection from disk: @picture3.PspSelection.
Preencha com o gradiente.
Effects / Plugin / Tramages / Tow The Line, valores padrão.Mantenha a seleção.
04- Layers / New Raster layer
Selections / Modify / Contract / 15px.
Preencha a seleção com a cor do fundo (background).
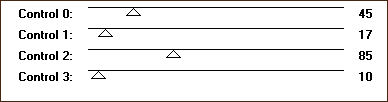
Effects / Plugin / Tramages / Tow The Line, valores:
Layers / New Raster layer
Selections / Modify / Contract/ 15px.
Preencha a seleção com a cor do foreground.
Copie o tube <<Gerry-faces36-26 maart 2008.pspimage>>, cole na seleção.
Selections / Select none.
Effects / 3D Effects / Drop Shadow: 5, 5, 50, 5.
Repita com os dois primeiros valores negativos -5.
Ative as layers 4 e 5 e aplique a mesma sombra.
Layers / Merge / merge down - 2 vezes.05- Ative a layer do fundo.
Copie o tube <<Gerry-faces36-26 maart 2008.pspimage>>Cole como nova layer.
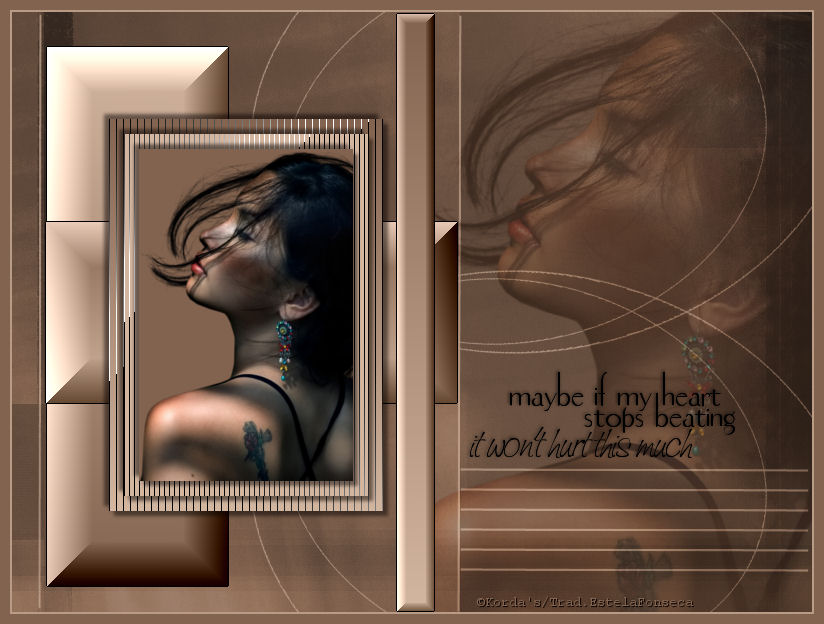
Colocar como mostra o modelo.
Blend mode / Soft lightOpacidade / 60%.
Layers / Merge / Merge Visible.Layers / New Raster layer
Selections / Load save selection / Load selection from disk :@picture4.PspSelection.
Effects / Plugin / Bordermania / Frame#2.com os mesmos valores de antes.
Selections / Select NoneImage / Add borders / Symmetric marcado / 2 px cor do background.
Image / Add borders / symmetric marcado / 10 px cor do foreground.
Copie e cole o texto como nova layerColoque a sua marca d'água.
Layers / Merge / Merge AllSalve como jpg.
©Tutorial traduzido por Estela Fonseca em 15/01/2010.
Não alterar nem repassar sem autorização.