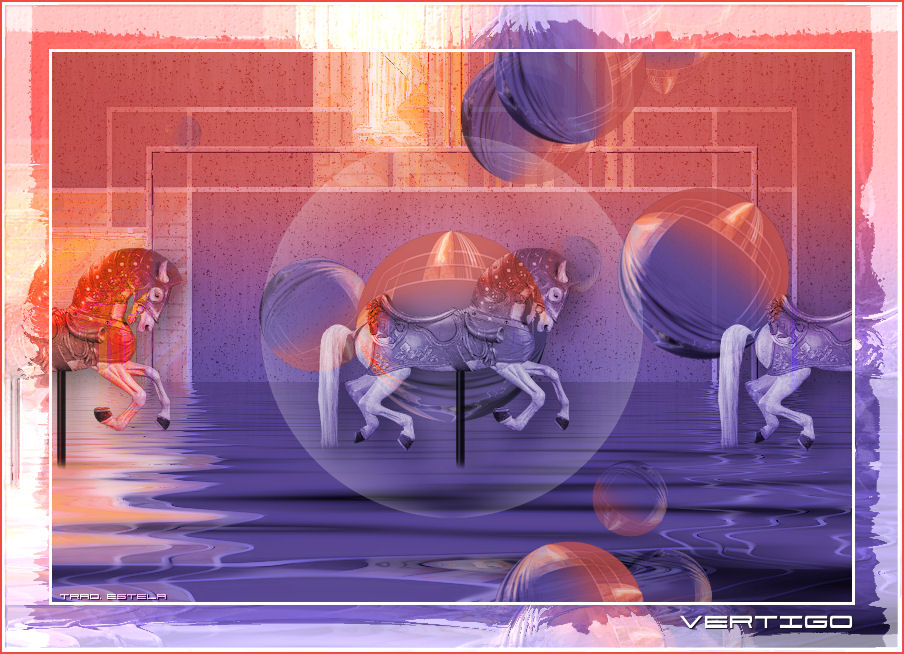
VERTIGO
Tutorial de ©CameronTags , original Aqui. / Obrigada Cameron , por sua autorização.
Material Necessário:
tube ©JCW Designs
Plugins Utilizados:
Nik Color Efex Pro 3
Flaming Pear Flood
Xero Porcelain
Alien Skin Eye Candy 5 Impact
MuRa's Meister Copies
1- Abra uma nova imagem transparente de 800 / 550 pixels
Selections / Select all
Ative << texturevertigo_camerontags >>
Copie e cole na seleção
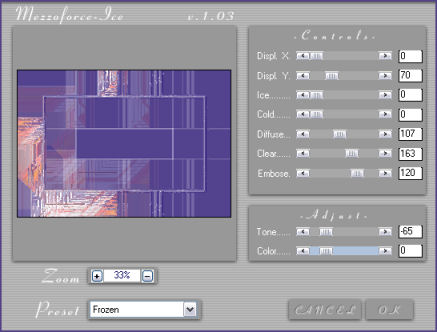
2- Effects / Plugin / 2manekenai MezzoForce-Ice 1 /Frozen:
3- Effects /Plugin / Flaming Pear / Flood:
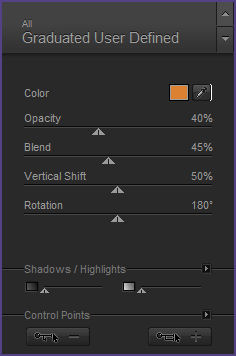
4- Effects /Plugins / Nik Color Efex Pro 3.0 / Graduated User Defined:
Ajust / One Step / Foto Fix
5- Effects /Plugin / Xero / Porcelain : 50 - 128 - 128 - 0 - 0 - 255
Repita novamente o Porcelain com os mesmos valores.
6- Layers / New Raster Layer
Ative a ferramenta seleção (S) / Custom Selection:
Coloque no Foreground a cor #ffffff
Selecione o Gradiente <<Fading-foreground>> Estilo Sunburst
Repeats 0 / Invert Marcado
Preencha a seleção com este gradiente
Effects /Plugin / Alien Skin Eye Candy 5 / Nature / Rust:Tiny, Dark Brown Specks
Selections / Select None
Blend mode / Overlay
Opacidade / 44%
7- Ative a Layer <<Raster 1>>
Layers / Arrange / Bring to Top
Effects / Geometric Effects / Circle / Transparente
Image / Resize / 35% (resize all layers desmarcado)
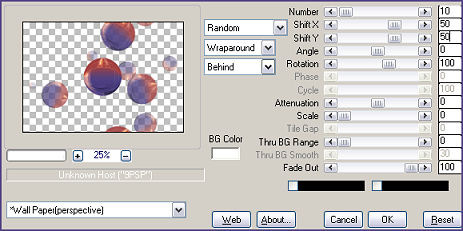
8- Effects /Plugin / MuRa's Meister / Copies / Wall Paper (perspective), valores:
Clique sobre a tela da esquerda para escolher uma imagem semelhante a do modelo.
9- Layers /New Raster Layer
Preencha com o gradiente <<fading-foreground>> estilo Sunburst / Repeats 1/ Inver marcado
Effects / Geometric Effects / Circle / Transparente
Image / Resize / 70% (resize all layers desmarcado)
Opacidade / 22%
10- Ative o tube << jcw_carousel_horse17.pspimage >>
Copie e cole como nova layer
Image / resize / 60% (resize all layers desmarcado)
Posicione no centro do trabalho como no exemplo.
Blend mode / Luminance Legacy
Opacidade / 90%
Effects / Plugin / Xero / Porcelain: valores iguais ao passo Nº 5
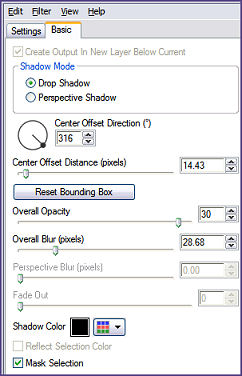
Effects / Plugin / Alien Skin Eye Candy 5 / Impact / Perspective Shadow / Drop Shadow Blurry
Basic, valores:
11- Sobre o tube << jcw_carousel_horse17.pspimage>>
Effects/ Image Effects / Seamless Tiling: corner / horizontal / 0/65.
12- Layers / Merge / Merge all
Image / Add Borders / Symmetric marcado / 3 pixels #ffffff - (Trabalho Nº1)
13- Abra uma nova imagem transparente de 900 / 650 pixels (trabalho Nº2)
Selections / Select all
Ative o trabalho Nº1
Copie e cole na seleção
Selections / Select None
Effects / Plugin / 2manekenai / MezzoForce-Ice 1 / FreezMeNow , valores:
14- Copie e cole o trabalho Nº1 como Nova layer sobre o trabalho Nº2
Layers / merge / Merge all
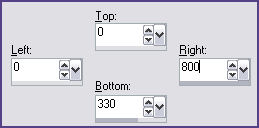
15- Adicione uma borda simétrica dImage / Add Borders / Symmetric marcado / 1 pixel cor #ee4b47
Escreva o texto
A Fonte que usei é Univox
Salve como jpg .
© Tutorial Traduzido por Estela Fonseca em 03/09/2009.
Obrigada, Cameron por me permitir traduzir este trabalho.