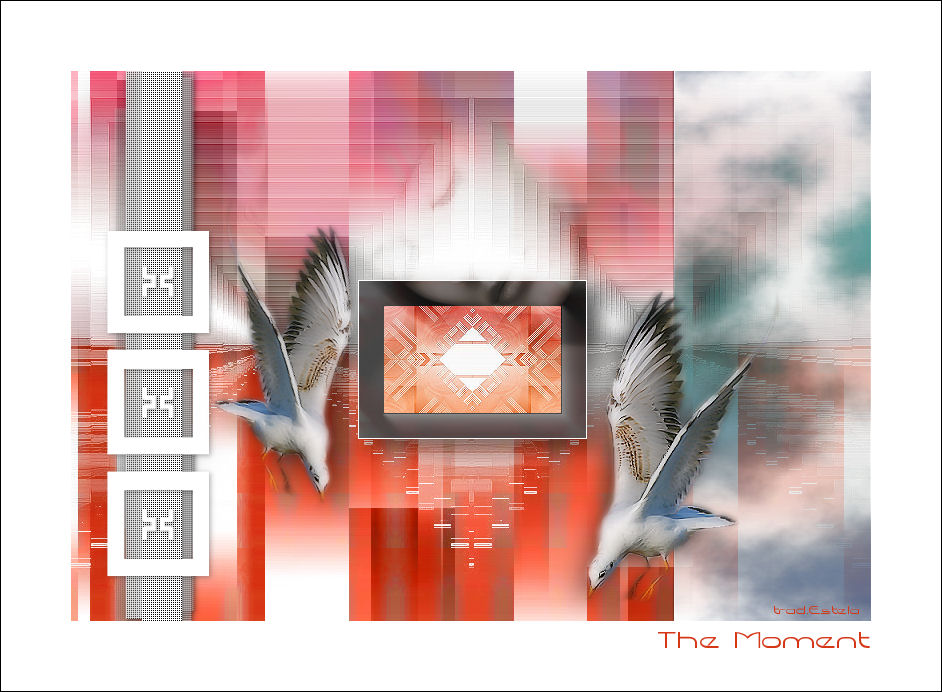
THE MOMENT
Tutorial de ©CameronTags , original Aqui. Obrigada Cameron , por sua autorização.
Material Necessário:
Tubes © Denise Worisch
Plugins Utilizados:
Mura's Meister /Copies
Backgroundmaniac /Medieval Impression
Alien Skin Eye Candy 5 / Impact
AAA Filtro / Moldura Moldura
Borduremania ou Bordermania
XE Xtras Elemental
Xero / Porcelain
1 - Abra uma Nova Imagem transparente de 800/550 pixelsSelections / Select All
Ative << texturethemoment_camerontags.jpg >>
Copie e Cole na Seleção
Selections / Select None.
2 - Ative << barra_themoment.pspimage>>Copie e Cole como Nova Layer
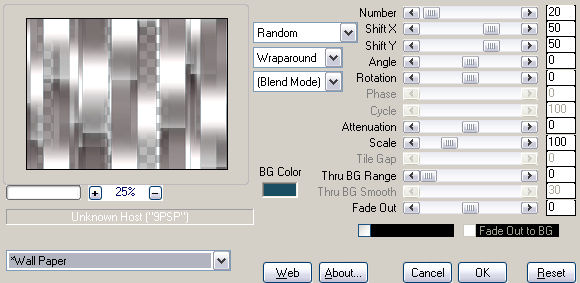
Effects / Plugin / Mura's Meister / Copies: / Wall Paper:
Blend Mode / Luminance Legacy
3 - Layers /New raster layer
Preencha com a cor # ffffff .
Ative << maskcamerontags_themoment.jpg>> Minimize
Layers / New Mask layer / From image / maskcamerontags themoment.jpg.
Layers / Merge / Merge Group
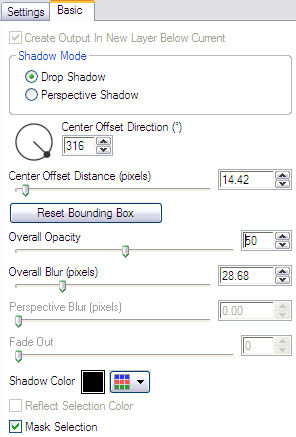
Effects / Plugin / Alien Skin Eye Candy 5/ Impact / Perspective Shadow / Drop Shadow Blurry:Basic
Adjust / Sharpness / Sharpen.4 - Na primeira layer (textura):
Ative a Ferramenta Seleção em Rectangle / Custom valores:
Na Seleção :
Effects / Plugins / Backgroundmaniac / Medieval Impression:
Selections / Select None
5 - Layers /New Raster Layer
Ferramenta seleção - Custom Selection valores: left: 71/Top: 0/Right: 111/Bottm: 550.
Preencha a seleção com a cor # ffffff
Selections /Select None.
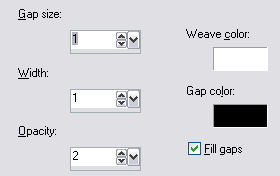
Effects / Texture Effects / Weave:
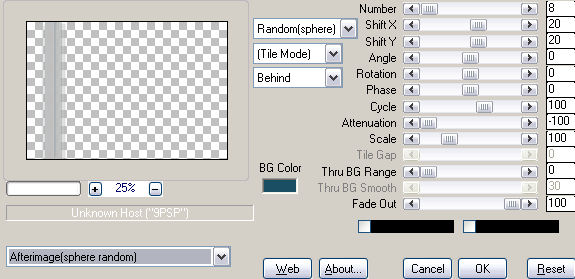
6 - Na mesma layer :Effects / Plugin / Mura's Meister Copies / Preset Menu Afterimage (sphere random)
Effects / Plugin / Alien Skin Eye Candy 5 /Impact / Perspective Shadow / Drop Shadow Lowest -Basic: defaults
Adjust / Sharpness / Sharpen7 - Ative <<cuadrosthemoment_camerontags.pspimage>>
Copie e cole como nova layer
Posicione à esquerda da tag.
8 - Layers /New raster layer
Ative a Ferramenta seleção / Custom Selection - Valores: Left: 603/Top:0/Right: 800/Bottom:550.
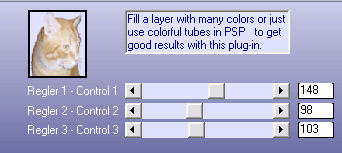
Preencha com gradiente ocean blue.Effects / Plugin / XE Xtras / Elemental
Clique em Customizer - valores:
Selections / Select NoneEffects / 3d effects / Shadow: -1 / -1 / 25 / 1,00 / # 000000
Adjust / Sharpness / Sharpen9 - Ative << PASSAROS2DW.pspimage >>
Copie e Cole como Nova Layer
Opacidade / 60%.
Image / Free Rotate / free / 15 º / for Right.
Effects / Plugin / Xero / Porcelain: 50/128/128/0/0/0.
Adjust / Sharpness / Sharpen
Effects /Plugin / Alien Skin Eye Candy 5 / Impact / Perspective Shadow / Drop Shadow Blurry
Basic , valores já usado no passo n º 3
Posicione de acordo com a imagem final do topo dessa página.
10 - Ative novamente <<passaroDW1 >>
Copie e Cole como Nova Layer
Image / Mirror.
Image / Resize / 80% / All layers desmarcado.
Effects / Plugin / Xero / Porcelain: 50/128/128/0/0/0.
Effects / Plugin / Alien Skin Eye Candy 5 / Impact / Perspective shadow / Drop Shadow Blurryvalores já usados anteriormente.
Adjust / Sharpness / Sharpen .Posicione de acordo com o trabalho final no topo da página.
11 - Layers /New raster layer
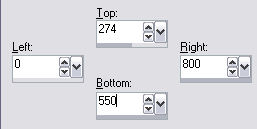
Ferramenta Seleção / Custom Selection, valores: Left:287/Top: 209/Right: 516/Bottom:368.
Ative << cuadrothemoment_camerontags.jpg >>
Copie e cole na seleção.
Não tire a seleção ainda.Adjust / Sharpness / Sharpen.
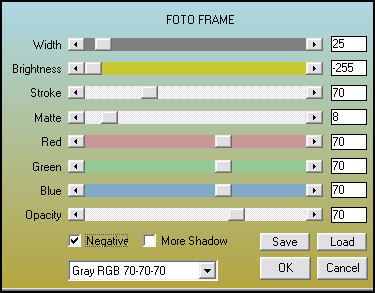
Continue com a seleçãoEffects / Plugin / AAA Frames /Foto Frame:
Effects / Plugin / Borduremania / Cadre plat / valores: 1/255/#ffffff
Selections / Select NoneEffects / Plugin / Alien Skin Eye Candy 5 / Impact / Perspective Shadow / Drop Shadow Blurry.
Em Basic: idem valores passo nº 3.
12 - Ative o tube <<4806DWTUBES.pspimage >>
Copie e cole como nova layer
Image / Resize / 80% / Resize, all layers desmarcado.
Blend Mode / Soft Light.
Posicione de acordo com o modelo.
Layers / Merge / Merge All.
Image / Add Borders / Symmetric / 70 pixels Cor# ffffff
Image / Add Borders / Symmetric / 1 pixel cor # 000000
Assine e salve como jpg .© Tutorial Traduzido por Estela Fonseca em 07/07/2009.
Obrigada, Cameron por me permitir traduzir este trabalho.