MAGENTA
Tutorial de ©CameronTags , original Aqui.
Material Necessário:
» Plugin MuRa's Meister Copies
» Plugin Andrew's Filter Collection 30
» Plugin Flaming Pear Flexify 2
» Plugin Horizonaus Mixed Bag - StripesareIn
» Programa Corel PaintShop Photo Pro
Buscador de Plugins CT
***
1- Abra uma nova imagem transparente de 800 x 550 pixelsSelections / Select All
Ative a texturetutmagenta camerontags.png
Copie e cole na seleção
Selections / Select None
2- Layers / Duplicate
Sobre a layer duplicada:
Selections / Select All
Selections / Modify / Contract / 100 pixels
Selections / Invert
Edit / Cut
Selections / Select None
3- Sobre a mesma layer: Image / Mirror
4- Sobre a mesma layer:
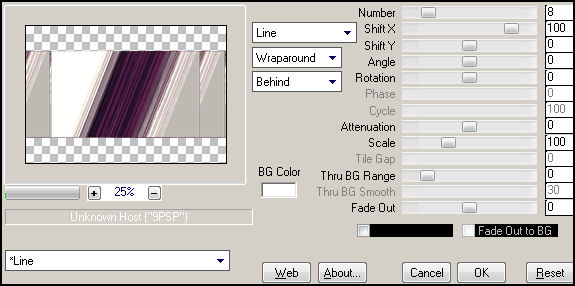
Effects / Plugin / MuRa's Meister Copies: preset Line - valores:
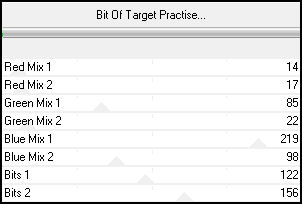
5- Sobre a mesma layer:Effects / Plugin / Andrew's Filter Collection 30 - Bit Of Target Practise / valores:
6- Layers , new raster layer
Preencha com a cor #ffffff
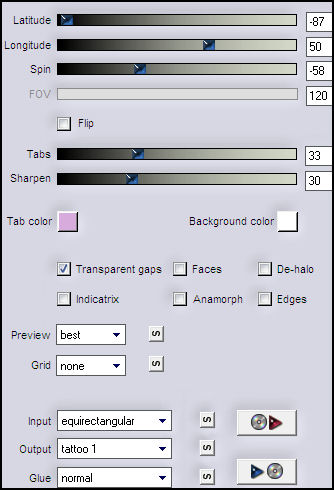
Effects / Plugin / Flaming Pear Flexify 2 / valores:
7- Layers / Merge/ Merge all
Layers / Duplicate
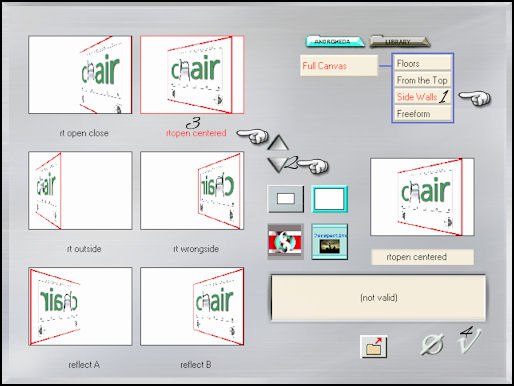
Effects / Plugin / Andrômeda Perspective / em Presets selecione: Side Walls - It open centered - OK
8- Sobre a mesma layer:Image / Resize / 99% / All layers, desmarcado
Adjust / Sharpness / Sharpen
9- Layers / Merge / Merge All
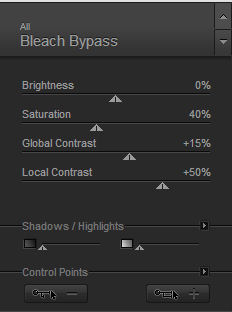
Effects / Plugin / Nik Color Efex Pro 3 / Bleach Bypass / valores:
10- Image / Add Borders / 1 pixel cor #000000 / 60 pixels cor #ffffff
11- Selections / Select All
Selections / Modify / Contract 59 pixels
Selections / Invert
Na seleção: Effects / Plugin / Horizonaus / Mixed Bag - StripesareIn - valores: 100 / 100
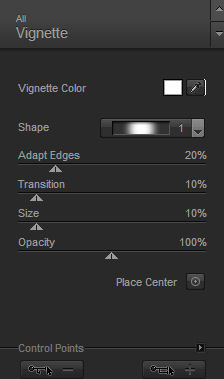
12- Ainda na seleção: Effects / Plugin / Filters Factory Gallery H / Alias Blur / valores: 59/2813- Na seleção: Effects / Plugin / Nik Color Efex Pro 3 / Vignette - valores:
Selections / Select None14- Ative a ferramenta seleção e clique em Custom selection / valores:
Preencha a seleção com a cor #ffffffSelections / Select None
15- Ative o tube facetutorialmagenta_camerontags.pspimage
Copie e cole como nova layer
Effects / Image Effects / Offset: 301 / 118 / Custom / Transparent
Blend Mode / Hard Light
16- Ative o tube florestutorialmagenta_camerontags.pspimage
Copie e cole como nova layer
Effects / Image Effects / Offset: 180 / -139 / Custom / Transparent
17- Ative o tube corazones_tutorialmagenta.pspimage
Copie e cole como nova layer
Effects / Image Effects / Offset:-254 / 4 / Custom / transparent
18- Sobre a mesma layer:
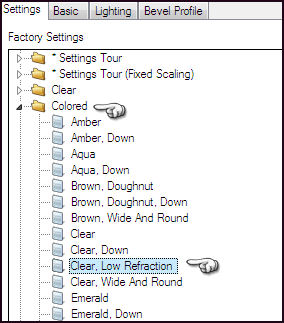
Effects / Plugin / Eye Candy 6 Text_Selection / Glass/ Colored - Clear Low Refraction
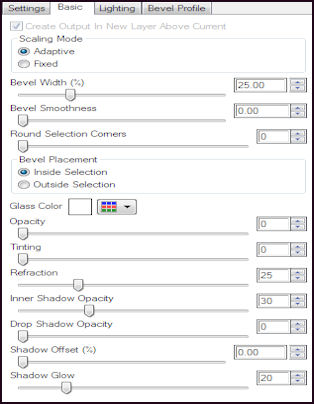
Em Basic, estes valores:
19- Layers / Merge / Merge All
Image / Add Borders / 1 pixel cor #000000
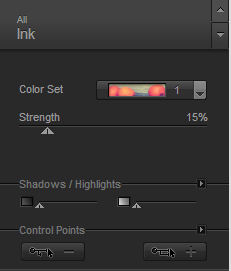
20- Effects / Plugin / Nik Color Efex Pro 3 / Ink - valores:
Assine e salve como jpg
© Tutorial Traduzido por Estela Fonseca em 17/05/2011.
Obrigada, Caroline por me permitir traduzir este trabalho.