KHARMA
Este Tutorial é de ©Cameron Tags.
Material Necessário:
Plugins Utilizados:
Eye Candy 6
Factory Gallerys E - M
Andrómeda Perspective
VanDerLee - UnPlugged-X
1- Abra uma nova imagem transparente de 800 / 550 pixelsSelections / Select All
Ative <<texturecamerontags tutorialkharma.png >>
Copie e cole na seleção
Selections / Select None
2- Layers / New Raster layer
Preencha com a cor #ffffff
Effects / Geometric Effects / Perspective Vertical /100/transparente
3- Layers / Duplicate
Image / Flip
Layers / Merge / Down
4- Sobre essa layer "Merged"
Effects / Distortion Effects / Twirl: 720
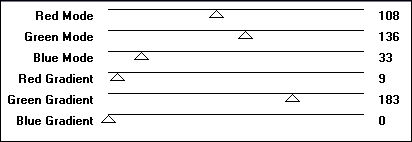
5- Effects / Plugin / Filter Factory Gallery M - Ambrosia / valores:
6- Effects / Plugin / VanDerLee / UnPlugged-X / Jalusi - valores:
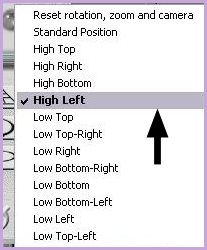
7- Effects / Plugin / Andrômeda Perspective
Clique em Menu Standar Positions
Escolha : High Left
8- Effects / Image / Seamless Tiling: Mirror / Bidirecional / 100/10/50
Blend Mode / Luminance (Legacy)
9- Layers / New Raster Layer
Preencha com a cor #97c713
Effects / Geometric / circle / Transparente
10- Image / Resize / 50% (desmarque a opção, all layers)
11- Effects / Plugin / Factory Gallery E / Transparent Bullseye:1312- Ative a Ferramenta "Borracha" e apague o circulo central ( o pequeninho)
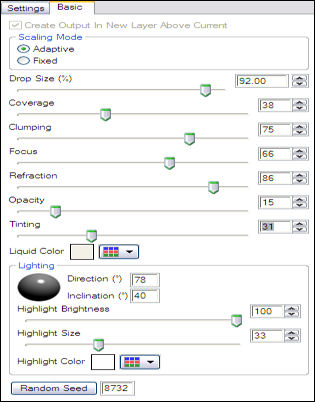
13- Effects / Plugin / Eye Candy 6 / Textures / Water Drops
Settings Tour - Large and Messy: Strong Refraction - Em Basic:
14- Effects / Plugin/ Eye Candy 6 / Text_Selection / Glass: Settings Tour / With Reflection: Steel
Em Basic:
15- Effects / image Effects / Offset: 200/0/Custom / Transparente
16- Layers /Duplicate
17- Na layer Original :
Effects / Image Effects / Seamless Tiling / Corner / Vertical / 0/50.
Blend Mode / Soft Light
18- Na layer da cópia: Blend Mode / Luminance
19- Ative o tube tube <<facekharma_camerontags.pspimage>>
Copie e cole como nova layer
Coloque no canto superior esquerdo (ver imagem)
20- Layers /Merge / Merge All
Image / Add Borders / Symmetric marcado / 65 pixels cor #ffffff
Image / Add Borders / Symmetric marcado / 1 píxel cor #b33557
Escreva o texto e salve seu trabalho como jpg.©Tutorial Traduzido por Estela Fonseca em 18/05/2010.
Não alterar nem repassar sem autorização.