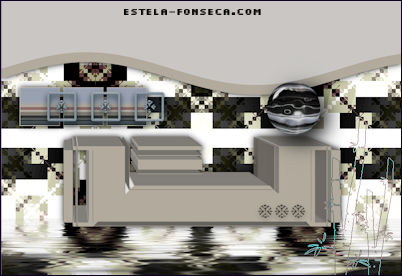
KANTHA
Tutorial de ©CameronTags , original Aqui.
Material Necessário:
Todos os materiais usados neste tutorial são criações de Cameron Tags.
Horizonaus Mixed Bag StripesareIn
Preparação:Copie a seleção para a pasta de seleções do PSP.
Abra a Pattern no PSP e minimize-a.
Abra a Mask no PSP e Minimize-a.
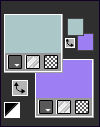
1- Abra uma nova imagem transparente de 800 / 550 pixelsForeground cor #abc7c7
Background cor #9e7ff3
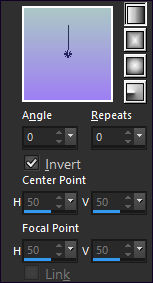
Forme um Gradiente <<Linear>> Configurado como segue:
Preencha com o Gradiente
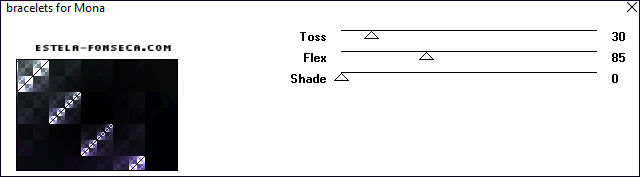
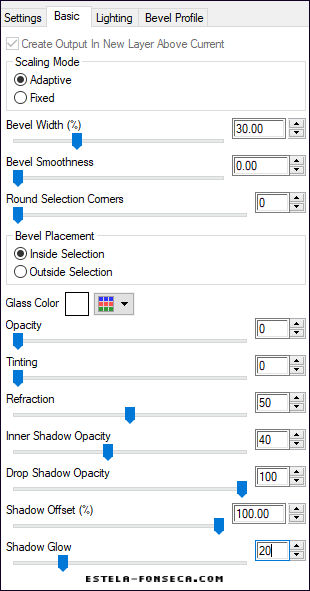
2- Effects / Plugins / Kang 1 / Bracelets for Mona / valores: 30/85/0.
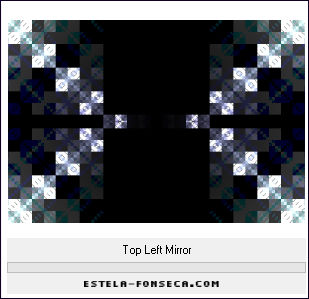
3- Effects / Plugins / Simple / Top Left Mirror
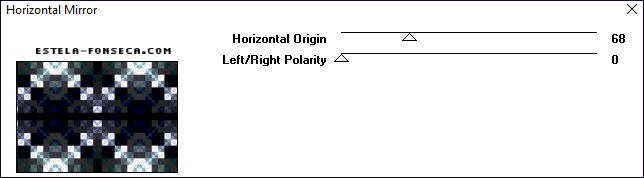
4- Effects / Plugins / Graphics Plus / Horizontal Mirror / valores: 68/0
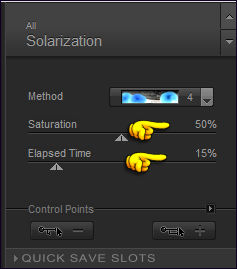
5- Effects / Plugins / Nik Color Efex Pro 3 / Solarization / valores: 50 / 15
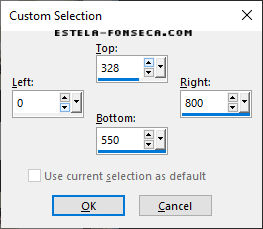
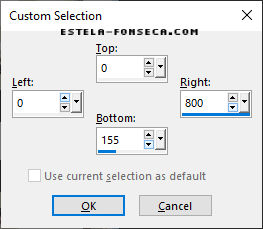
6- Selection Tool (S) Rectangle / Custom Selection
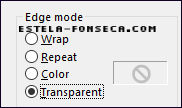
7- Effects / Plugins / Flaming Pear / Flood:
Selections / Select None8- Layers / New Raster layer
Selection Tool (S) Rectangle / Custom Selection
9- Preencha a seleção com a cor #b1aa9d
Selections / Select None
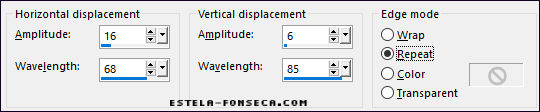
10- Effects / Distortion Effects / Wave:
11- Layers / Duplicate
Image / Negative / Image
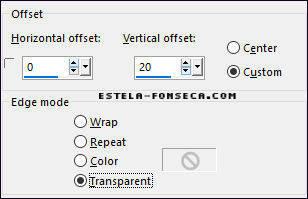
12- Effects / Image Effects / Offset: 0 / 20 / Custom e Transparente marcados
Blend Mode / Screen
13- Ative a layer imediatamente abaixo: (Raster 2)
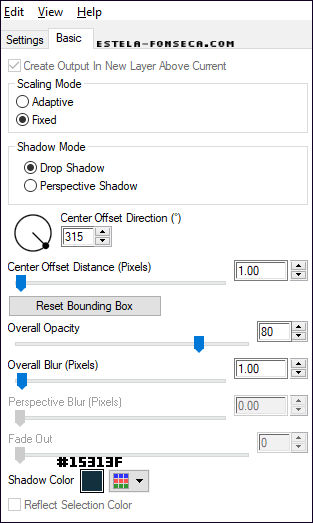
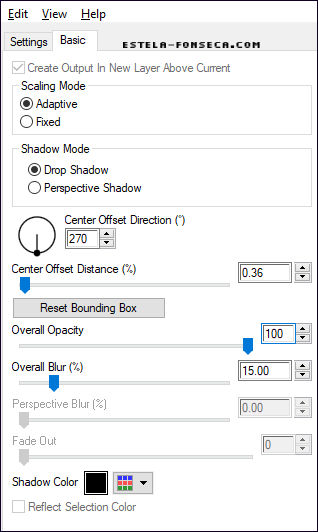
Effects / Plugins / Alien Skin Eye Candy 6 / Text_Selection / Perspective Shadow
em Basic, valores:
14- Layers / New Raster Layer
Selections / Load /save selection / Load selection from disk: selekantha
15- Preencha a seleção com a cor #b1aa9d
16- Selections / Modify / Contract / 1 Pixel
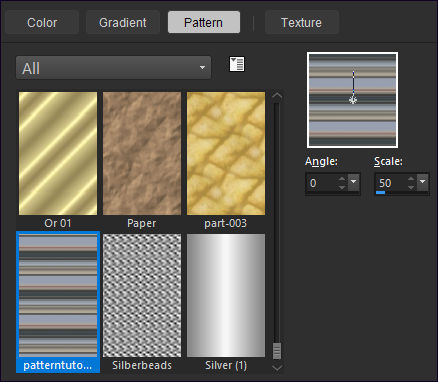
17- Abra a <<patterntutorialkantha_camerontags.png>> Minimize no PSP
Configure na paleta de Estilos e Texturas angle 0 Scale 50
Preencha a seleção com esta pattern
18- Selections / Select None
Adjust / Sharpness / Sharpen
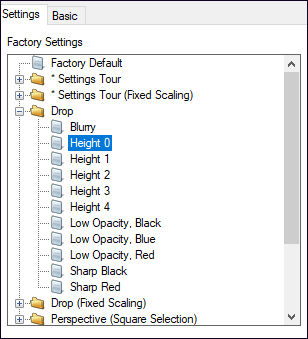
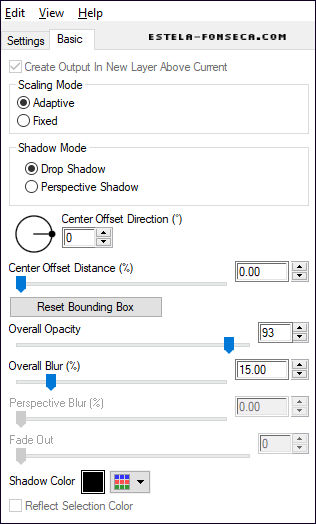
19- Effects / Plugins / Eye Candy 6 Text_Selection / Perspective Shadow / Drop / Height 0
Em Basic, valores:
20- Ative <<decotutorialkantha_camerontags.pspimage>>
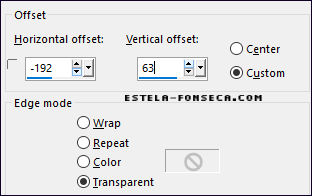
Copie / Cole como nova layer21- Effects / Image Effects / Offset: -192 / 63 / Custom e Transparente marcados
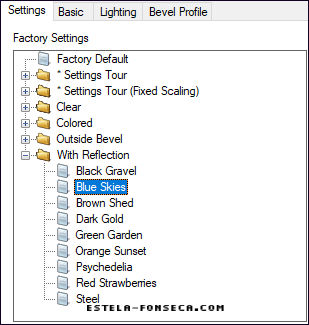
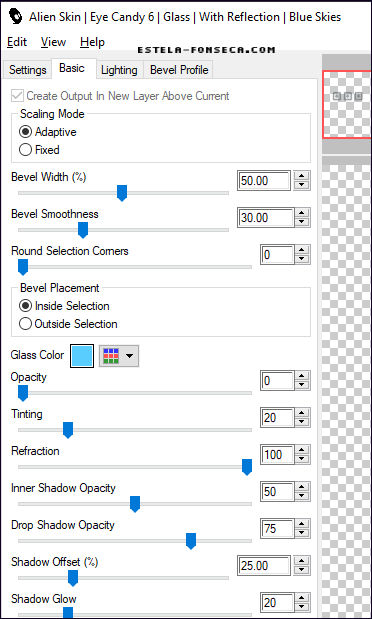
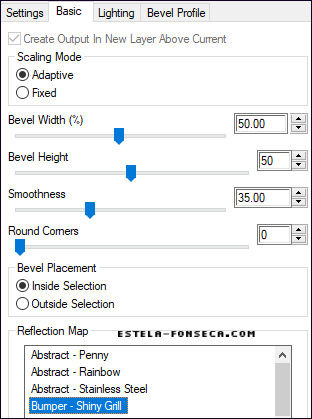
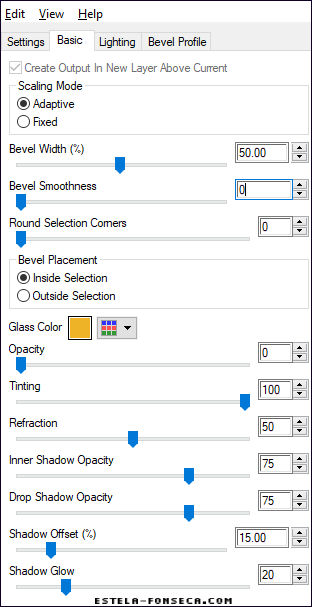
22- Effects / Plugins / Eye Candy 6 / Text_Selection / Glass / With Reflection / Blue Skies
Em Basic, valores:
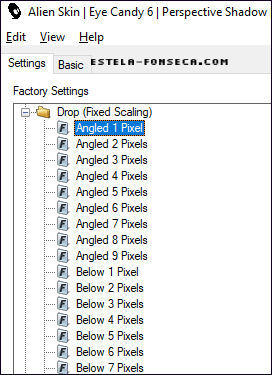
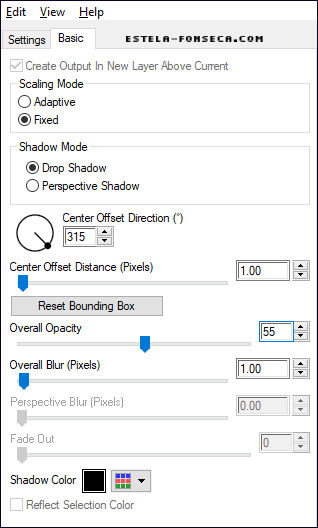
23- Effects / Plugins / Eye Candy 6 / Text_Selection / Perspective Shadow / Drop (Fixed Scaling)
Angled 1 Pixel
Em Basic valores: (Mude apenas a cor)
24- Layers / New raster layer
Preencha com a cor #b1aa9d
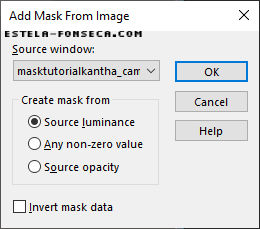
Abra <<masktutorialkantha_camerontags.png>> Minimize
Layers / New mask layer / From image:
Layers / Merge / Merge Group
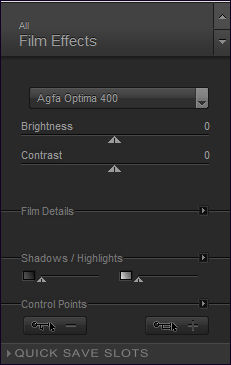
25- Image / Resize / 70% ... Resize all Layers... Desmarcado
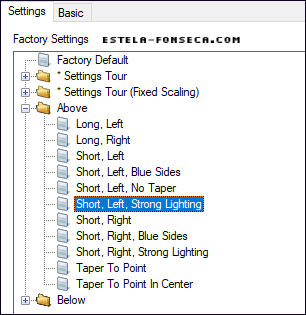
26- Effects / Plugins / Eye Candy 6 Text_Selection / Extrude / Above Short, Left, Strong Lighting
Em Basic, valores:
27- Ainda nesta layer:
Effects / Plugins / Eye Candy 6/ Text_Selection / Perspective Shadow / Drop / Height 0
28- Layers / New raster layer
Preencha com a cor #ffffff
Effects / Geometric effects / Circle / Transparente
29- Image / Resize / 20% ... Resize all layers ... Desmarcado
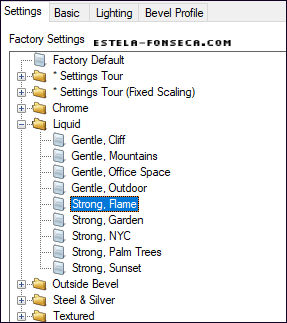
30- Effects / Plugins / Eye Candy 6 / Text_Selection / Chrome / Liquid - Strong, Flame
Em Basic, valores:
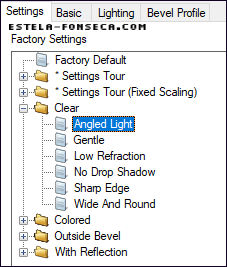
31- Effects / Plugins / Eye Candy 6 / Text_Selection / Glass / Clear / Angled Light
Em Basic, valores:
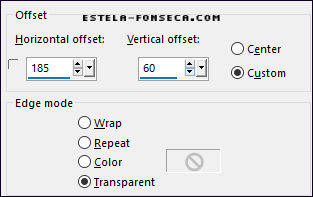
32- Effects / Image Effects / Offset: 185 / 60 / Custom e Transparente marcados
33- Ative <<decotutorialkantha2_camerontags.pspimage>>
Copie / Cole como nova layer
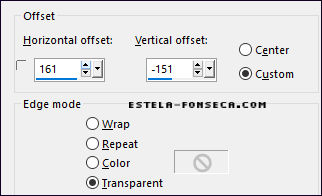
Effects / Image Effects / Offset: 161 / -151 / Custom e Transparente marcados
34- Layers / New Raster Layer
Ative <<bambootutorialkantha_camerontags.png>>
File / Export Custom Brush / bambootutorialkantha>>
Ative a Ferramenta Paint Brush / localize o brush <<bamboo tutorialkantha>>
35- Foreground cor #b1aa9d
Carimbe o brush no local estabelecido com apenas um clique
36- Effects / Plugins / Eye Candy 6 /Text_Selection / Glass / With Reflection Orange Sunset
Em Basic:
37- Effects / Plugins / Eye Candy 6 /Text_Selection / Perspective Shadow / Drop (Fixed Scaling)
Angled 1 Pixel
Em Basic : Mude O valor de Overal Opacity para 55
38- Layers / New Raster Layer
Ative a Ferramenta Paint Brush / bambootutorialkantha - valores: Size 233
39- Foreground cor #b1aa9d
Clique apenas uma vez com o brush abaixo e a esquerda.
40- Effects / Plugins / Eye Candy 6 / Text_Selection / Glass / With Reflection /Orange Sunset
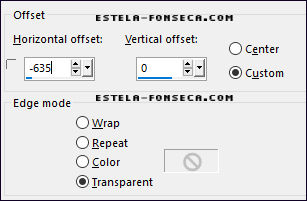
41- Image / Mirror
Effects / Image Effects / Offset: -635/ 0 / custom e transparente marcados
42- Effects / Plugins / Eye Candy 6 Text_Selection / Perspective Shadow / Drop (Fixed Scaling)
Angled 1 Pixel
Em Basic - valores: Mude apenas o valor de Overall Opacity: 55
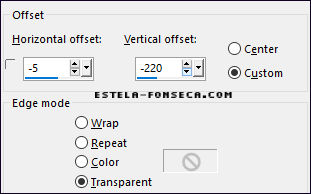
43- Ative <<basetutorialkantha_camerontags.pspimage>>Copie / Cole como nova layer
44- Effects / Image Effects / Offset: -5 / -220 / custom e transparente marcados
45- Effects / Plugins / Eye Candy 6 / Text_Selection / Perspective Shadow / Drop / Height 0
46- Ative <<jirafastutorialkantha_camerontags.psp>> Copie / Cole como nova layer
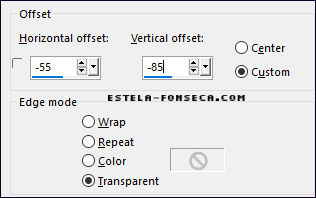
47- Effects / Image Effects / Offset: -55/ -85/custom e transparente marcados
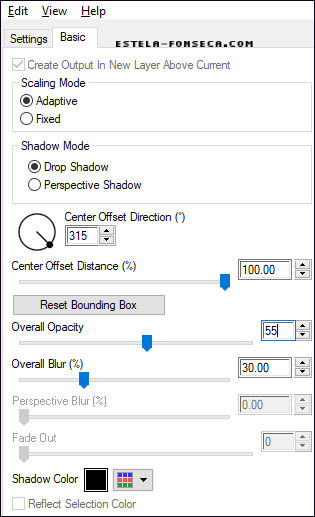
48- Effects / Plugins / Eye Candy 6 Text_Selection / Perspective Shadow / Drop Blurry
Em Basic - valores:
49-Layers / Merge / Merge All
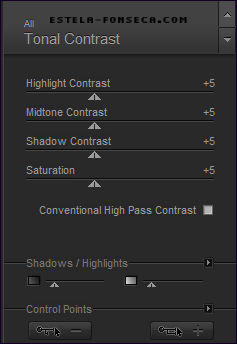
Effects / Plugins / Nik Color Efex Pro 3 / Tonal Contrast - valores:
50- Image / Add Borders / Symmetric Marcado / 1 pixel cor 000000
Image / Add Borders / Symmetric Marcado / 50 pixels #ffffff
51- Selections / Select AllSelections / Modify / Contract / 50 pixels
Selections / Invert
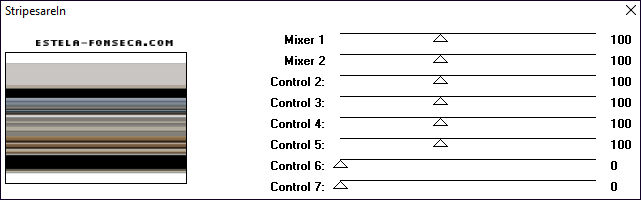
52- Effects / Plugins / Horizonaus Mixed Bag / StripesareIn / valores: 100 - 100
53- Effects / Plugins / Nik Color Efex Pro 3 / Film Effects - valores: 0 / 0
54- Selections / InvertEffects / Plugins / Eye Candy 6 / Text_Selection / Perspective Shadow / Drop / Height 0
Em Basic, valores:
55- Selections / Select NoneImage / Add Borders / Symmetric Marcado / 1 pixel cor preta
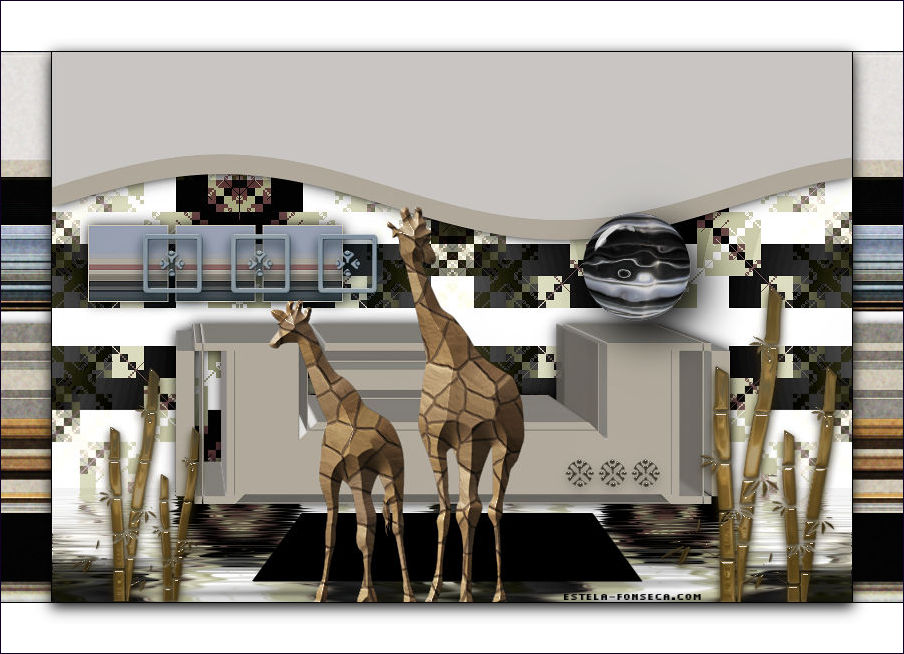
Assine seu Trabalho
Layers / Merge / Merge All
Salve como jpg.
© Tutorial Traduzido por Estela Fonseca em 27/10/2011.
Obrigada, Caroline por me permitir traduzir este trabalho.