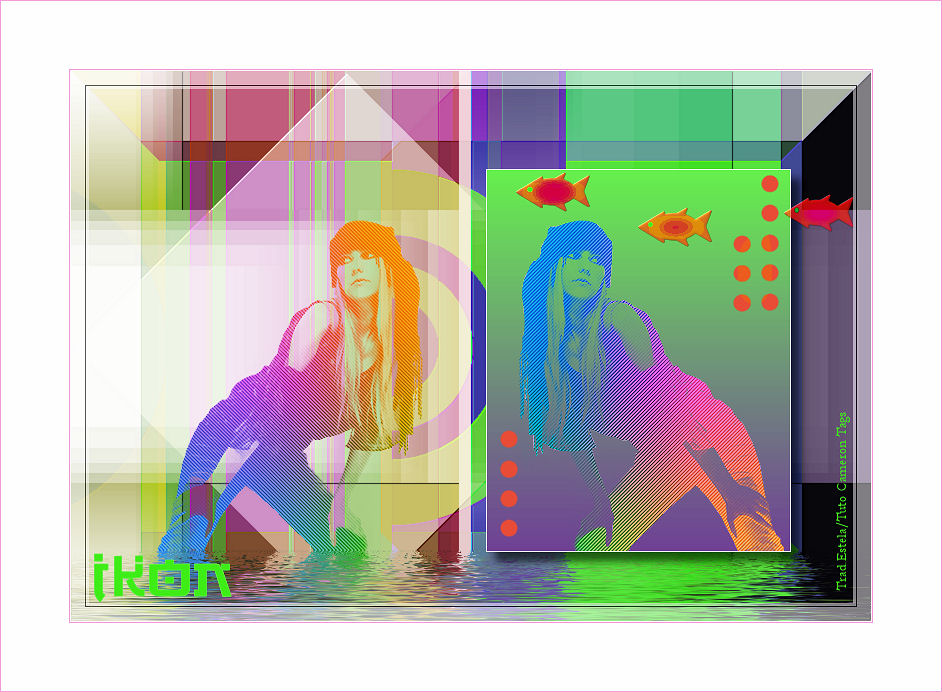
IKAN
Este Tutorial é de ©Cameron Tags
Material Necessário:

Plugins Utilizados:
Filter Factory Gallery A - G - U
VanDerLee UnPlugged-X
FM TileTools - Blend Emboss
Eye Candy 6
Bordure Mania ou Bordermania
Flaming Pear Swap Red/Blue | Flood
AAA Frames Foto Frame
1- Abra uma nova imagem transparente 800 / 550 pixels
Preencha com a cor #66c32d
2- Layers / New Raster Layer
Preencha com a cor #8b51b8
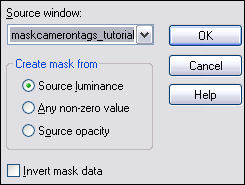
Ative a mask <<maskcamerontags_tutorialikan.png
>> Minimize
Layers / New Mask Layer , from image:
3- Layers / Merge /Merge group
Layers / Merge / Merge All
4- Image / Mirror
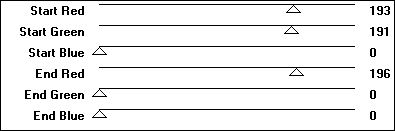
5- Effects / Plugin / Filter Factory Gallery U /
Gradient on Path / valores:
6- Effects /Plugin / Filter Factory Gallery G /
Bevel 2 / valores:

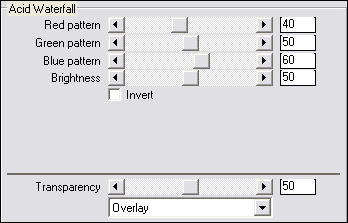
7- Effects /Plugin / VanDerLee UnPlugged-X /
Acid Waterfall / valores:
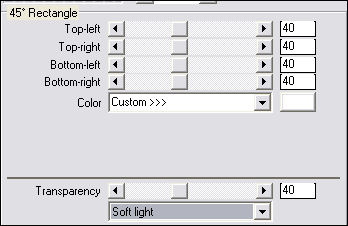
8- Effects / Plugin / VanDerLee UnPlugged-X /45º Rectangle
/ valores:
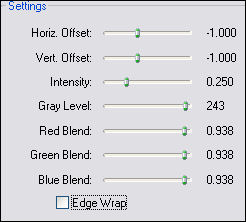
9- Effects /Plugins / FM TileTools / Blend Emboss /
valores:
10- Layers / New Raster Layer
Preencha com a cor do Foreground
#ffffff
Effects / Plugin / Filter Factory Gallery A /
Weave / valores:
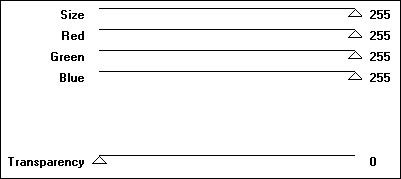
11- Effects /Plugin / Filter Factory Gallery A /Zoom Out
/ valores:

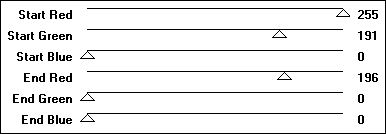
12- Effects / Plugin / Filter Factory Gallery U
/Gradient on path / valores:
13- Sobre a mesma layer:
Image / Mirror
14- Sobre a mesma layer:
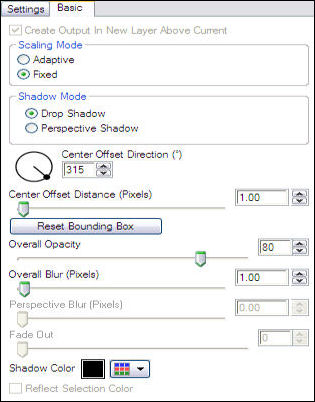
Effects /Plugin /Eye Candy 6
/ Text_Selection / Perspective Shadow
Drop (Fixed Scaling) Angled 1 Pixel / Basic, estes valores:
15- Na Palete das Layers :
Blend Mode / Luminance
Opacidade / 81%
16- Layers / New Raster Layer
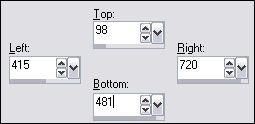
Ative a Ferramenta Selection Tool /Custom Selection:
17- Preencha a seleção com o Gradiente formado pelas
cores: #68f550 e #8b51b8
Estilo Linear / Angle e Repeats : 0 / Invert marcado.
Selections / Select None
18- Na mesma layer:
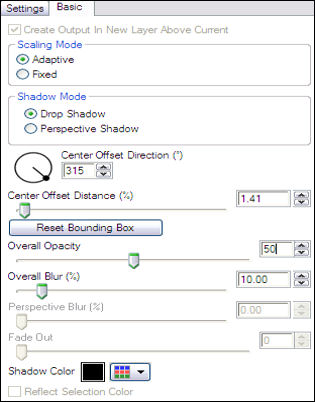
Effects / Plugin / Eye Candy 6 /
Text_Selection / Drop / Height 1
Em Basic, estes valores:
19- Ative o tube <<mujertutorialikan_camerontags.pspimage >>
Copie e cole
como nova layer
Com a Ferramenta Mover coloque a esquerda como no
modelo.
20- Layers / Duplicate
21-Image / Mirror
22- Sobre o tube duplicado:
Effects / Plugin / Flaming
Pear / Swap Red/Blue
23- Na Paleta das Layers , feche todas as layers,
exceto o tube duplicado
( copy of raster 3) e a layer 2 ( do
gradiente)
Layers / Merge / Merge Visible
24- Sobre essa layer Merged:
Ative a Ferramenta Selection Tool / Custom Selection / valores:
25- Na seleção :
Effects / Plugin / Bordure Mania ou Bordermanía
/ Cadre Plat (ou Flat Solid) - valores:

Selections / Select None
26- Na paleta das layers / volte a abrir as
layers ocultas
Ative <<circulosikan_camerontags.pspimage>>
Copie e cole
como nova layer
Posicione como no modelo do tutorial
27- Na Paleta das Layers / Oculte todas as
layers
exceto a layer circulosikan e a layer
merged
Layers Merge / Merge Visible
Renomeie essas layers para Merged 1 e Merged 2
O resultado deverá estar assim:

28- Sobre a layer merged 1 ( a inferior) :
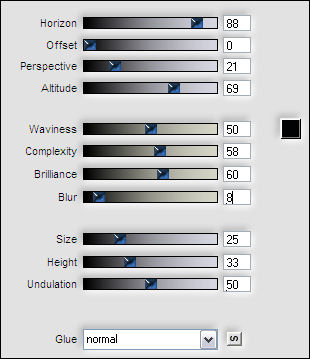
Effects / Plugin /
Flaming Pear - Flood - valores:
29- Ative a layer de cima
Copie o tube <<pecestutorialikan_camerontags.pspimage
>>
Cole como nova layer
Posicione como no modelo do tutorial.
Blend Mode / Hard Light
30- Layers / Merge / Merge All
Image / Add Borders / Symmetric marcado / 1 píxel cor #ffffff
Image / add Borders /Symmetric marcado / 1 píxel cor
#fe59ca
Image / add Borders /Symmetric marcado / 68 píxels cor #ffffff
Image / add borders / Symmetric marcado / 1 píxel cor #fe59ca
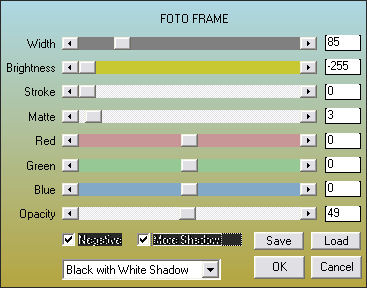
31- Effects / Plugin / AAA Frames / Foto Frame /
valores:
32- Ative
a Ferramenta de Texto - valores:

Na Paleta de Cores coloque no foreground e no
background a cor #41f11d
Escreva "ikan" / Selection / Promote
Selection to layer
Selections / Select None
Coloque o texto abaixo do lado esquerdo
33- Layers / Merge / Merge All
Salve como Jpeg.
VOLTAR
©Tutorial Traduzido por Estela Fonseca em 06/08/2010.
Não alterar nem repassar sem autorização.
|
