I-CARO
Tutorial de ©CameronTags , original Aqui. Obrigada Cameron , por sua autorização.
Tube © Denise Worisch
Material Necessário:
Plugins Utilizados:
Xero / Fritillary
Nik Color Efex Pro 3.0
Mehdi / Vibrations 1/1
Corel Paint Shop Pro . Aqui.
1 - Abra uma nova imagem transparente de 800 x 550 pixelsPreencha com a cor #9a8581.
Effects / Plugin / Xero / Fritillary: 5/30/10/0.
2 - Layers / New Raster Layer
Preencha com a cor # d58273
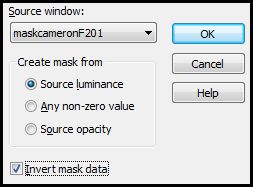
Ative a << maskcameronF201 >> Minimize.
Layers / New mask layer / from image << mask: maskcameronF201 >> invert marcado
Layers / Merge / Merge group.
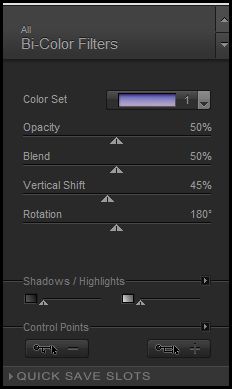
3 - Layers / Merge / Merge visible.Effects / Plugins / Nik Software / Color Efex Pro 3.0 / Bi-Color Filters:
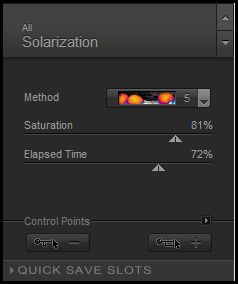
4 - Effects / Plugin / Nik Software / Color Efex Pro 3.0 / Solarization:
5 - Layers / New raster layer
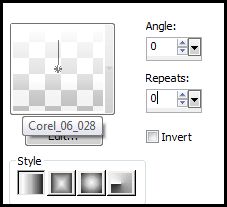
Ferramenta seleção / Custom Selection:
Preencha a seleção com o gradiente fadding White.
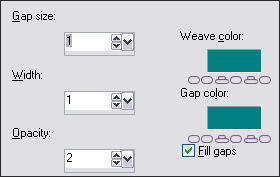
6 - Effects / Texture Effects / Weave:
Selections / Select none.
Adjust / Sharpness / Sharpen
7 - Ative o tube <<5214pspcybertubes.blogspot.com.pspimage>>
Copie e cole como nova layer
Image / Resize / 90% (Resize all layers desmarcado)
Posicione no centro do trabalho.Ative a Ferramenta Selection Tool / Rectangle / Selecione a base do tube como segue:
Pressione a tecla Delete no teclado
Para tirar as sobras do tube que ficaram na parte inferior da esfera use a ferramenta Eraser Tool
Selections / Select None
Blend Mode / Luminance Legacy.
Layers/ Duplicate
8 - Na layer do tube :
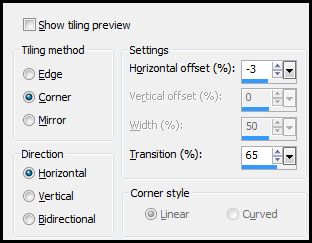
Effects / Image Effects / Seamless Tiling : Corner/Horizontal/-3/65.
Layers / Arrange / Move Down.
9 - Layers / New raster layer
Ative a ferramenta Selection Tool / Custom Selection:
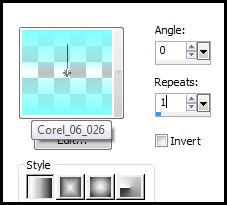
Foreground cor # 80ffff / Graduente Fading Foreground / angle 0 / repeats 1
Preencha a seleção com o gradiente
10 - Selections - Select None.
Layers / Arrange / Bring to top
Effects / Distortion Effects / wave: 0/25/7/90/transparente.
Effects / Image Effects / Seamless Tiling: Mesmos valores usados antes.
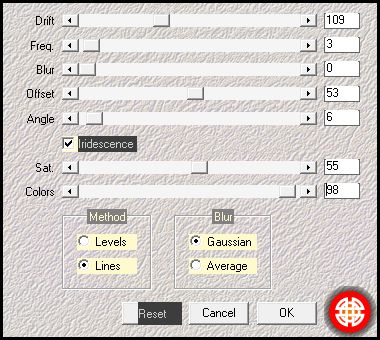
12 - Effects / Plugins / Mehdi / Vibrations 1.1 :
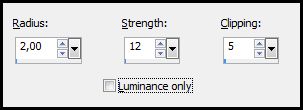
Effects / Plugin / Alien Skin Eye Candy 5 / Impact / Perspective Shadow / Drop Shadow BlurryAdjust / Sharpness / Unsharp Mask: 2.00/12/5.
13 - Ative o tube << estruc_icaro_camerontags.pspimage >>Copie / Cole como nova layer
Arraste para cima:
Effects / Image Effects / Semless Tiling , mesmas configurações de antes.
14 -Layers / Merge / Merge All .
Image / Add Borders / Symmetric Marcado / 2 pixels cor # c52762
Image / Add Borders / Symmetric Marcado / 70 pixels cor # dddddd
Escreva o textoSalve como jpg
© Tutorial Traduzido por Estela Fonseca em 08/07/2009.
Obrigada, Cameron por me permitir traduzir este trabalho.