FOCUS
Tutorial de ©CameronTags , original Aqui.
Material Necessário:
Plugins Utilizados:
Filters Factory Gallery B - J
Eye Candy 6
Nik Color Efex Pro 3
Flaming Pear Flexify 2
1- Abra uma Nova Imagem transparente de 800 / 550 pixelsPreencha com a cor do foreground #ffffff
2- Layers / New Raster LayerPreencha com a cor #00c0c0
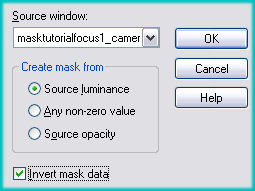
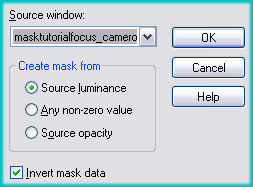
3- Abra a Mask <<masktutorialfocus1_camerontags.png>> MinimizeLayers / New Mask Layer / From Image:
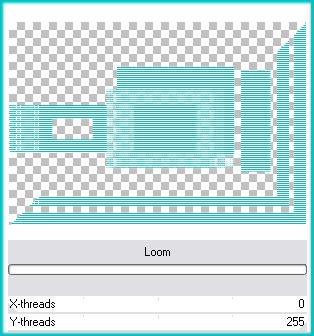
Layers / Merge / Merge Group4- Effects / Plugin / Filters Factory Gallery M / Loom:
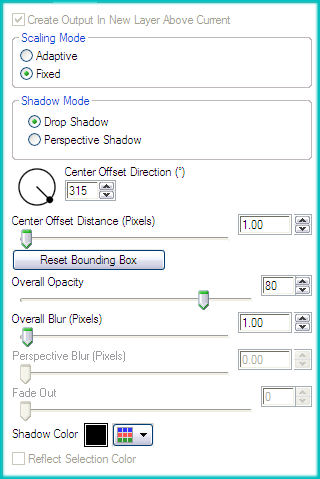
5- Effects / Plugin / Eye Candy 6 / Text_Selection / Perspective Shadow
Drop(Fixed Scaling) / Angled 1 Pixel /Em Basic, valores:
6- Layers / New Raster Layer
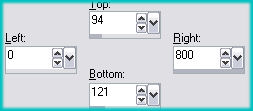
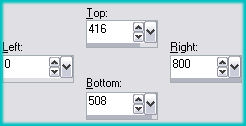
Selection Tool / Custom Selection:
Preencha a seleção com a cor #40ff40Selections / Select None
7- Layers / New Raster Layer
Preencha com a cor #400040
8- Ative a mask << masktutorialfocus_camerontags.png>>MinimizeLayers / New Mask Layer/ From Image:
Layers / Merge / Merge Group
9- Layers / Duplicate
10- Image / FlipImage / Mirror
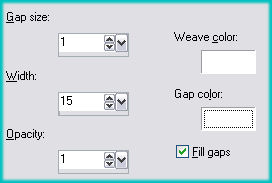
11- Effects / Texture Effects / Weave:
12- Image / Negative Image13- Effects / Plugin /Eye Candy 6 / Text_Selection / Perspective Shadow
Drop (Fixed Scaling)/ Angled 1 Pixel / em Basic, valores:
14- Layers / New Raster Layer
Preencha com a cor #ffffff
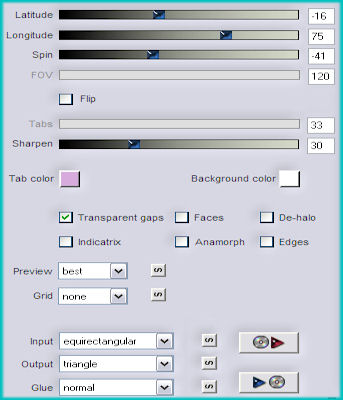
Effects / Plugin / Flaming Pear / Flexify 2 - valores:
15- Layers / DuplicateImage / Resize / 50% ( Resize alll layers desmarcado)
16- Sobre a Layer Original:
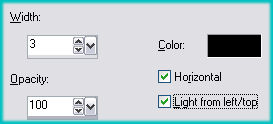
Effects / Texture Effects / Blinds:
Blend Mode / Lighten17- Sobre a copia:
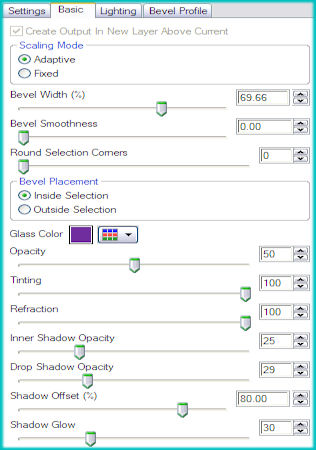
Effects / Plugin / Eye Candy 6 / Text_Selection / Glass / Colored / Ruby, Ring
Em Basic, valores:
18- Ative <<facetutorialfocus_camerontags.pspimage>>
Copie e cole como nova layerEffects / Image Effects / Offset:196/79/custom/transparente
19- Sobre o tube da face:
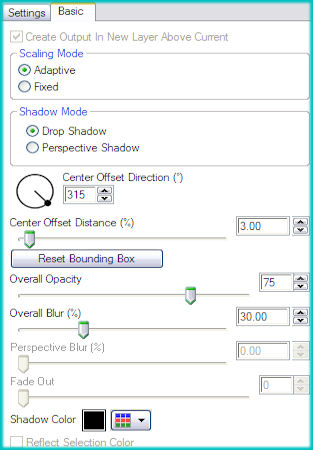
Effects / Plugin / Eye Candy 6 / Text_Selection / Perspective Shadow / Drop Blurry / em Basic, valores:
20- Ative <<botonestutorialfocus_camerontags.pspimage>>
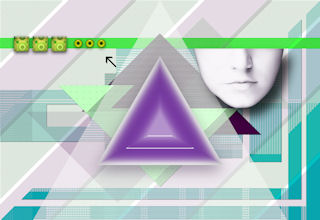
Copie / Cole como nova layerCom a Ferramenta Move Tool coloque do lado esquerdo, como na imagem abaixo
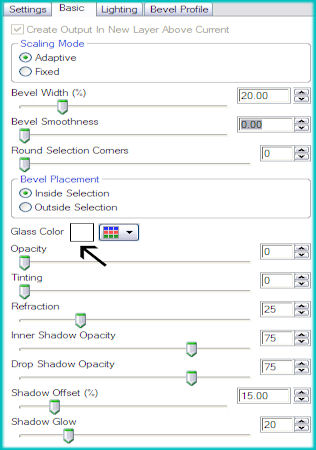
21- Sobre essa layer:Effects / Plugins / Eye Candy 6 / Text_Selection / Glass / Colored / Clear,Low Refraction /
Basic, valores:
22- Ative o <<buttonstutorialfocus_camerontags.pspsimage>>
Copie e cole como nova layerCom a ferramenta mover coloque a esquerda , sobre a barra como mostra a seta:
23- Layers / Merge / Merge All
Layers / Duplicate
Ative a Layer original:
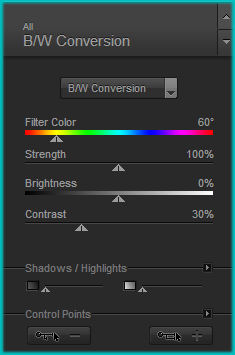
Effects / Plugin / Nik Software / Color Efex Pro 3 / B/W Conversion:
24- Sobre a Cópia:
Selections / Select All
Selections / Modify / Contract / 10 pixels
Selections / Invert
Preencha com a cor #ffffff
Selections / Select None
25- Image / Resize / 90 % ( Resize all layers, desmarcado)
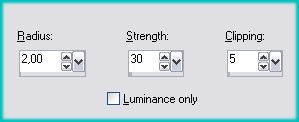
Adjust / Sharpness / Unssharp Mask:
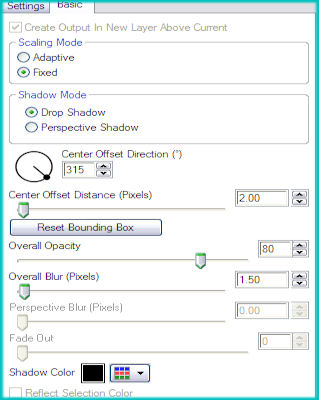
26- Effects / Plugin / Eye Candy 6 / Text_Selection / Perspective Shadow /
Drop (Fixed Scaling) / Angled 2 Pixels / em Basic, valores:
27- Layers / New Raster Layer
Selection Tool / Custom selection:
Preencha a seleção com a cor #ffffffSelections / Select None
28- Effects / Plugin / Filter Factory Gallery J / Drink To Me / Overdose: 15
29- Effects / Plugin / Eye Candy 6 / Text_Selection / Perspective Shadow
Drop (Fixed Scaling) / Angled 1 Pixel / em Basic, valores default
30- Ative <<letrastutorialfocus_camerontags.pspimage>>
Copie e cole como nova layerColoque a esquerda centralizando, como na imagem:
(Nota: no material está disponibilizada essa fonte)31- Layers / New raster layer
Selections / Load save selection / Load selection from disk : seletutorialfocus_camerontags.
32- Preencha a seleção com a cor #ffffffSelections / Select None
33- Effects / Plugin / Filter Factory Gallery B / X-Diffusion - valores: 189/161
Blend Mode / Overlay
34- Ative o tube << decotutorialfocus_camerontags.pspimage>>
Copie e cole como nova layerColoque sobre abaixo e ao centro, veja o exemplo
35- Layers / Merge / Merge All
Image / Add Borders / Symmetric Marcado / 50 pixels cor branca
Image / Add Borders / Symmetric Marcado /1 pixel cor preta #000000
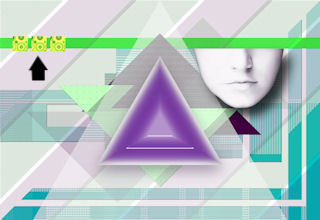
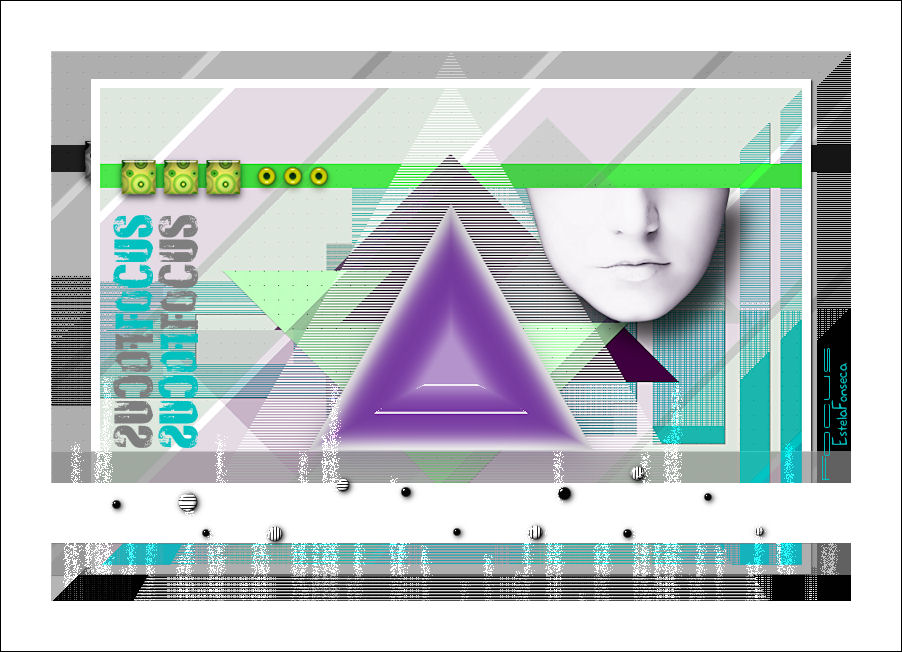
Escreva o TextoSalve como jpg
© Tutorial Traduzido por Estela Fonseca em 20/11/2010.
Obrigada, Cameron por me permitir traduzir este trabalho.