FLOATING MOON
Tutorial de ©CameronTags , original Aqui.
Material Necessário:
Plugins Utilizados:
Redfield Jama 3D
Simple
Factory Gallery B - E
VanDerLee UnPlugged-X
Eye Candy 6
Nik Color Efex Pro 3
Mac's Remove White
» Mac's Remove White Site
Flaming Pear Flexify 2
1- Abra uma nova imagem transparente de 800 x 550 pixelsSelections - Select All
Ative a texturacamerontags floatingmoon.png
Copie / Cole na seleção
Selections - Select None.
2- Layers - Duplicate
3- Sobre a layer original: Effects - Plugin - Simple - Diamonds
4- Sobre a mesma layer: Effects - Plugin - Simple - Pizza Slice Mirror
5- Sobre a mesma layer: Effects - Plugin - Filter Factory Gallery E - Warm Cloth - valores:
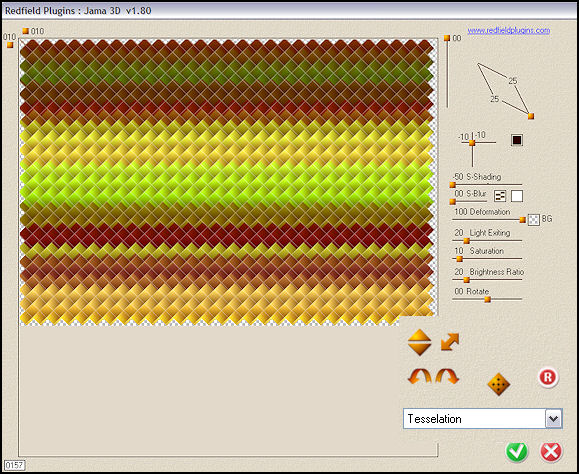
6- Sobre a layer duplicada no passo Nº2:
Effects - Plugin - Redfield - Jama 3D - valores:
7- Sobre a mesma layer:
Effects - Plugin - Simple - Pizza Slice Mirror
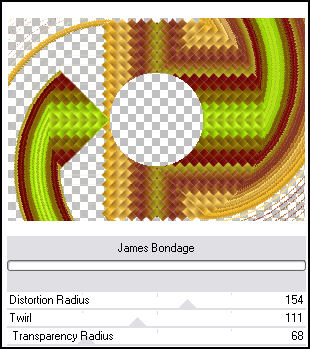
8- Sobre a mesma layer:Effects - Plguin - Factory Gallery B - James Bondage - valores:
9- Sobre a mesma layer:
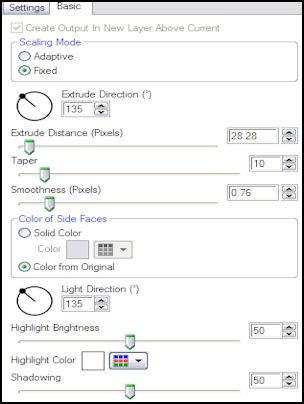
Effects - Plugin - Eye Candy 6 - Text_Selection - Extrude
Settings Tour (Fixed Scaling) Above: Short, Left
Basic, valores:
10- Layers - Merge - Merge All
Image - Add Borders: 70 pixels cor #ffffff - simétrica
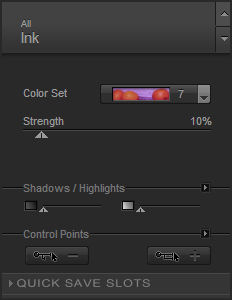
11- Effects - Plugin - Nik Color Efex Pro 3 - Ink
valores:
12- Layers / Duplicate
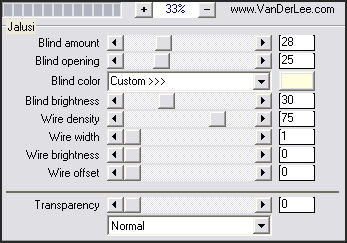
Sobre a layer duplicada: Effects - Plugin - VanDerLee - UnPlugged-X - Jalusi - valores:
13- Sobre a mesma layer:
Effects - Plugin - Mac's - Remove White
14- Sobre a mesma layer: Image - Resize - 80%, All layers, desmarcado
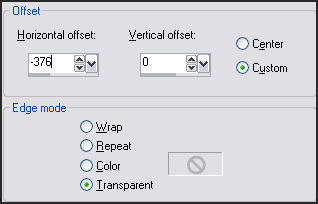
15- Sobre a mesma layer: Effects - Image Effects - Offset - Valores:
16- Layers - Merge - Merge All
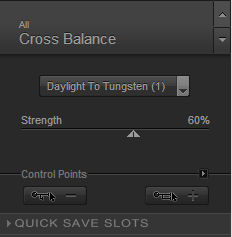
Effects - Plugin - Nik Color Efex Pro 3
Cross Balance - valores:
17- Layers - New Raster Layer
Preencha com a cor #c0b484
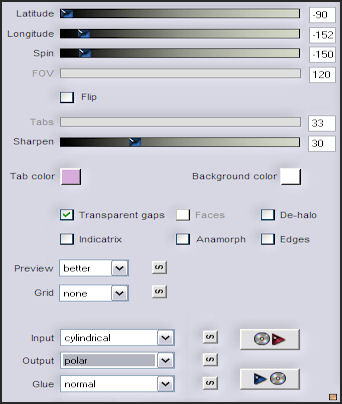
Effects - Plugin - Flaming Pear - Flexify 2 - valores:
18- Sobre a mesma layer:
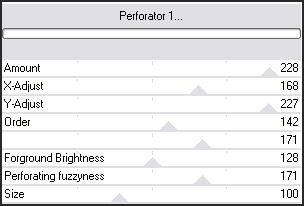
Effects - Plugin - Filters Factory Gallery E - Perforator - valores:
Blend Mode - Liminance Legacy
19- layers - New Raster layer
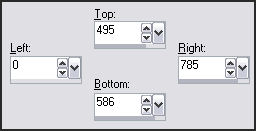
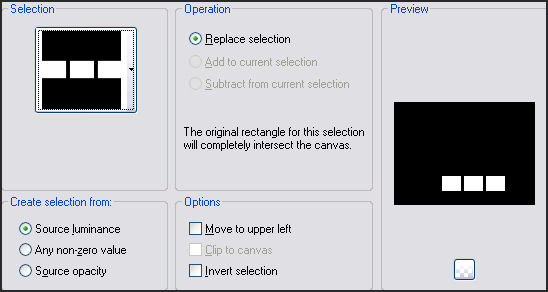
Ferramenta Selection Tool / Custom Selection:
Preencha a seleção com a cor #ffffff
Selections - Select None
20- Layers - Duplicate
21- Sobre a layer duplicada:
Image - Mirror
Image - Flip
Layers, Merge, Merge Down.
22- Sobre esta layer:
Effects - Plugin - Filter Factory Gallery J - Drink To Me - valores: 15
23- Sobre a mesma layer:
Effects - Plugin - Eye Candy 6 - Text_Selection - Perspective Shadow
Drop (Fixed Scaling) - Angled 1 Pixel
Basic, valores: default
24- Sobre a mesma layer:
Effects - Edge Effects - Enhance
25- Layers - New Raster layer
Selections - Load save selection - Load selection from disk
seletutorialfloating_camerontags.PspSelection
Preencha a seleção com a cor #ffffff
Selections - Select None
26- Com a Varinha mágica clique no quadro Nº1 (començando pela esquerda)
Abra lunatutorialfloating_camerontags.png
Copie / Cole na Seleção
Selections / Select None
27- Com a Varinha mágica clique no quadro Nº2
Abra lunatutorialfloating_camerontags.png
Copie / Cole na Seleção
Selections / Select None
28- Com a Varinha mágica clique no quadro Nº3
Abra lunatutorialfloating_camerontags.png
Copie / Cole na Seleção
Selections / Select None
29- Sobre a mesma layer: Effects , Plugin, Eye Candy 6 - Text_Selection
Perspective Shadow - Drop (Fixed Scaling) - Angled 1 Pixel -
Basic, valores:
Mude apenas a cor de shadow color para #400000
30- Ative cuadrotutorial_camerontags.png
Copie e cole como nova layer
Effects / Image Effects / Offset: -233/15/custom/transparente
31- Layers / Duplicate
Effects / Image Effects / Offset: 372/0/custom / transparente
Blend Mode / Multiply
32- Sobre a layer original de cuadrotutorial: Effects, plugin, Eye Candy 6 - Text_Selection
Perspective Shadow - Drop (Fixed Scaling) - Angled 1 Pixel
Basic, valores: os mesmos que usamos no passo anterior
33- Ative o tube decotutorialfloating_camerontags.pspimage
Copie e cole como nova layer
Effects, Image Effects, Offset: -391/7/custom/transparente
34- Abra a fonte Yankee Ghosts e minimize
Ferramenta de Texto - valores:
35- Na Paleta de Cores coloque o foreground e no background a cor preta
Escreva "Floating Moon"
Promote selection to layer
Selections, Select none
36- Sobre a layer das letras: Image - Rotate free 90º left
Arraste para a direita e para baixo veja o exemplo
37- Layers, merge, merge all
Adicione uma borda de 1 pixel cor #000000
Salve como jpg
VOLTAR© Tutorial Traduzido por Estela Fonseca em 03/02/2011.
Obrigada, Cameron por me permitir traduzir este trabalho.