AVALONN
Tutorial de ©CameronTags , original Aqui. / Obrigada Cameron , por sua autorização.
Material Necessário:
Tube © MDZ
Plugins Utilizados:
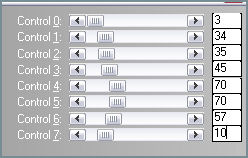
Eye Candy 5 ImpactAndromeda Perspective
Plugin Xero
L & K's e Pia Zitah
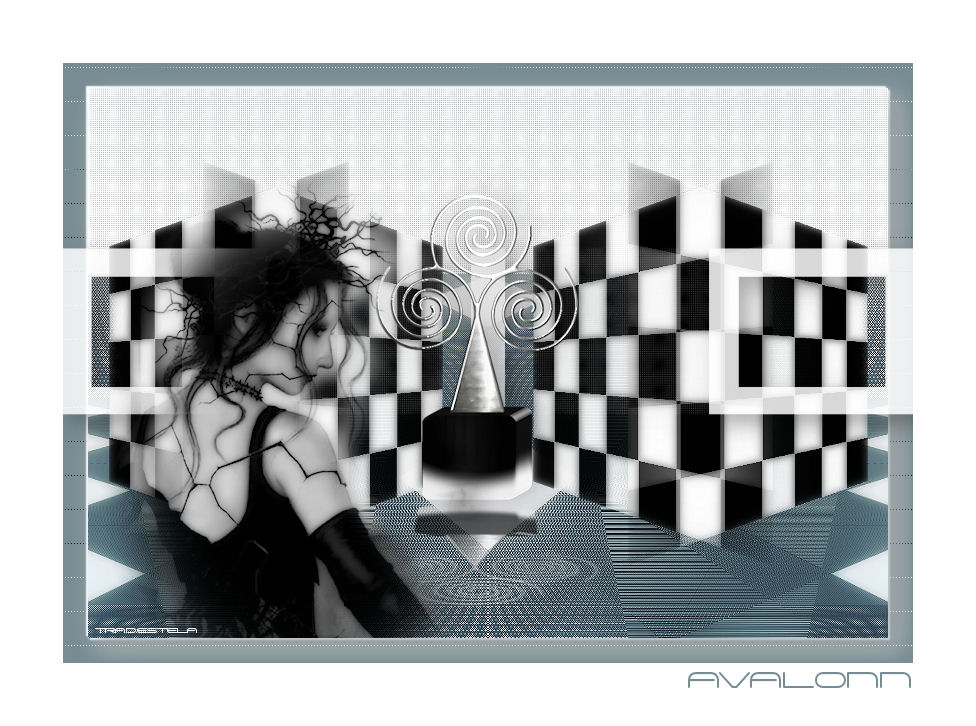
1 - Abra uma nova imagem transparente de 850/600 pixelsPreencha com a cor #778c93
Effects / Plugin / L & K's / Zitah:
2 - Ative <<fondoavalonn_camerontags.jpg>>Copie e Cole como nova layer
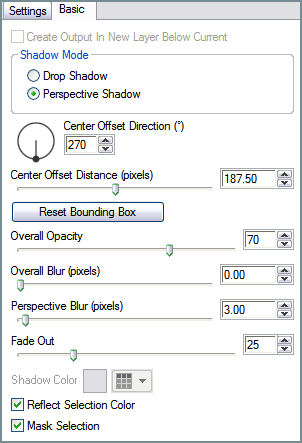
Effects / Plugin / Alien Skin Eye Candy 5 / Impact / Perspective Shadow / Drop Shadow Blurry
Basic: Overall Opacity 40 / Overall Blur 28,68 / Shadow cor # 000000.
3 - Layers / New raster layerPreencha com a cor # ffffff
Effects / Plugin / L & K / Pia / valor: 122
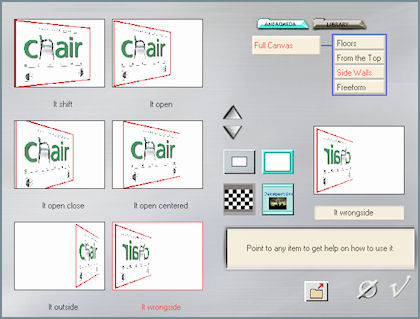
Effects / Plugin / Andromeda Perspective / Preset selecione / Side Walls / It wrongside:
4 - Layers / Duplicate
Image / Mirror
Layers / Merge / Merge Down
Image / Resize / 70% (Resize all layers desmarcado)
Effects / Plugin / Xero / Porcelain: 50/128/128/0/0/0.
5 - No "Muro":
Effects / Image Effects / Seamless Tiling / Corner / Horizontal / 0 / 64.
Effects / Plugin / Xero / Porcelain: 50/128/128/0/0/0.
Adjust /Sharpness / Sharpen.
6 - Layers /New raster layerPreencha com a cor # ffffff
Ative a <<maskcameronF100>> Minimize
Layers / New Mask layer / From Image: Invert Mask desmarcado
Layers / Merge / Merge Group.
Effects / Plugin / Alien Skin Eye Candy 5 / Impact / Perspective Shadow / Drop Shadow Blurry.
(mesmos valores passo 2)
Opacidade / 85%.
7 - Ative o tube <<arbolavalonn_camerontags.pspimage>>
Copie e Cole como nova layer
Posicione no centro do trabalho
Effects / Plugin /Alien Skin Eye Candy 5 / Impact / Perspective Shadow / Reflect in Front - Sharp.
Basic :
8 - Ative o tube da pessoa
Copie e Cole como Nova Layer
Image / Photo Effects / Black and White Film
Effects / Plugin / Xero / Porcelain (mesmos valores do passo n°4)Posicione na parte inferior esquerda do trabalho.
Image / Add Borders / Symmetric Marcado / 63 pixels cor # ffffff
Escreva o texto
Salve como jpg.
VOLTAR
© Tutorial Traduzido por Estela Fonseca em 17/07/2009.
Obrigada, Cameron por me permitir traduzir este trabalho.