ALUMINE
Tutorial de ©CameronTags , original Aqui.
Material Necessário:
Plugins Utilizados:
» Andrew's Filters 11 - 27 - 39 (Official Site)» Filter Factory Gallery A - G
» Filtro FM File Tools Blend Emboss
» Programa Corel PaintShop Photo Pro
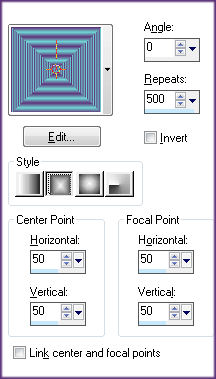
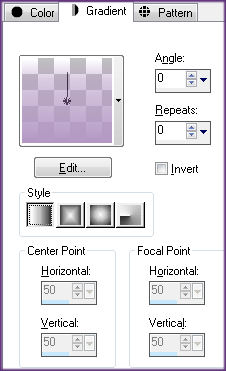
1- Abra uma nova imagem transparente de 800 x 550 pixelsPreencha com o Gradiente Fore/background color estilo Rectangular , formado das cores
#70d8d6 e #5f337a - Angle 0 - Repeats 500
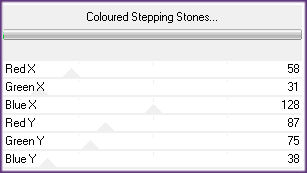
2- Effects / Plugins / Andrew's Filters 11 / Coloured Stepping Stones / valores Default:
3- Effects / Plugins / Andrew's Filters 11 / Coloured Stepping Stones / valores:
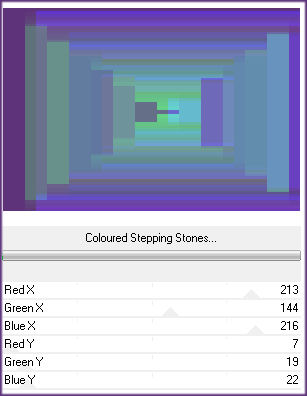
4- Effects / Plugins / Filter Factory Gallery A / Weave - valores:
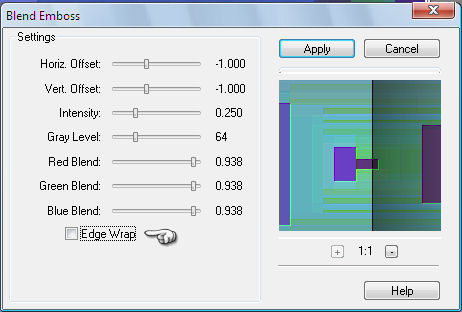
5- Effects / Plugins / FM Tile Tools / Blend Emboss - valores:
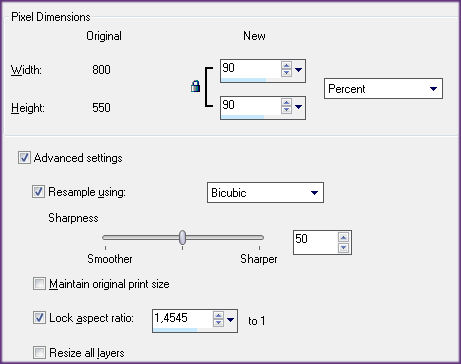
6- Layers / DuplicateNa layer da cópia: Image / Resize / 60% (All layers, desmarcado)
7- Sobre a mesma layer: Effects / Plugins / Eye Candy 6 Text_Selection / Perspective Shadow
Drop Blurry / Em Basic, valores que abrir.
8- Layers / Merge / Merge All
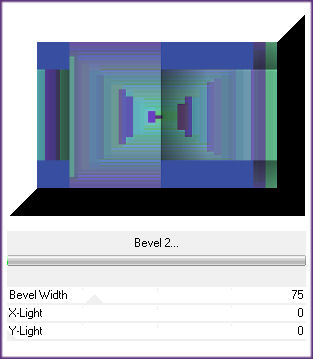
Effects / Plugins / Filter Factory Gallery G / Bevel 2 - valores:
9- Effects / Plugins / Nik Color Efex Pro 3 / Bleach Bypass - valores:
10- Layers / New raster layer
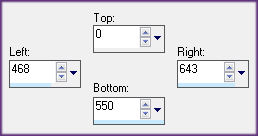
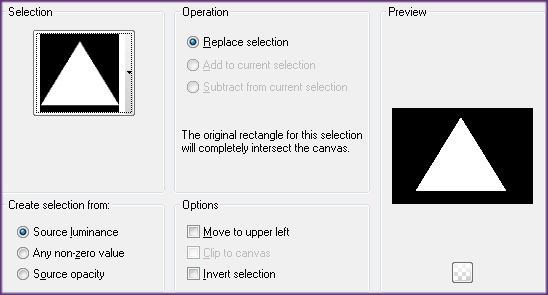
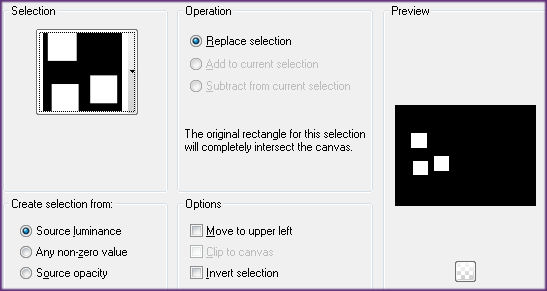
Ative a Ferramenta Selection Tool (S) / Custom Selection:
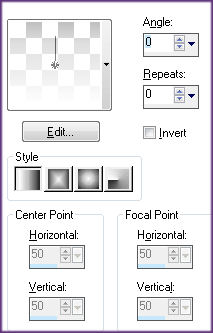
Preencha a seleção com o Gradiente Fading Foreground Estilo LinearAngle e Repeats 0 / Cor do foreground #b398c4
11- Na seleção: Effects / Plugins / Simple / Pizza Slice MirrorSelections / Select None
12- Na mesma layer: Effects / Plugins / Simple / Half Wrap
Image / Mirror
13- Na mesma layer: Effects / Edge Effects / Enhance
14- Layers / New Raster layer
Preencha com o Gradiente Fading Foreground formado pela cor#ffffff no foreground
Estilo Linear - Angle e Repeats 0
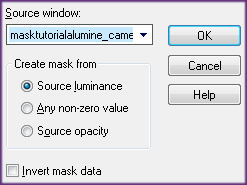
15- Ative a <<masktutorialalumine_camerontags.pspimage>>
Layers / New Mask layer from image:
Layers / Merge / Merge Group
Na paleta das layers: baixe a opacidade da layer para 83%
Adjust / Sharpness / Sharpen
16- Layers / New Raster Layer
Selections / Load save select / Load select from disk: selealumine
17- Na seleção: Preencha a seleção com o gradiente Fading Foreground formado pela cor #4e95c0
No foreground / Estilo Linear angle e Repeats 0 / Invert marcado
Selections / Select None
18- Na mesma layer: Effects / Plugins / Andrew's Filters 27 / SearchLights / valores:
19- Na mesma layer: Effects / Plugins / Eye Candy 6 Text_Selection - Perspective Shadow
Drop Blurry / Em Basic, valores default.
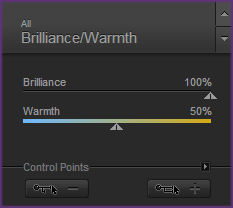
20- Na mesma layer: Effects / Plugins / Nik Color Efex Pro 3 / Brilliance/Warmth - valores:
21- Ative o tube <<arboltutorialalumine_camerontags.pspimage>>Copie / Cole como nova layer
Effects / Image Effects / Offset: -214/-45/ Custom / Transparente
22- Ative o tube <<facetutorialalumine_camerontags.pspimage>>
Copie / Cole como nova layer
Effects / Image Effects / Offset: 128 / - 42 / Custom / Transparente
Layers / Merge / Merge All
23- Image / Add Borders / Simétricas de 50 pixels cor #ffffff
24- Selections / Load save selection / Load selection from disk: alumineb_camerontags.PspSelection
25- Na seleção: Editar / Copiar
Cole como nova layer
Selections / Select None
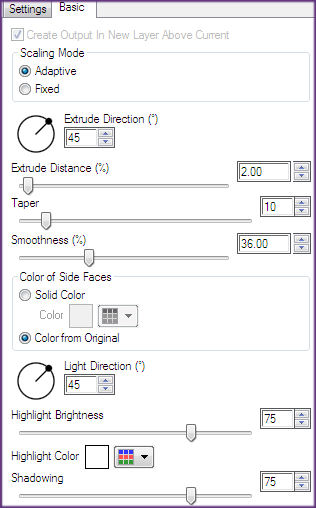
26- Sobre a mesma layer: Effects / Plugins / Eye Candy 6 Text_ Selection / Extrude
Em Basic, valores:
27- Sobre essa mesma layer: Image / Resize / 70% ( all layers desmarcado)
Adjust / One Step / Photo Fix
28- Sobre a mesma layer: Effects / Image Effects / Offset: 278 / - 201 / Custom / Transparente
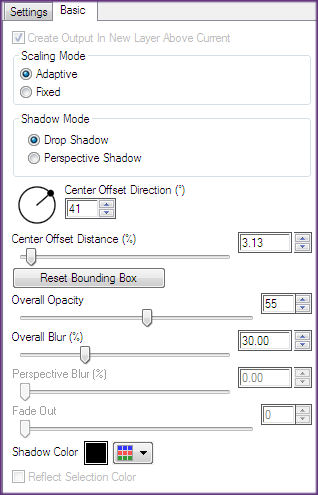
29- Sobre a mesma layer: Effects / Plugins / Eye Candy 6 Text_Selection / Perspective Shadow
Drop Blurry / Em Basic, valores:
30- Ative o tube <<hierbatutorialalumine_camerontags.pspimage>>
Copie / Cole como nova layer
Effects / Image Effects / Offset:-129/-191/ Custom / Transparente
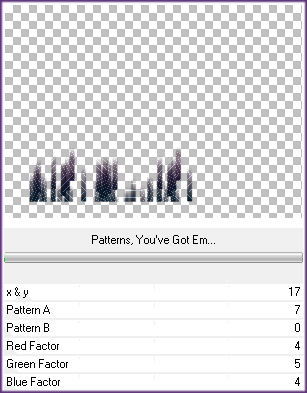
31- Sobre a mesma layer: Effects / Plugins / Andrew's Filters 39 / Patterns, You've Got Em valores:
Adjust / Sharpness / Sharpen
32- Layers / Merge / Merge All
Image Add borders / Symmetric Marcado / de 1 pixel cor #202020
Assine, merge all e salve como jpg ou png.
© Tutorial Traduzido por Estela Fonseca em 07/08/2011.
Obrigada, Caroline por me permitir traduzir este trabalho.