ALIZARIN
Tutorial de ©CameronTags , original Aqui.
Material Necessário:
Plugins Utilizados:
» Andrew's Filters 15 - 39 Sitio Oficial
» Programa Corel PaintShop Photo Pro
CT Plugins & Filters
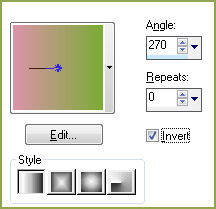
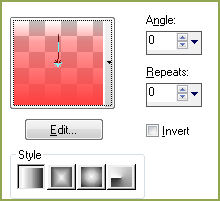
1- Abra uma nova imagem Transparente de 800 / 550 pixelsPreencha com o gradiente formado das cores #db94a9 e #7baa36
Estilo Linear Angle 270° / Repeats 0 / Invert Marcado
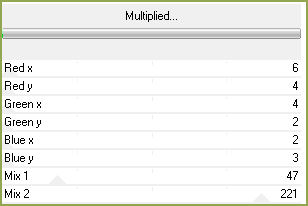
2- Effects / Plugin / Andrew's Filters 15 / Multiplied:
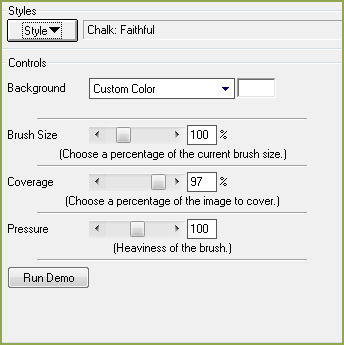
3- Effects / Plugin / Impressionist:
4- Layers / New Raster Layer
Preencha com a cor #ffffff
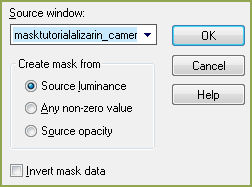
Abra a máscara masktutorialalizarin_camerontags.png / Minimize
Layers / New mask layer /From imagem:
Layers / Merge / Merge Group
5- Sobre a layer da Mask:
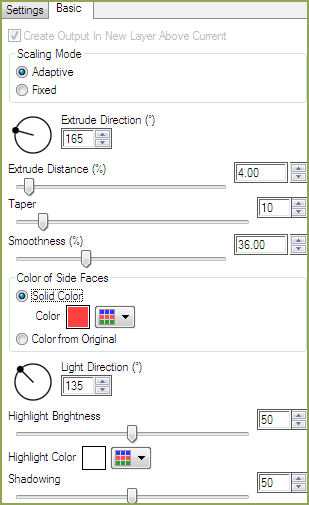
Effects / Plugin / Alien Skin Eye Candy 6 / Text_Selection / Extrude / Above Short, Left / Em Basic:
Cor #ff4040
6- Sobre a mesma layer:
Effects / Plugin / Eye Candy 6 Text_Selection / Perspective Shadow
Drop - Height 0em Basic, valores default
Blend Mode / Overlay
7- Ative <<ventanatutorialalizarin_camerontags.pspimage>>
Copie e cole como nova layer
8- Nessa layer:
Effects / Image Effects / Offset: 44 / 62 / Custom e transparente , marcados.
9- Ainda nessa layer:
Ative a varinha mágica e clique sobre a <<ventanatutorialalizarin>> (para selecioná-la)
10- Na seleção:
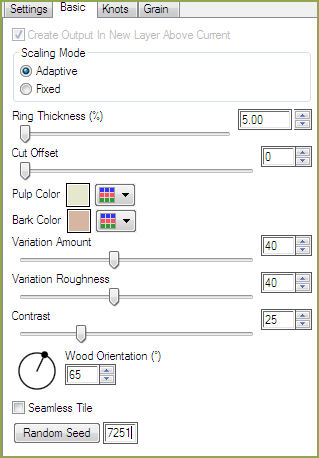
Effects / Plugin / Eye Candy 6 Textures / Wood / Natural / Holly
Em Basic, valores:
Selections / Select None
11- Sobre a mesma layer:
Effects / Plugin / Alien Skin Eye Candy 6 Text_Selection / Perspective Shadow Drop - Height 0
Em Basic:
12- Layers / New Raster layer
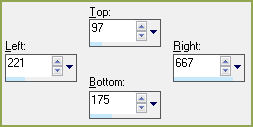
Ative a Ferramenta Selection Tool (S) , clique em Custom Selection e configure:
13- Coloque no foreground a cor #ff4040 / Busque o gradiente Fading ForegroundEstilo Linear / Angle e Repeats 0
Preencha a seleção
14- Na seleção:
Effects / Plugin / Andrew's Filters 39 / Patterns Anonymous : 4 / 12 / 1 / 1 / 3 / 2
Selections / Select None
15- Sobre a mesma layer:
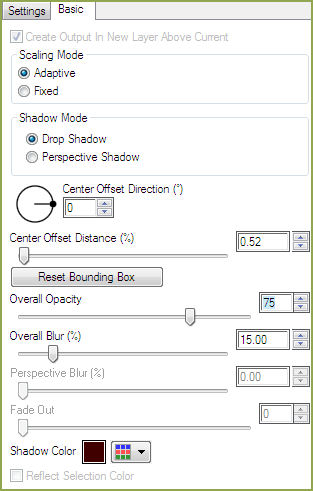
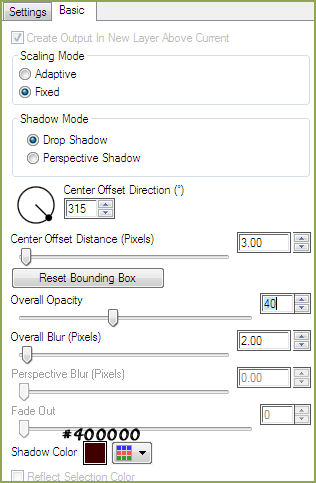
Effects / Plugin / Eye Candy 6 Text_Selection / Perspective Shadow
Drop (Fixed Scaling) Angled 3 PixelsBasic, valores:
16- Abra <<macetastutorialalizarin_camerontags.pspimage>>
Copie / Cole como nova layer
Effects / Image Effects / Offset: 32/-31/ Custom e Transparente marcados
17- Sobre a mesma layer:
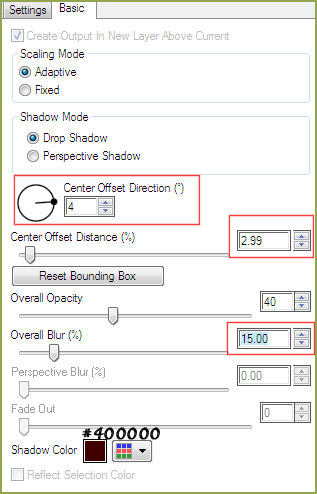
Effects / Plugin / Eye Candy 6 Text_Selection / Perspective Shadow
Drop - BlurryBasic, valores:
18- Abra <<gatotutorialalizarin_camerontags.pspimage>>
Copie e cole como nova layer
Effects / Image Effects / Offset: 204/-86/ Custom e Transparente marcados
19- Sobre a mesma layer:
Effects / Plugin /Eye Candy 6 Text_Selection / Perspective Shadow
Drop - Blurry -Basic, valores:
20- Abra <<cercatutorialalizarin_camerontags.pspimage>>
Copie e Cole como nova layer
Effects / Image Effects / Offset: -122/ -207/ Custom e transparente marcados
21- Abra <<molinetetutorialalizarin_camerontags.pspimage>>
Copie e cole como nova layer
Effects / Image Effects / Offset: -286/ -172 / Custom e transparente marcados
22- Ative novamente molinetetutorialalizarin_camerontags.pspimage
Copie e cole como nova layer
Effects / Image Effects / Offset: -212/ -129 / Custom e transparente marcados
23- Abra <<hierbatutorialalizarin_camerontags.pspimage>>
Copie e cole como nova layer
Effects / Image Effects / Offset: 0/ -240 / Custom e transparente marcados
24- Layers / Merge / Merge all
Image / Add Borders / Simétricas / 50 pixels cor #ffffff
25- Selections / Select All
Selections / Modify / Contract 50 pixels
Selections / Invert
26- Na seleção:
Effects / Plugin / Unlimited 2 / Special Effects 1 / Aged Film - valores: 21 / 36 / 175
Selections / Select None
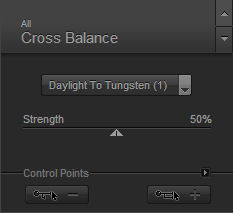
27- Effects / Plugin / Nik Color Efex Pro 3 / Cross Balance - valores:
Assine
Layers /Merge / Merge all
Salve como jpg ou png.
© Tutorial Traduzido por Estela Fonseca em 10/09/2011.
Obrigada, Caroline por me permitir traduzir este trabalho.