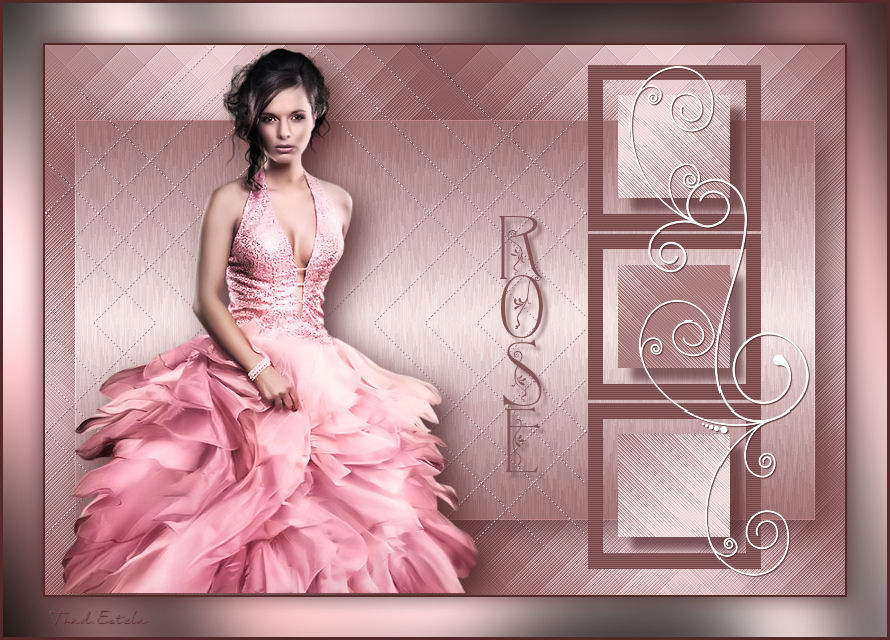
ROSE
Tutorial de Violette Graphic , original, Aqui. Traduzido com a permissão da autora.
.jpg)
Tutorial realizado no PSP XII mas pode ser feito em outras versões do PSP
Materiais Necessários:
Plugins Utilizados:Funhouse
Presets Funhouse / coloque na pasta do Unlimited
** Graphic Plus
Pentacom Plus
Alien Skin Eye Candy Impact 5
***"Vyp_selectionrose.pspimage"
Tube s aua escolha, aqi usei um tube de Ann e na segunda versão um tube de Tocha.Fonte Tendril
Os tube são oferecidos para uso pessoalPor favor não os repasse sem permissão dos seus autores.
***
1 -Abra o tube duplique e feche o original2 - Foreground cor #fbebec e background cor #9f6f70
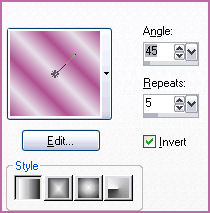
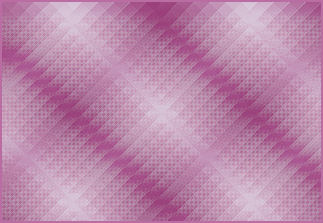
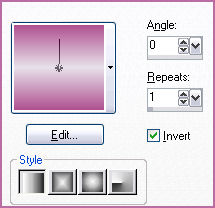
3 - Configure um Gradiente estilo linear/angle: 45/ Repeats: 5/ Invert marcado
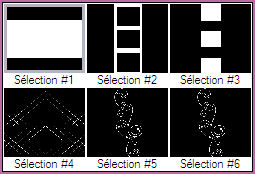
4 - Abra "selectionrose.pspimage"
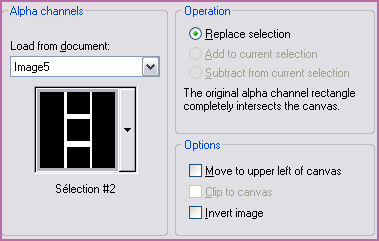
Selections / load save selection / load selection from alpha channelDuplique e minimize
5 - Preencha com o gradiente
Adjust/Blur/Gaussian Blur : 20
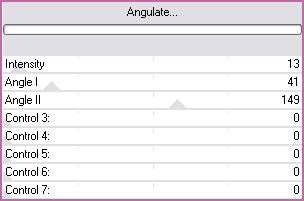
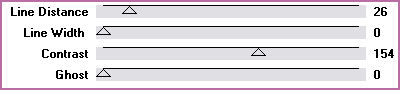
6 - Effects/Plugin Funhouse/Angulate :
Effects / Edge Effects / Enhance
7 - Layers / Duplicate
Image/Mirror
Blend Mode : Multiply
Opacidade : 50%
8 - Layers/New Layer
Selections / load save selection / load selection from alpha channel / selection #1
Preencha com o gradiente : estilo linear/angle: 45/ Repeats: 1/ Invert marcado
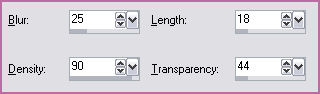
9 - Effects/Texture Effects/Fur :
Selections / Select/None
Adjust/Sharpeness/Sharpen10 - Effects/Plugin / Alien Skin Eye Candy Impact /Perspective Shadow /Drop Shadow,Blurry
preset "Vyp_shadow_rose.f1s" /OK
guia basic : cor #53292a11 - Layers/New Layer
Selections / load save selection / load selection from alpha channel / selection #2
Preencha a seleção com a cor #53292a
12 - Effects/Plugin / Pentacom/VTR2 :
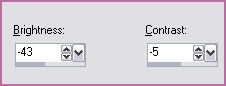
13 - Adjust/Brightness and Contrast /Brightness and Contrast:
Selections /Select/None
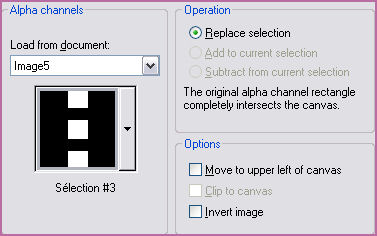
14 - Layers/New Layer
Selections / load save selection / load selection from alpha channel / selection #3
Ative a layer - raster 2 ( copy of raster 1)
Selection/ promote selection to layer
Layers/arange/bring to top
Select/None15 - Na layer do topo
Layers, merge, merge down.
16 - Effects/Plugin / Alien Skin Eye Candy Impact /Perspective Shadow /Drop Shadow,hight
preset "Vyp_shadow_rose.f2s" /OK
Em basic : cor #53292a17 - Layers/New Layer
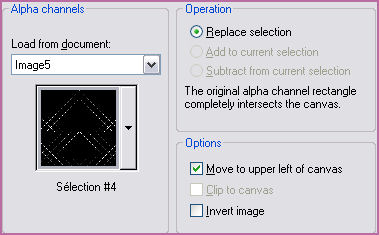
Selections / load save selection / load selection from alpha channel / selection #4
Preencha a seleção com a cor #fbebec
Select/None18 - Effects/3D Effects/Drops Shadow : 1/1/60/1/cor #53292a
19 - Layers/New Layer
Selections / load save selection / load selection from alpha channel / selection #5
Preencha com a cor #ffffff
Select/None20 - Repita a mesma sombra
21 - Layers /Duplicate
22 - Ative o tube
Copie e cole como nova layer
Image/Resize 95 %/ all layers, desmarcado
Adjust/Sharpen/SharpenRepita
23 - Effects/Image Effects/Offset: -175 / 0 / custom / transparente
24 - Effects/Alien Skin Eye Candy Impact /Perspective Shadow /Drop Shadow,hight
preset "Vyp_shadow_rose.f3s" /OK
Em basic : cor #53292a25 - Image/Add borders : 2 pixels cor #53292a
26 - Image/Add borders : 40 pixels color #ffffff
Selecione a borda com a varinha mágicaPreencha com o gradiente do fill with gradient linear angle: 45°/repeat: 1/invers checked
foreground cor #fbebec/background cor #cea97d27 - Effects/Plugin / Graphic Plus/Cross shadow / Deafult
28 - Select/Invers
29 - Effects/3D Effects/Drops Shadow : 5/5/50/25/cor #53292a
Effects/3D Effects/Drops Shadow : -5 em offset vertical e horizontal
Select/None
30 - Image/ Add borders : 3 pixels cor #53292a31 - Ative a Ferramenta de texto /Fonte Tendril/Tamanho 60 ou 70/negrito / Vector / direção vertical
Background on color: #53292a
Type: ROSE
Layer /Convert to rasterlayer
Give a dropshadow : 5/5/50/5/color #53292a
33 - Type your name
34 - Layers / Merge
VOLTAR©Tutorial traduzido por Estela Fonseca em 19/08/2010.
Não alterar nem repassar sem autorização.