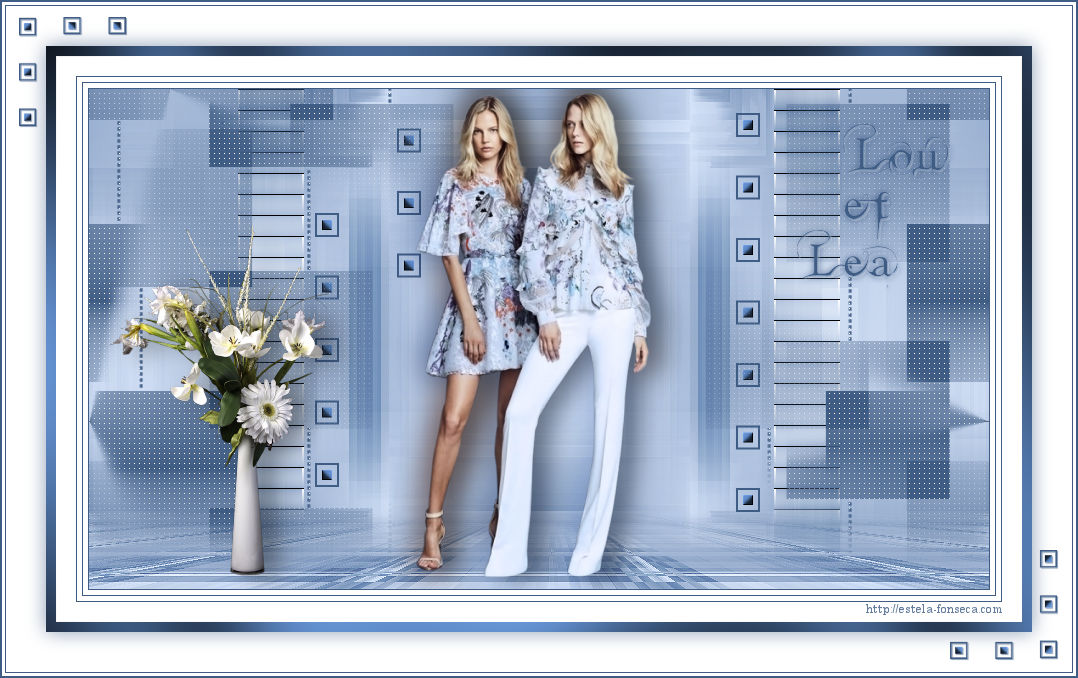
.jpg)
Tutorial realizado no Corel PaintShop Pro X9, mas pode ser feito em outras versões do PSP
Materiais Necessários:
Tube de Colybrix e Linda.
Mask de Narah_Mask_1123.jpg , AQUI
Seleções em canal alfa <<Sélection Vyp_Alpha_Lou_et_Lea.PspImage>>
Demais materiais de @Violette
Você não tem permissão para colocar esses tubes em outro site sem a permissão do criador.
Plugins Utilizados:
&< BKG Designers sf10 II > Hinzeberg's Mirror 02
Mura's Meister / Perspective Tiling
Medhi / Sorting Tiles
Unlimited 2 / Tile & Mirror / Quadrant Mirror
Toadies / Weaver
Alien Skin Eye Candy 5 Impact
Graphic Plus / Cross Shadow
Preparação:
Abra o tube no PSP, duplique e feche o original.
Abra a Mask no PSP e Minimize.
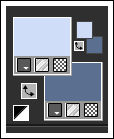
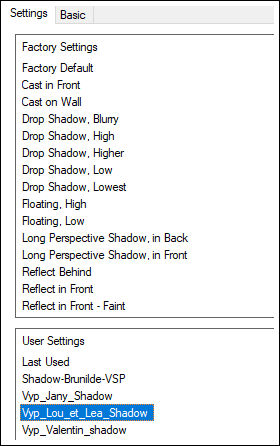
Dê dois cliques no preset <<Vyp_Lou_et_Lea_Shadow>>
Cores:
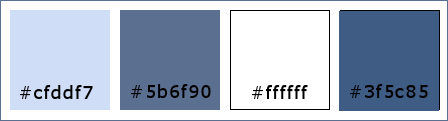
1- Primeiro Plano cor #cfddf7 e Segundo Plano cor #5b6f90
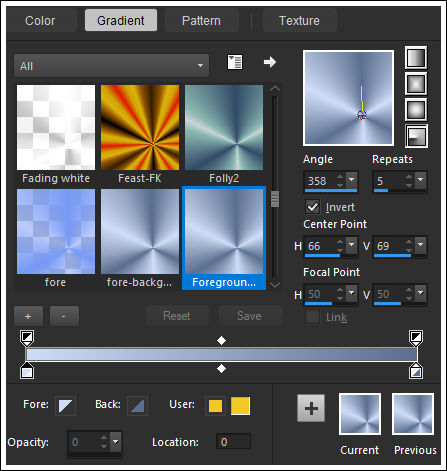
2- Gradiente <<Radial>> Configurado como segue:
3- Abra o arquivo <<Vyp_Alpha_Lou_et_Lea.pspimage>>
Window / Duplicate
Feche e continue na cópia!
Preencha com o Gradiente
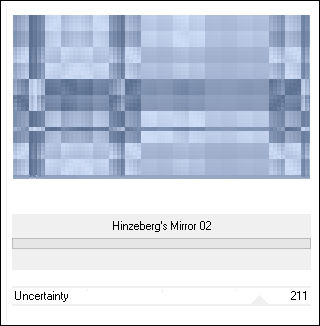
4 - Effects / Plugins / <I.C.NET Software> Filters Unlimited 2 / &< BKG Designers sf10 II > Hinzeberg's Mirror 02
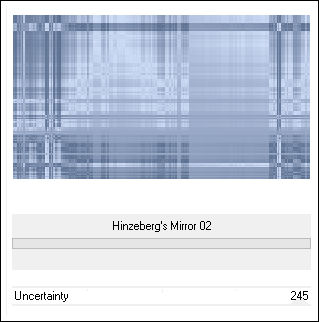
Effects / Plugins / <I.C.NET Software> Filters Unlimited 2 /&< BKG Designers sf10 II > Hinzeberg's Mirror 02
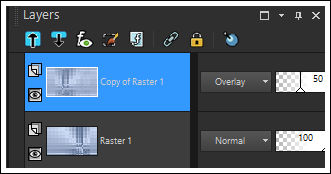
5 - Layers / Duplicate
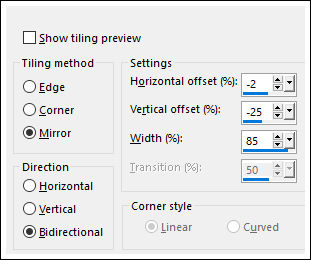
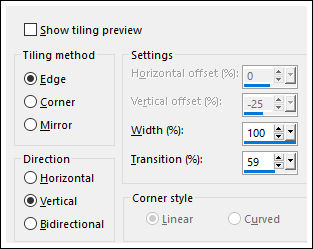
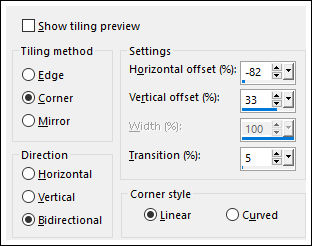
Effects / Image Effects / Seamless Tiling
Image / Mirror / Mirror Horizontal
Opacidade / 50%
Blend Mode / Overlay
Effects / Edge Effects / Enhance
Layers / Merge / Merge Down
6 - Layers / Duplicate
Effects / Plugins / Mura's Meister / Perspective Tiling:
Ative a Varinha Mágica e selecione a parte transparente
( Para facilitar feche a layer 1 )
Selections / Modify / Feather: 40Delete no Teclado 3 à 4 vezes
Selections / Select None
Adjust / Sharpness / Sharpen
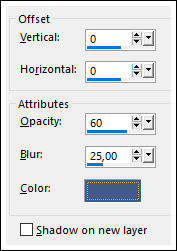
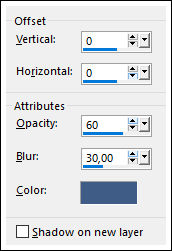
Effects / 3D Effects / Drop Shadow: 0/0/60/25/cor #3f5c85
7 - Ative a Layer <<Raster 1>>
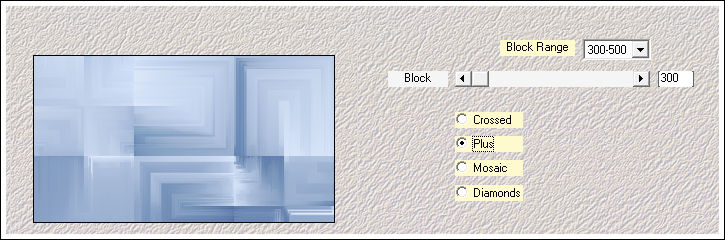
Effects / Plugins / Medhi / Sorting Tiles:
8 - Layers / Duplicate
Image / Mirror / Mirror Horizontal
Effects / Image Effects / Seamless Tiling
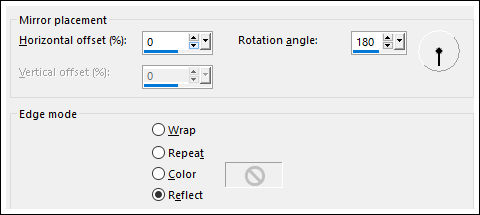
Effects / Reflection Effects / Rotating Mirror
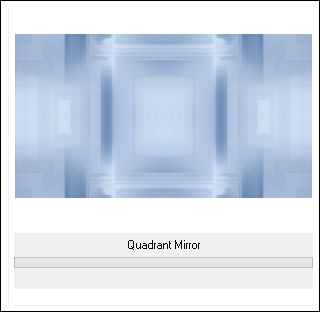
Effects / Plugins / <I.C.NET Software> Filters Unlimited 2/ Tile & Mirror/Quadrant Mirror
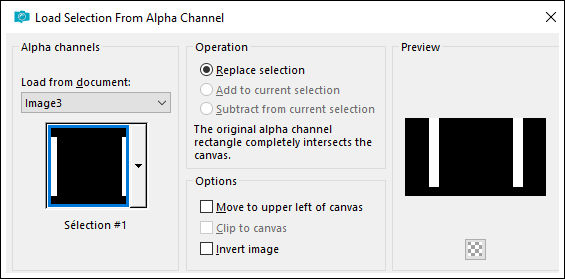
9 - Selections / Load save selection / Load selection from alpha channel: Vyp_Lou_et_Lea01.PspSelection
Selections / Promote selection to layer
Layers / New Raster layer
Preencha com a cor #ffffff
Selections / Modify / Contract 2 pixels
Delete no TecladoSelections / Select None
Layers / Merge / Merge Down
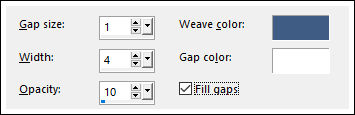
Effects / Plugins / Toadies / Weaver
10 - Layers / New Raster Layer
Preencha com a cor #3f5c85
Ative a Mask <<Narah_Mask_1123.jpg>>
Image / Flip / Flip HorizontalMinimize a mask
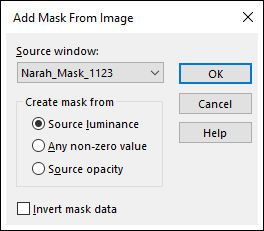
Layers / New Mask Layer / From Image: Narah_Mask_1123.jpg
Layers / Merge / Merge Group
Effects / Image Effects / Seamless Tiling
Effects / Texture Effects / Weave
11 - Ative o tube << Vyp_Lou_et_Lea_deco01.pspimage>> Copie e Cole como nova layer
Pick Tool (K) Posição X ( 226) Posição Y ( 24) Tecla "A" para sair da Pick Tool
Layers / Arrange / Move Down ( 2 Vezes)12 - Ative a Layer do Topo
Ative o tube <<femme417-coly.psd>> Remova o "copyright"
Copie e Cole como nova layerImage / Resize / 75... Resize all layers ... Desmarcado
Image / Resize / 85% ... Resize All Layers ... Desmarcado
Adjust / Sharpness / Sharpen
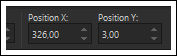
Pick Tool (K) Posição X ( 326) Posição Y ( 3) Tecla "A" para sair da Pick Tool
Layers / DuplicateAtive a Layer <<Raster 3>>
Adjust / Blur / Gaussian Blur / Radius 15
Blend Mode / Multiply
Ative a Layer do topo
Effects / Plugins / Alien Skin Eye Candy 5 /Impact / Perspective Shadow / preset <<Vyp_Lou_et_Lea_Shadow.f1s>>
13- Ative o tube <<LF-FlowersVase-21052013.psd>> Copie e Cole como nova layer
Image / Resize / 50%... Resize All Layers ... Desmarcado
Adjust / Sharpness / Sharpen
Posicione como no modelo
Effects / Plugins / Alien Skin Eye Candy 5 /Impact / Perspective Shadow / preset <<Vyp_Lou_et_Lea_Shadow.f1s>>
14- Ative o tube << Vyp_Lou_et_Lea_texte.pspimage>> Copie e Cole como nova layer
Posicione como no modelo
15 - Image / Add Borders / Symmetric Marcado / 1 pixel cor #3f5c85
Image / Add Borders / Symmetric Marcado / 5 pixels cor #ffffff
Image / Add Borders / Symmetric Marcado / 1 pixel cor #3f5c85
Image / Add Borders / Symmetric Marcado / 5 pixels cor #ffffff
Image / Add Borders / Symmetric Marcado / 1 pixel cor #3f5c85Image / Add Borders / Symmetric Marcado / 20 pixels cor #ffffff
Image / Add Borders / Symmetric Marcado / 10 pixels cor #3f5c85
Ative a Varinha mágica (Feather e Tolerance 0) e selecione esta bordaEffects / Plugins / Graphic Plus/Cross Shadow / Default
16 - Selections / Select All
Image / Add Borders / Symmetric Marcado / 40 pixels cour #ffffff
Effects / 3D Effects / Drop Shadow : 0/0/60/30/cor #3f5c85
Selections / Select None17 - Image / Add Borders / Symmetric Marcado / 1 pixel cor #3f5c85
Image / Add Borders / Symmetric Marcado / 3 pixels cor #ffffff
Image / Add Borders / Symmetric Marcado / 2 pixels cor #3f5c8518 - Ative o tube <<Vyp_Lou_et_Lea_Deco2.pspimage>> Copie e Cole como nova layer
19 - Image / Add Borders / Symmetric Marcado / 1 pixel cor #3f5c85
20 - Coloque a sua assinatura
21 - Layers / Merge / Merge All
22- Exporte como JPG Otimizado!!!
Versão com tube de Verlaine (personagens) e de Gabry (vaso floral):
©Tutorial traduzido por Estela Fonseca em 01/03/2020.
Não alterar nem repassar sem autorização.