ESTELA
Tutorial de Valerie , original, Aqui.
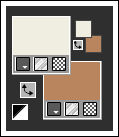
.jpg)
Tutorial traduzido no PSP X9 mas pode ser feito em versões anteriores do PSP.
Materiais Necessários:
O tube utilizado neste tutorial é de AlysoN, seu grupo de postagem, AQUI.
Demais materiais de Valy...
Plugins Utilizados:AAA Filters / Tweed Frame
Alien Skin Eye Candy 5 / Impact
Carolaine and Sensibility / cs_texture
Mehdi / Wavy Lab 1.1
MuRa's Meister / Copies
VM Toolbox / Motion Trail Wild
Toadies / Weaver**VM Distortion / FlipChop**
** Plugins importados para o Unlimited 2
Preparação:Abra os tubes no PSP, dupluque e feche os originais. Remova a Marca d'água das cópias.
Tabela de Cores:
Primeiro Plano cor 1 / Segundo Plano cor 3
01- Abra a Layer transparente <<Alpha-Estela-VSP>> (essa layer contém seleções em canal alfa)
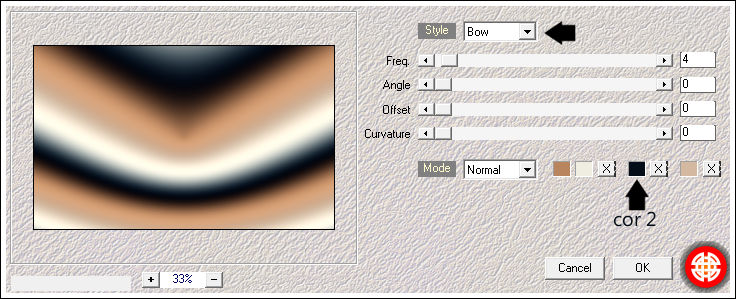
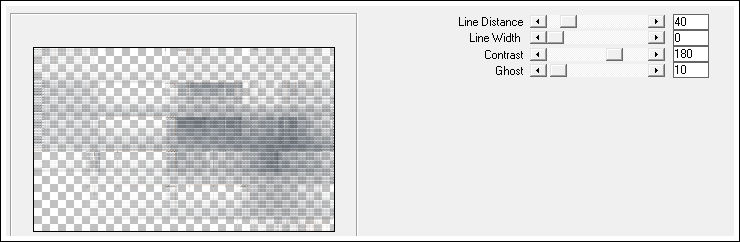
Effects / Plugins / Mehdi / Wavy Lab 1.1
Effects / Plugins / <I.C.NET Software> / Filters Unlimited 2.0 / VM Distortion / FlipChop
02- Layers / Duplicate
Effects / Plugins / VM Toolbox / Motion Trail Wild / Default
Effects / Distortion Effects / Wrap
Opacidade / 60%
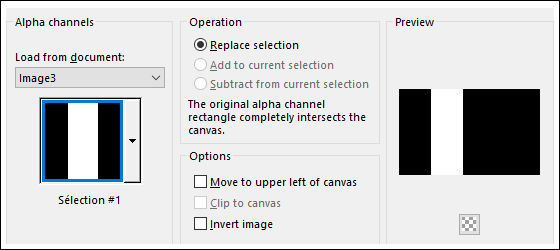
03- Selections / Load/Save Selection / Load Selection From Alpha Channel: Sélection#1
Layers / New Raster Layer
Preencha com a cor 2
Selections / Select None
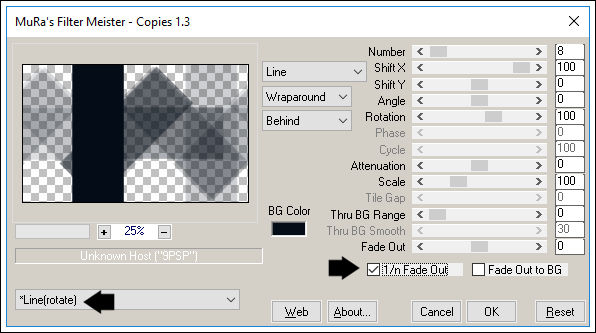
Effects / Plugins / MuRa's Meister / Copies
Selections / Load/Save Selection / Load Selection From Alpha Channel: Sélection#1
Edit / Cut
Selections / Select None
04- Effects / Texture Effects / Mosaic Antique
Effects / Plugins / <I.C.NET Software> / Filters Unlimited 2.0 / Toadies / Weaver
Effects / Artistic Effects / Halftone
Effects / User Defined Filters / Emboss 3
Effects / 3D Effects / Drop Shadow: Cor 4
Ative a Layer do topo
Effects / Plugins / Carolaine and Sensibility / cs_texture
Resultado , até aqui:
Layers / Merge / Merge Visible
05- Selections / Load/Save Selection / Load Selection From Alpha Channel: Sélection#2
Selections / Promote Selection to Layer
Selections / Select None
Blend Mode / Burn
06- Ative o tube <<Deco1-Estela-VSP>> Copie e Cole como nova layer
Objects / Align / Left
07- Layers / New Raster Layer
Selections / Load/Save Selection / Load Selection From Alpha Channel: Sélection#1
Preencha com a cor 2
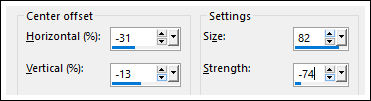
Selections / Modify / Contract 15 pixels
Delete no teclado
Ative o Baldinho de Pintura e Mude a Opacidade para 50%
Preencha com a cor 4
Selections / Modify / Contract 10 pixels
Mude a Opacidade do Baldinho de Pintura para 100%
Preencha com a cor 2
Selections / Modify / Contract 5 pixels
Delete no teclado
Selections / Select None
Effects / Plugins / Alien Skin Eye Candy 5 / Impact / Perspective Shadow / Drop Shadow, Blurry
08- Ative o tube <<Deco2-Estela-VSP>> Copie e Cole como nova layer
Ferramenta <<Pick Tool>> Posição de X: 262,00 / Posição de Y: 24,00
Para sair da Ferramenta <<Letra M>>
09- Ative o tube <<Deco3-Estela-VSP>>
Copie e Cole como nova layer
Layers / Arrange / Move Down ( 2 vezes)
Resultado
Layers / Merge / Merge Visible
10- Ative o tube <<AlysonS 11-01-2015-19>> Copie e Cole como nova layer
Image / Resize / 75%... Resize All Layers ... Desmarcado ( 2 vezes)
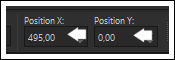
Ferramenta <<Pick Tool>> Posição de X: 495,00 / Posição de Y: 0,00
Para sair da Ferramenta <<Letra M>>
11- Layers / Duplicate
Effects / Artistic Effects / Enamel
Image / Resize / 120%... Resize All Layers ... Desmarcado
Blend Mode / Multiply
Opacidade / 75%
Layers / Arrange / Move Down
12- Ative o tube <<Titre-Estela-VSP>>
Copie e Cole como nova Layer
Ferramenta <<Pick Tool>> Posição de X: 2,00 / Posição de Y: 16,00
Para sair da Ferramenta <<Letra M>>
13- Image / Add Borders / Symmetric Marcado / 1 pixel cor 2
Image / Add Borders / Symmetric Marcado / 40 pixels cor 1
Image / Add Borders / Symmetric Marcado / 1 pixel cor 2
Image / Add Borders / Symmetric marcado / 2 pixels cor 1
Image / Add Borders / Symmetric Marcado / 1 pixel cor 2
Image / Add Borders / Symmetric Marcado / 40 pixels cor 1
Image / Add Borders / Symmetric Marcado / 1 pixel cor 2
14- Ative o tube <<Deco4-Estela-VSP>> Copie e Cole como nova layer
Layers / Merge / Merge / Visible
15- Selections / Select All
Selections / Modify / Contract 85 pixels
Effects / Plugins / AAA Filters / Tweed Frame
Selections / Select None
16- Image / Resize / 900 pixels de Largura... Resize All layers ... Marcado
Adjust / Sharpness / Unsharp Mask:
17- Assine seu trabalho
Layers / Merge / Merge All
Salve como JPG.
Versão com tube de Cady Design:
©Tutorial traduzido por Estela Fonseca em 20/07/2018.
Não alterar nem repassar sem autorização.