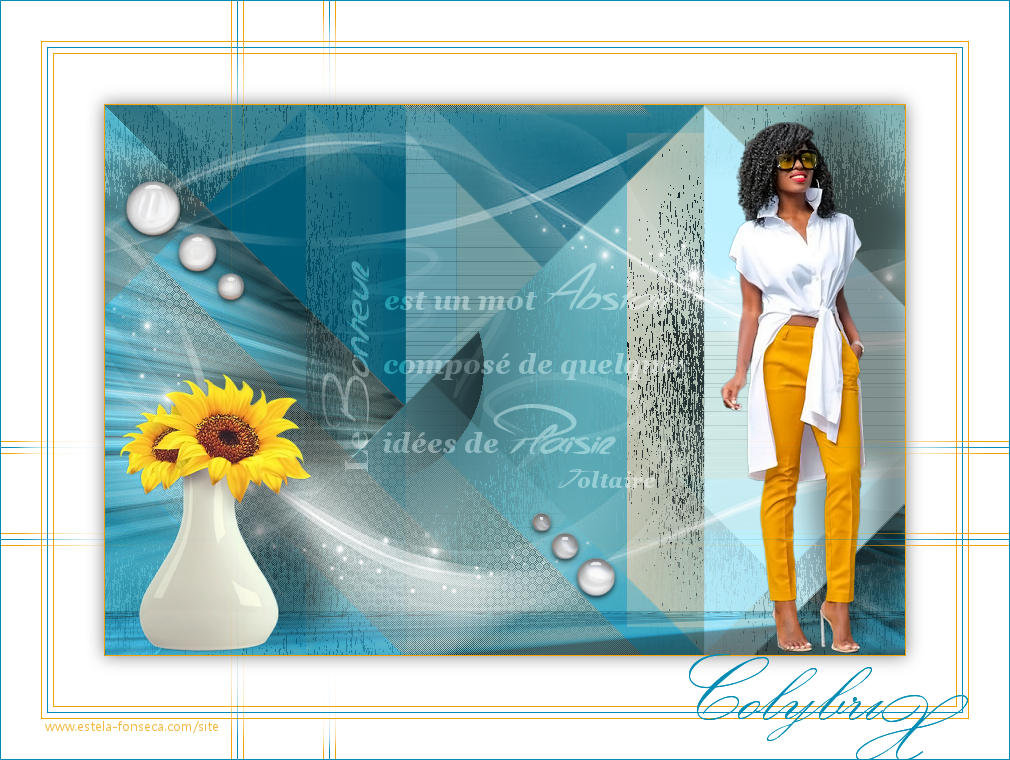
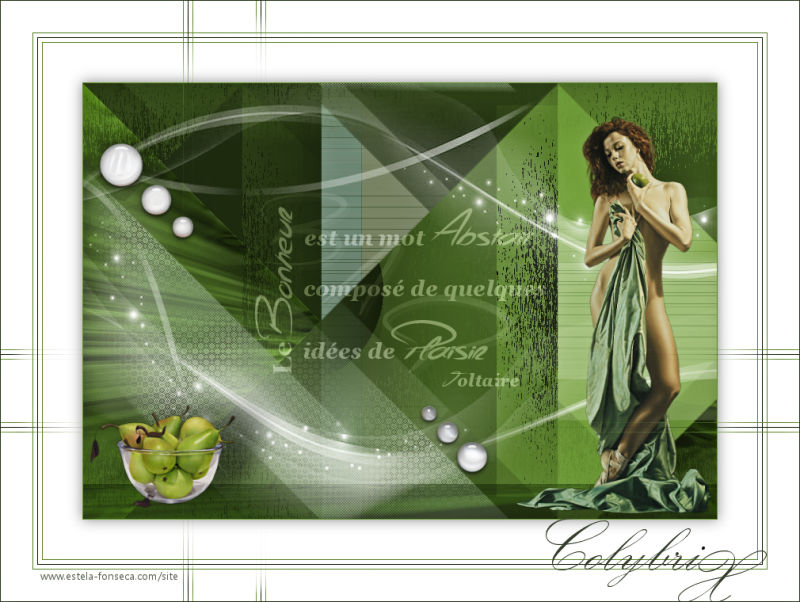
COLYBRIX
Tutorial de Valerie , original, Aqui.
.jpg)
Tutorial traduzido no PSP X9, mas pode ser feito em versões anteriores do PSP.
Materiais Necessários:
Tube de Colybrix, seu blog, AQUI.
Mask de Tine, seu site, AQUI.
Wordart
Demais tubes de VSP, AQUI.
Plugins Utilizados:
Alien Skin Eye Candy 5 / ImpactL en K's landksiteofwonders / L en K's Mayra e L en K's Palmyre
LOtis Filters / Mosaic Toolkit Plus
MuRa's Meister / Perspective Tiling
&<Bkg Designer sf10 III> / VMT Trimosaic CG...**
It@lian Editors Effect / Effetto Fantasma**
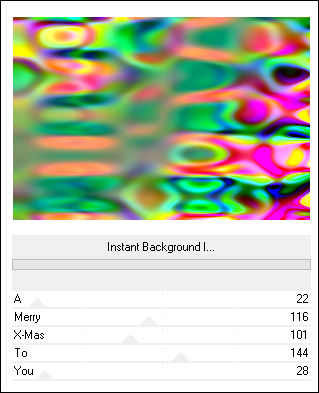
VM Instant Art / Instant Background I...**
**Importados para o Unlimited 2
Preparação:Abra os tubes , duplique e feche os originais.
Abra a Mask no PSP e Minimize.
Dê dois cliques nos presets do Alien Skin para importá-los automaticamenta para a pasta do Plugins.
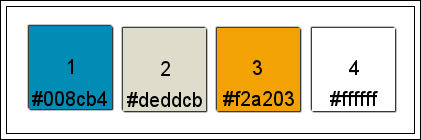
Paleta de Cores:
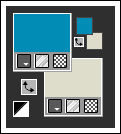
Primeiro Plano cor1 / Segundo Plano cor 2
01- Abra a Layer <<Alpha-Colybrix-VSP>> Duplique e feche a original
Effects / Plugins / <I.C.NET Software> Filters Unlimited 2.0 / VM Instant Art / Instant Background I...
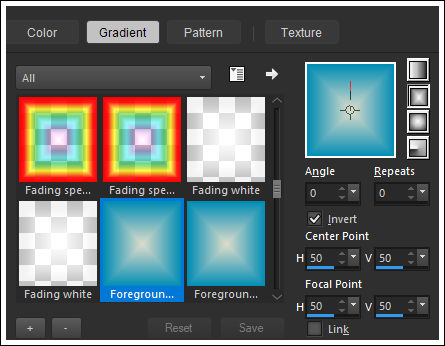
02- Gradiente <<Rectangular>> Configurado como segue:
Layers / New Raster LayerPreencha com o gradiente
Blend Mode / Color (Legacy)
Layers / Merge / Merge Down
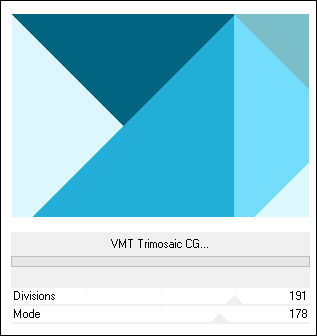
03- Layers / Duplicate
Effects / Plugins / <I.C.NET Software> Filters Unlimited 2.0 / &<Bkg Designer sf10 III>/ VMT Trimosaic CG...
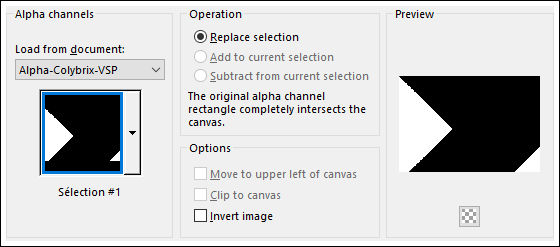
Selections / Load save selection / Load selection from alpha channel: Selection #1
Delete no Teclado
Mantenha a seleção ativa
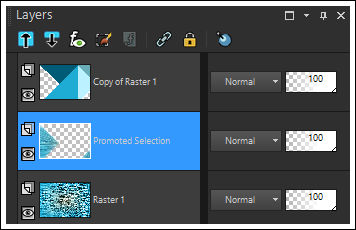
04- Ative a Layer <<Raster 1 >>
Selections / Promote Selection to Layer
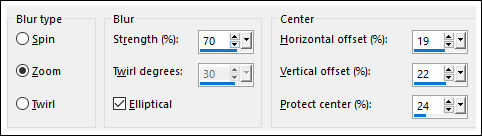
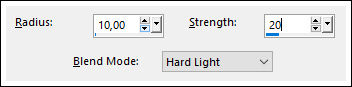
Adjust / Blur / Radial Blur
Selections / Select None
Effects / Edge Effects / Enhance More
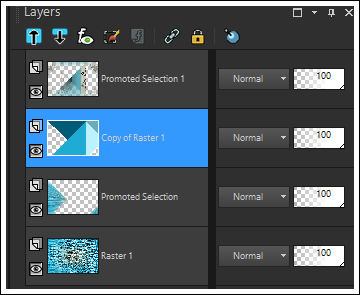
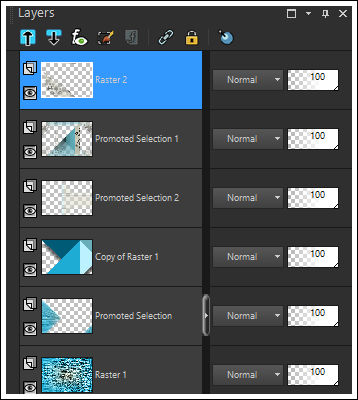
Sua Paleta das Layers está assim:
05- Ative a Layer do Topo
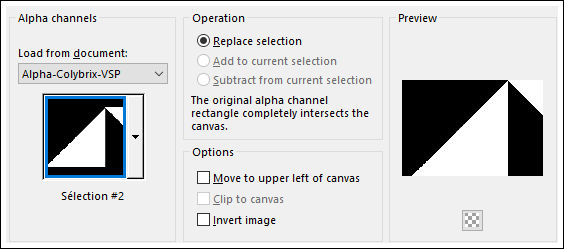
Selections / Load save selection / Load selection from alpha channel: Selection #2
Selections / Promote Selection to Layer
Selections / Select None
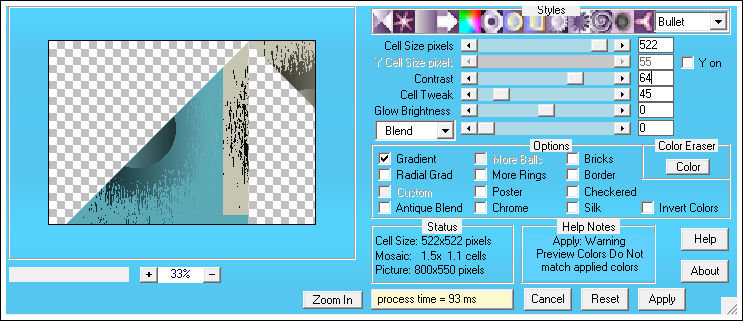
Effects / Plugins / LOtis Filters / Mosaic Toolkit Plus
Effects / Image Effects / Seamless Tiling
06- Ative a layer abaixo desta (portanto a segunda a partir da layer do topo)
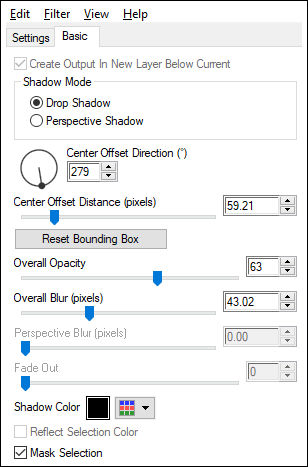
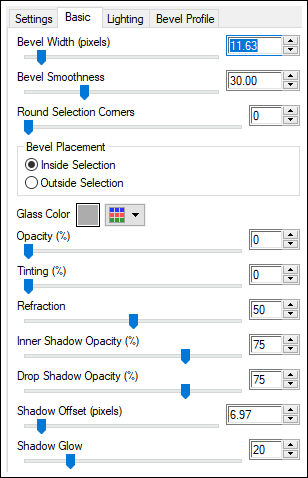
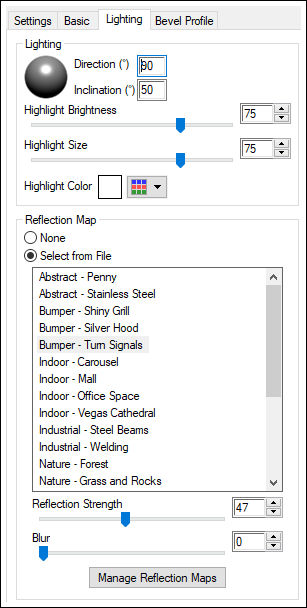
Effects / Plugins / Alien Skin Eye Candy 5 / Impact / Perspective Shadow / Preset Colybrix-Shadow1-VSP
Aba Basic:
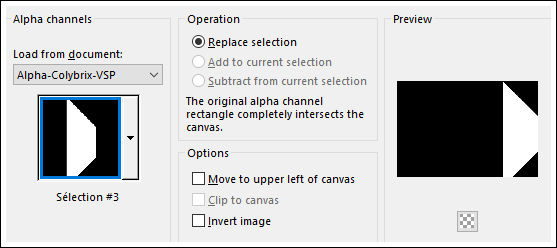
07- Selections / Load save selection / Load selection from alpha channel: Selection #3
Selections / Promote Selection to Layer
Selections / Select None
Effects / Plugins / L en K's landksiteofwonders / L en K's Mayra / Default
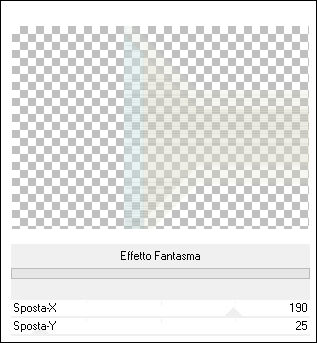
Effects / Plugins / <I.C.NET Software> Filters Unlimited 2.0 / It@lian Editors Effect / Effetto Fantasma
08- Ative a Layer do Topo
Layers / New Raster Layer
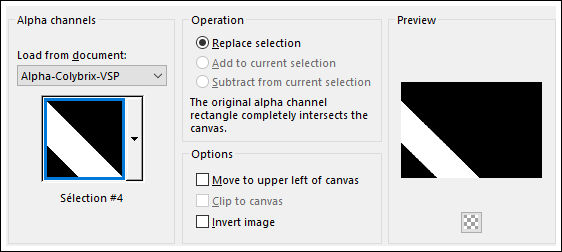
Selections / Load save selection / Load selection from alpha channel: Selection #4
Mude a opacidade do Baldinho de Pintura à 60
Preencha a seleção com a cor 2
Volte a Opacidade do Baldinho de Pintura para 100
Selections / Select None
Effects / Plugins / L en K's landksiteofwonders / L en K's Palmyre / Default
Effects / Image Effects / Seamless Tiling
Sua Palete das Layers estão assim:
09- Ative a Layer <<raster 1>>
Layers / Duplicate
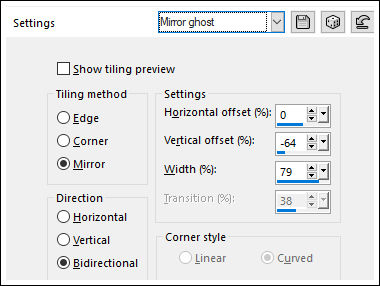
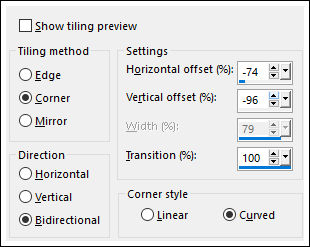
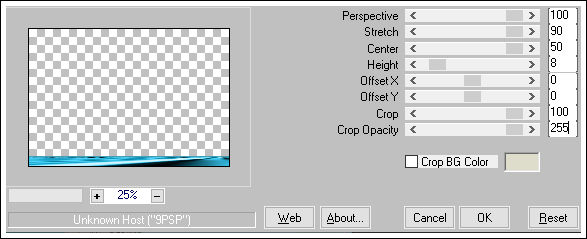
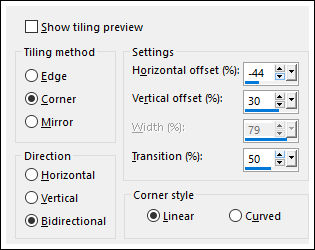
Effects / Plugins / MuRa's Meister / Perspective Tiling
Layers / Arrange / Bring to top
Blend Mode / Multiply
Opacidade / 45
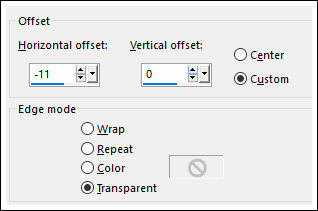
10- Ative o tube <<209976wordartmeltexte3>> Copie e Cole como nova layerEffects / Image Effects / Offset: -11/0
Image / Negative Image
Blend Mode / Soft Light
11- Layers / New Raster Layer
Preencha com a cor 4
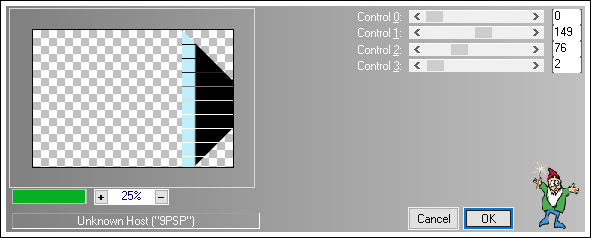
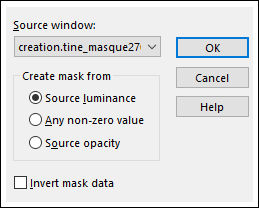
Layers / New Mask Layer / From Image: creation.tine_masque270
Adjust / Sharpness / Sharpen
Layers / Merge / Merge Group
12- Layers / New Raster Layer
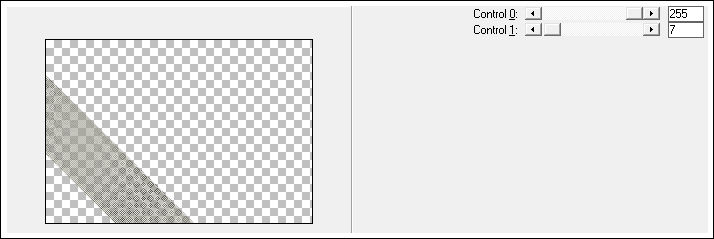
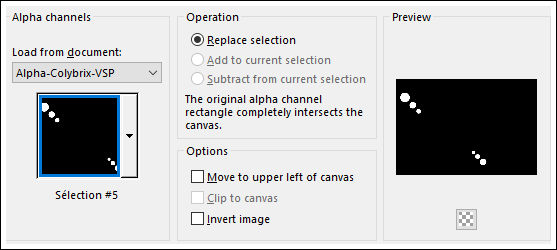
Selections / Load save selection / Load selection from alpha channel: Selection #5
Preencha com a cor 3
Effects / Plugins / Alien Skin Eye Candy 5 / Impact / Glass / Preset Colybrix-Glass1-VSP
Selections / Select None
13- Ative o tube <<Fleurs29VSP>> Remova a assinatura
Copie e Cole como nova layer
Image / Resize / 75%... Resize All Layers ... Desmarcado ( 2 vezes)
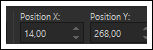
Pick Tool (K) Posição de X=14 / Posição de Y=268
Letra M para sair da Ferramenta
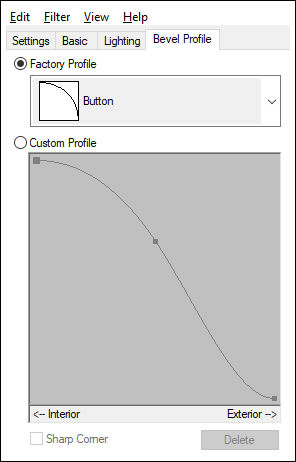
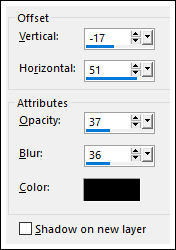
Effects / 3D Effects / Drop Shadow:Cor #000000
14- Ative o tube <<femme528-coly>> Remova a assinatura
Copie e Cole como nova layer
Image / Resize / 80%... Resize All Layers ... Desmarcado ( 2 Vezes)
Image / Mirror / Mirror Horizontal
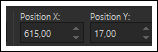
Pick Tool (K) Posição de X=615 / Posição de Y=17
Letra M para sair da Ferramenta
Effects / 3D Effects / Drop Shadow:Cor #000000
15- Image / Add Borders / Symmetric Marcado / 1 Pixel cor 3
Image / Add Borders / Symmetric Marcado / 103 Pixels cor 4
Selections / Select All
Selections / Modify / Contract / 40 Pixels
Mantenha a seleção!
16- Layers / New Raster Layer
Preencha com a cor 3
Selections / Modify / Contract 1 Pixel
Delete
Selections / Modify / Contract 5
Preencha com a cor 1
Selections / Modify / Contract 1 Pixel
Delete
Selections / Modify / Contract 5 Pixels
Preencha com a cor 3
Selections / Modify / Contract 1 Pixel
Delete
Selections / Modify / Contract 50 Pixels
Mantenha a seleção
17- Ative a Layer <<Background>>
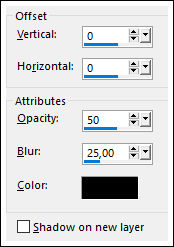
Effects / 3D Effects / Drop Shadow: 0 / 0 / 50 / 25 / #000000
Selections / Select None
Ative a Layer do topo
Layers / Duplicate
Effects / Image Effects / Seamless Tilig
18- Ative o tube <<Colybrix-Titre-VSP (Colorize de acordo com seu gosto)
Copie e Cole como nova layer
Pick Tool (K) Posição de X=688 / Posição de Y=653
Tecla M para sair da Ferramenta
Image / Add Borders / Symmetric Marcado / 1 Pixel cor 1
19- Image / Resize / 800 pixels de largura (Resize All Layers Marcado)
Adjust / Sharpness / High Pass Sharpen:
20- Assine seu trabalho.
Layers / Merge / Merge All
Salve como JPG.
Versão com tubes de Nicole:
©Tutorial traduzido por Estela Fonseca em 03/04/2019.
Não alterar nem repassar sem autorização.