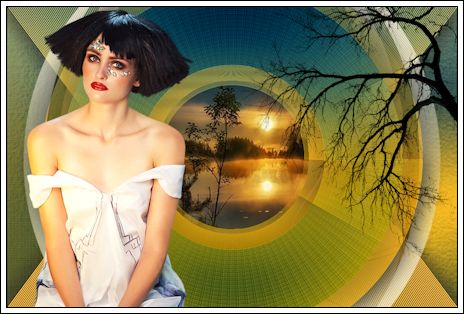
someone like you
Tutorial de ©Narah - Original Aqui
Este tutorial foi realizado em PSP X6.
Materiais Necessários:
Tubes : tube Narah_0695_Scenery_June2014.pspimage
Brush: Tree_Branches2.PspBrush ( à exporter )Seleções: Narah_Sel80 e Narah_Sel81 (Coloque na pasta de seleções de Corel PaintShop Pro )
Máscara : Narah_mask_0649.jpg
Marca d'água: "Narah's Tutorials"
Plugins Utilizados:AFS Import / sqborder2
Xero / Fritillary
Toadies / What are You?
MuRa's Meister / Pole Transform
Déformation / Verre
Nik Software /Color Efex Pro 3.0 Complete
Alf's Border Fx / Mirror Bevel
***
Os tubes estão disponíveis para uso pessoal.
Você não tem permissão para colocar os tubes em outro site sem a permissão do criador.***
Abra os tubes, duplique e feche os originais.***
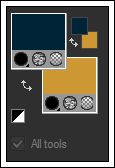
Paleta de Cores utilizada:
Nota: Você pode mudar as cores do Plugin Nick Software , Color Efex pro 3 Complete e o blend Mode das
layers dependendo das cores utilizadas por você.
***
1 - Coloque no Primeiro Plano (Foreground) a cor #012437 e no Segundo Plano (Background) a cor #cd9735
Na paleta de Estilo e Texturas configure um Gradiente estilo Sunburst Repeats 0.
2 - Abra uma imagem transparente de 900 / 600 pixels
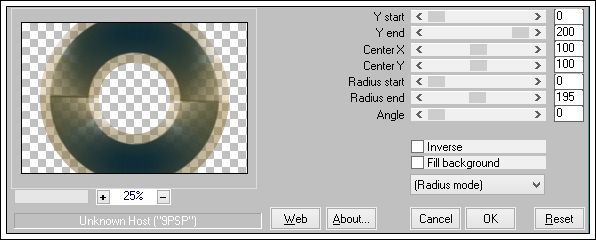
Preencha com o Gradiente3 - Effects / Plugin / AFS Import / sqborder2:
4 - Selections / Load save selection / Load selection from disk: Narah_Sel80.PspSelection
5 - Selections / Promote selection to layer
6 - Effects / Plugin / Xero / Fritillary:
7 - Selections / Select None
8 - Effects / Plugin / Toadies / What are You?....
9 - Effects / Image Effects / Seamless Tiling:
10 - Effects / Plugin / MuRa's Meister / Pole Transform:
11 - Layers / Duplicate
12 - Layers / New raster layer
Selections / Load save selection / Load selection from disk: Narah_Sel81.PspSelection
13 - Selections / Modify / Expand / 3 pixels
Preencha com o mesmo gradienteAtive o tube " Narah_0695_Scenery_June2014.pspimage"
Copie / Cole como nova layerPosicione como segue:
14 - Selections / Invert
Aperte a tecla "DELETE" de seu teclado
Selections / Select None
15 - Layers / Merge / Merge Down
16 - Layers / Arrange / Move down.
17 - Ative a layer "Raster 1"
Effects / Geometric effects / perspective vertical:
18 - Layers / Duplicate
Image / Flip
Layers / Merge / Merge down
19 - Layers / New raster layer
Layers / Arrange / Move down
Preencha com o gradiente Sunburst / Repeats:4
20 - Adjust / Blur / Gaussian Blur / 3021 - Effects / Plugin / Déformation / Verre:
22 - Posicione-se na layer (Raster 1)
Effects / 3D Effects / Drop Shadow: cor #000000
Effects / 3D Effects / Drop Shadow:cor #000000
23 - Ative a layer do círculo (Promoted Selection )
Effects / 3D Effects / Drop Shadow: cor #000000
Effects / 3D Effects / Drop Shadow:cor #000000
Blend Mode / Hard Light
24 - Se posicione sobre a layer (Copy of promoted Selection)
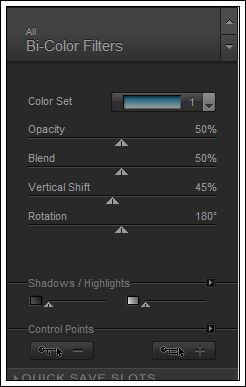
Effects / Plugin / Nik Software / Color Efex Pro 3.0 Complete / Bi-Color Filters / Cool Warm 1
25 - Adjust / One Step Photo Fix
26 - Ative a layer (Raster 1)
Effects/ Plugin / Nik Software / Color Efex Pro 3.0 Complete / Bi-Color Filters / Cool Warm 1
Mesmas Configurações anteriores
27 - Adjust / One Step Photo Fix
28 - Ative a layer (Raster 3)
Effects/ Plugin / Nik Software / Color Efex Pro 3.0 Complete / Bi-Color Filters / Cool Warm 1
Mesmas Configurações anteriores
29 - Ative a layer (Raster 1)
Layers / New raster layer
Preencha com a cor #d0c5b0
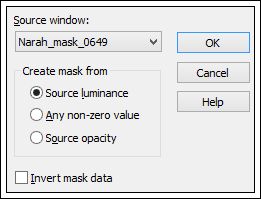
30 - Ative a mask "Narah_mask_0649.jpg" minimize
Layers / New mask layer from image: Narah_mask_0649.jpg
Layers / Merge / Merge group.
31 - Layers / Duplicate
Image / Mirror
Layers / Merge / Merge Down.
Blend Mode / Screen
32 - Ative o tube " SvB (840) Beauty.png"
Copie / Cole como nova layerLayers / Arrange / Bring to top
Apague a marca d'água da autora do tube
Image / Resize / 90% / Desmarque "Resize all layers""
Adjust / Sharpness / Sharpen
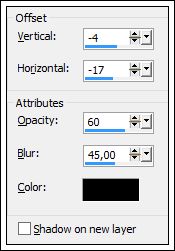
33 - Effects / Image Effects / Offset:
34 - Layers / New raster layer
Mude a cor do Primeiro Plano para a cor #000000
Ative o brush " Tree_Branches2" configure:
Aplique do lado direito de seu trabalho
Suas layers estão assim:
35 - Image / Add Borders / Symmetric / 1 pixel cor #cd9735
36 - Copie37 - Image / Add Borders / Symmetric/ 40 pixels cor #ffffff
Selecione a borda branca com a varinha mágica
Cole na seleção
38 - Adjust / Blur / Gaussian Blur / 30
Selections / Promote Selection to layer39 - Na paleta de cores, estilos e texturas mude a cor do Segundo Plano para #d0c5b0
Effects / Plugin / Alf's Border Fx / Mirror Bevel: 168 / 139
Selections / Select None
40 - Selecione a borda (do efeito) com a varinha mágica
41 - Effects/ Plugin / xero / fritillary:
Effects / Edge Effects / Enhance
Selections / Select None
42 - Coloque a sua assinatura
43 - Coloque a marca d'água "Narah"
44 - Layers / Merge / Merge All
45 - Exporte como jpg optimizado.Versão 2:
© 2014 Tutorial criado por Narah e Traduzido por Estela Fonseca.
Não alterar nem repassar sem autorização.


