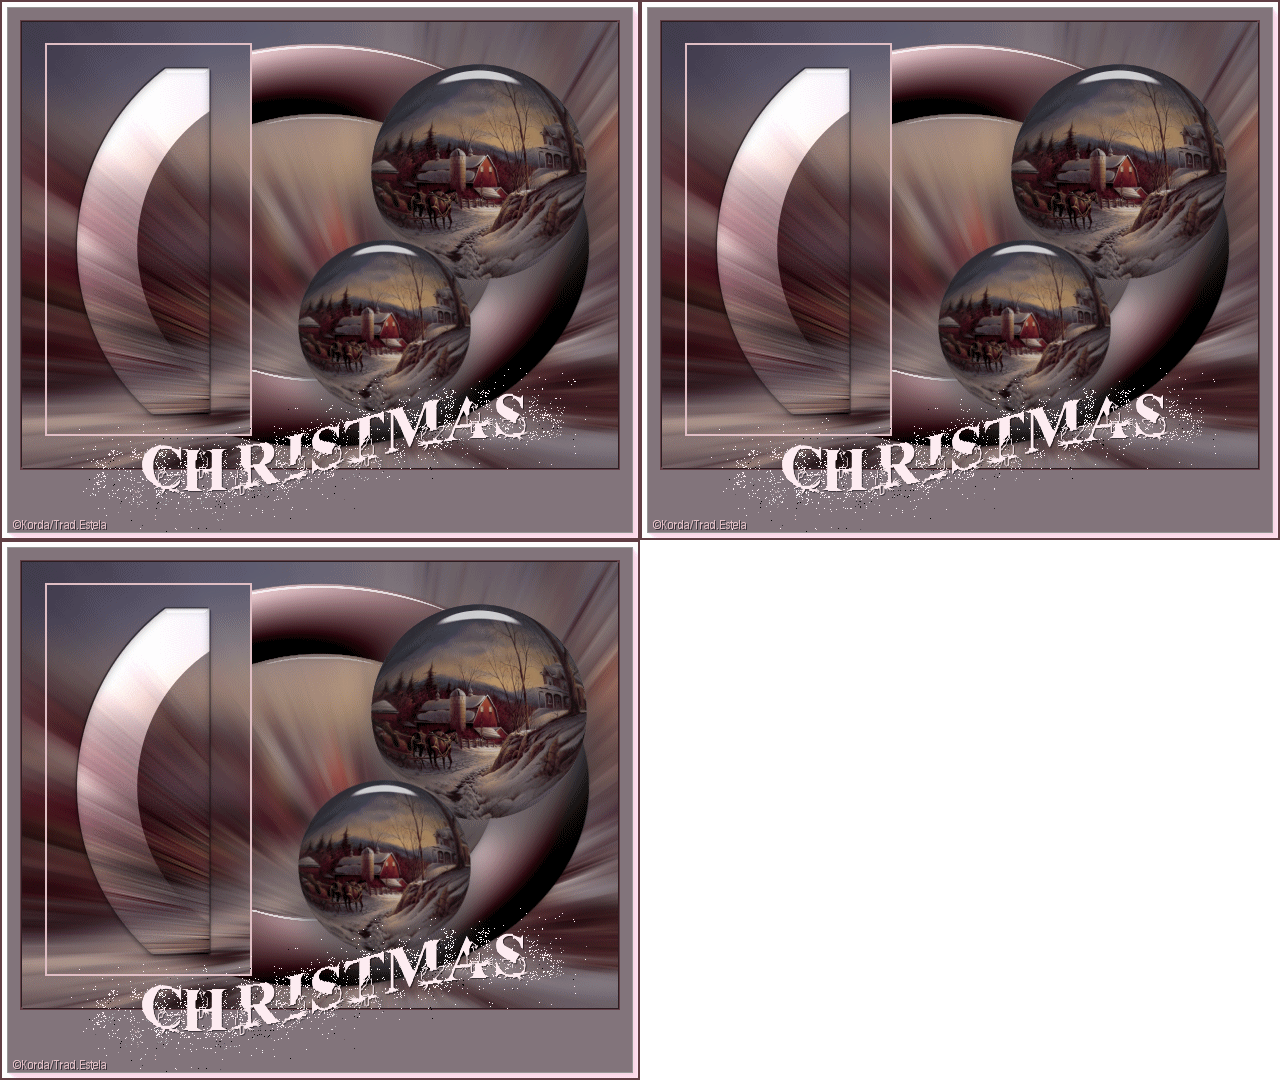
NAVIDAD
Tutorial de ©Kordas , original, Aqui.
Este tutorial foi escrito para o PSP X2, mas poderá ser feito em outras versões.
Materiais Necessários:
Imagem <<christmas.088.jpg>> da net.
O resto do material é de Korda.
Plugins Utilizados:
Border Mania
Alien Skin / Eye Candy 5 Impact / Glass
AAA Frame
FM Tile Tool / Blend Emboss
Alien Skin / Xenofex 2 / Constellation
E do programa Animation Shop
01- Abra uma imagem transparente de 600 / 450 px.
Selections / Select AllAbra a imagem <<Christmas.088.jpg>>
Copie e cole na seleção.
Selections / Select NoneLayers / Duplicate.
Effects / Geometric Effects / Circle / Transparente.Image / Resize / 50% ....resize all layers desmarcado.
Effects /Plugin / Alien Skin Eye Candy 5 /Impact /GlassSettings / preset_kugel_korda / default.
Mova essa esfera para a direita
Layers / Duplicate.
Image / Resize / 80% (resize all layers , desmarcado)2- Feche a visibilidade das layers superiores e ative a layer do fundo.
Adjust / Blur / Radial Blur.
Effects /Plugin / FM Tile Tools / Blend Emboss / Default
A layer inferior está ativa!
Layers / New Raster LayerPreencha com a cor do Primeiro Plano
Effects /Plugin / Bordermania / Round Button # 3.
Image / Resize / 80% (resize , all layers, desmarcado)
3- Selecione centro do botão com a varinha mágica
Delete no teclado
Effects /Plugin / Eye Candy 5 / Impact /Glass
Settings: kugel2_korda / default.
Ative a layer 2Layers / New Raster Layer
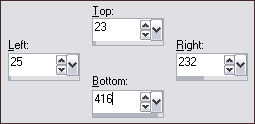
Selections Tool (S)/ Rectangle / Custom Selection:
Preencha a seleção com a cor do Segundo Plano.
Selections / Modify / Contract / 2px.
Preencha a seleção com a cor principal.
Layers / New Raster layer.
Selections / Modify / Contract / 2px.
Copie a layer 1 e cole na seleção.
Selections / Select None.
Abra o tube << Teil_kugel.pspimage>>Copie e cole como nova layer.
Posicione como no exemploEffects / 3D Effects / Drop Shadow: 1, 1, 55, 1.
Effects / 3D Effects / Drop Shadow: -1 / 1-Layers / Merge / Merge visible.
4- Layers / New Raster layer.
Selections / Select AllPreencha com a cor principal.
Selections / Modify / Contract / 2px.
Pressione a tecla Delete.
Selections / Select None.Effects / 3D Effects / Drop Shadow: 1, 1, 55, 1.
Effects / 3D Effects / Drop Shadow: -1 / -1Layers / Merge / Merge visible.
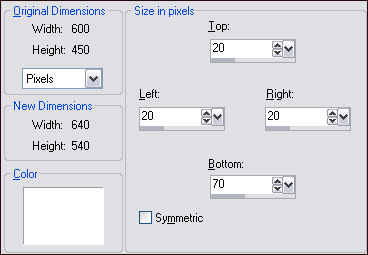
Image / Add Borders:
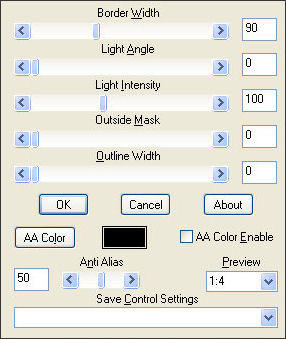
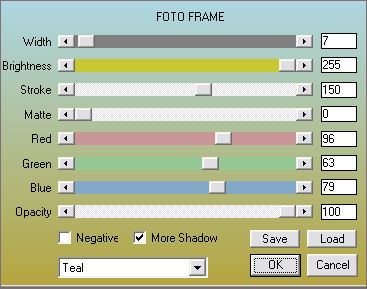
Effects / Plugin / AAA Frames / Foto Frame.
5- Abra <<schrift.pspimage>>
Copie e Cole como Nova layer
Posicione como no exemplo
Layers / Duplicate.
Na cópia.
Image / resize /120% (resize , all layers, desmarcado)Posicione
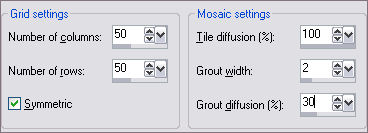
Effects / Texture Effects / Mosaic antique:
Blend Mode / Dissolve
Opacidade / 20%.
Layers / New Raster LayerSelections / Select All.
Preencha com a cor do primeiro plano
Selections / Modify / Contract / 2px.
Pressione a tecla Delete.
Selections /Select None.
Adicione a marca d'água e se não deseja animar a imagem, salve como jpg.Animação:
Ative a layer 1.
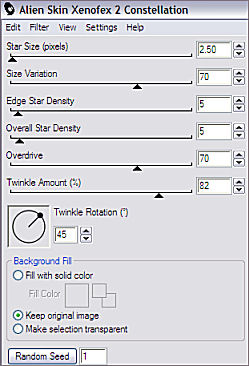
Effects / Plugin / Alien Skin / Xenofex 2 / Constellation.
Edit / Copy Especial / Copy Merged.
Abra o Animation Shop e Paste as new animation.
Volte para o PSP.
Edit / Desfazer Constellation.
Effects /Plugin / Xenofez 2 / Constellation.Pressione o botão Random Seed abaixo.
Edit / Copy Especial / Copy Merged.
Voltar ao Animation Shop.
Edit / paste current frame.
Voltar para o PSP.
Edit / Desfazer Constellation.
Effects /Plugin / Xenofez 2 / Constellation.Pressione o botão Random Seed abaixo.
Edit / Copy Especial / Copy Merged.
Voltar ao Animation Shop.
Edit / Paste current frame.
Salve como gif.
VOLTAR©Tutorial traduzido por Estela Fonseca em 11/12/2009.
Não alterar nem repassar sem autorização.
