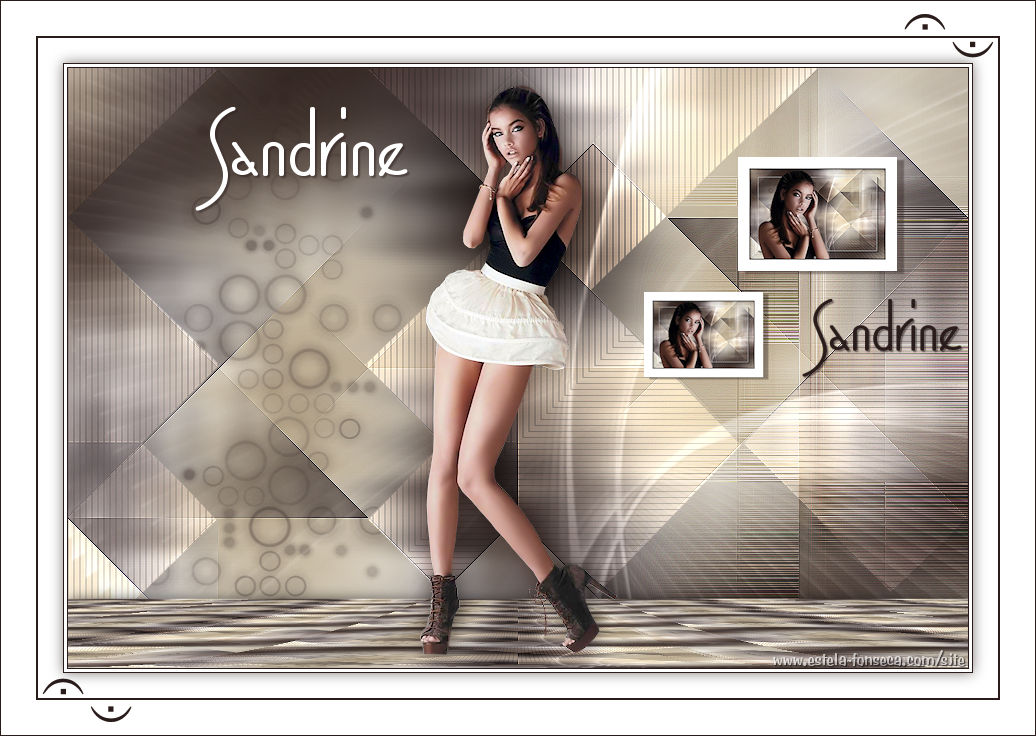
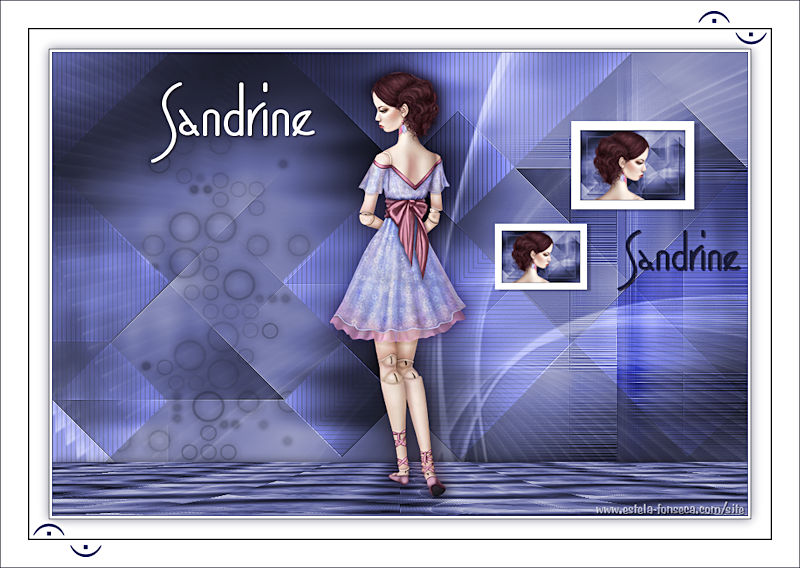
SANDRINE
Tutorial de KaDs , original, Aqui.
Tutorial traduzido no PSP X9 mas pode ser feito em versões anteriores do PSP.
Materiais Necessários:
Masks de Maelle Dreams e de Narah. Elas compartilham suas Masks, AQUI.
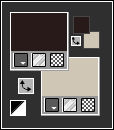
Plugins Utilizados:
<I.C.NET Software> / Filters Unlimited 2.0Mehdi / Wavy Lab & Perspective Tiling
&<Bkg Designers sf10 II> / Gregs FO Warp (importado para o unlimited)
Simple / Pizza Slice Mirror & Blintz
AP 01[Innovations] / Lines - SilverLining
MuRa's Meister / Copies
Toadies / Weaver
AAA Frames / Texture Frame & Foto Frame
Preparação:
Abra o tube no PSP, duplique e feche o original.Abra a Mask no PSP e Minimize
Nota: Se está usando cores diferentes , colorize.
Duplo clique na fonte (ttf) para abrir. Minimize ou instale... depende da versão do seu PSP.
Nota: Ao trabalhar com suas próprias cores, brinque com o Blend Mode e/ou Opacidade a seu critério!!!
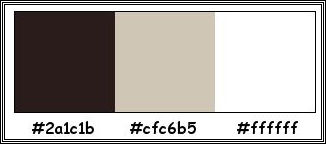
Tabela de Cores:
Primeiro Plano Cor #2a1c1b
Segundo Plano Cor #d0c6b5
01) Abra <<419_KaD_Alfakanaal>>Window / Duplicate (or shift+D) / Feche o original
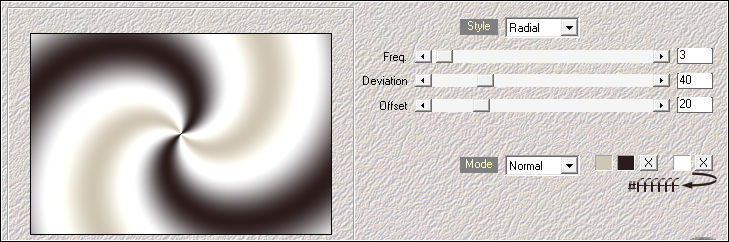
02) Effects / Plugins / Mehdi / Wavy Lab : Mude o terceiro quadradinho de cor para #ffffff
03) Adjust / Blur / Gaussian Blur / Radius 50
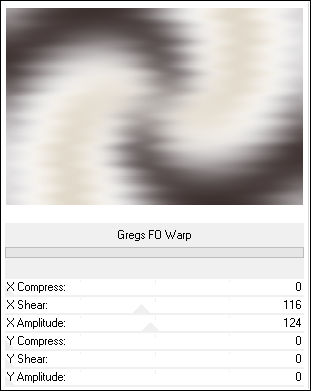
04) Effects / Plugins / <I.C.NET Software> / Filters Unlimited 2.0 / &<Bkg Designers sf10 II> / Gregs FO Warp
05) Layers / Duplicate
Effects / Plugins / Simple / Pizza Slice Mirror
Effects / Plugins / Simple / Blintz
Blend Mode / Multiply06) Layers / Duplicate
Image / Mirror /Mirror HorizontalImage / Mirror / Mirror Vertical
Layers / Merge / Merge Down
07) Effects / Edge Effects / Enhance
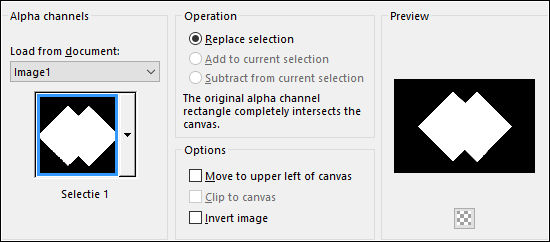
08) Selections / Load/Save Selection / Load Selection From Alpha Channel : Selectie 1
Selections / Promote Selection to Layer
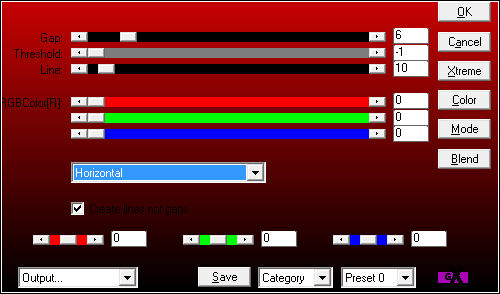
Effects / Plugins / AP 01[Innovations] / Lines - SilverLining
Selections / Select None
09) Effects / Image Effects / Seamless Tiling
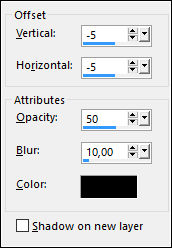
Effects / 3D Effects / Drop Shadow:
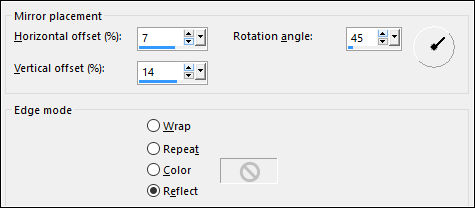
10) Effects / Reflection Effects / Rotating Mirror
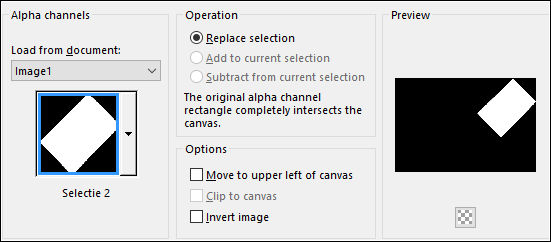
11) Selections / Load/Save Selection / Load Selection From Alpha Channel : Selectie 2
Edit / Cut ... Ou Delete no teclado
Selections / Select None
Blend Mode / DodgeOpacidade / 50
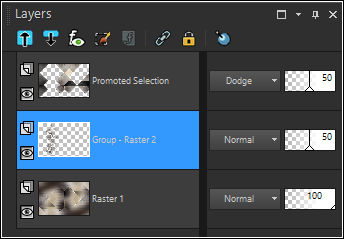
12) Ative a Layer do Meio
Layers / Merge / Merge Down
13) Ative a Layer do Fundo << Raster 1>>Layers / New Raster Layer
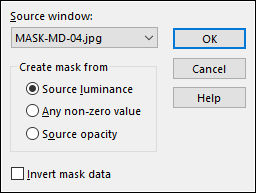
Preencha com a cor do Primeiro Plano14) Layers / New Mask Layer / From Image : MASK-MD-04
Layers / Merge / Merge Group
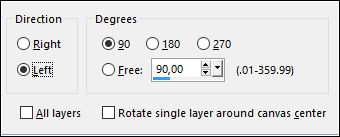
15) Image / Free Rotate / Left Marcado / 90°
16) Ferramenta Pick Tool (K) / Posiciton X: 59 e Position Y: -5
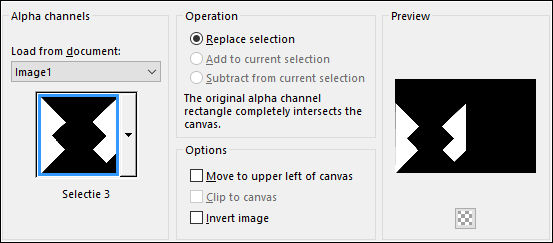
Selections / Load/Save Selection / Load Selection From Alpha Channel : Selectie 3
Edit / Cut ... Ou Delete no teclado
Selections / Select None
Opacidade / 50
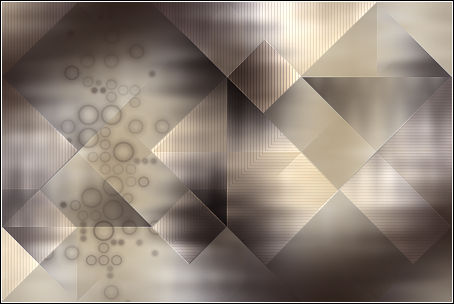
Resultado:
17) Ative a Layer do Fundo <<Raster 1>>
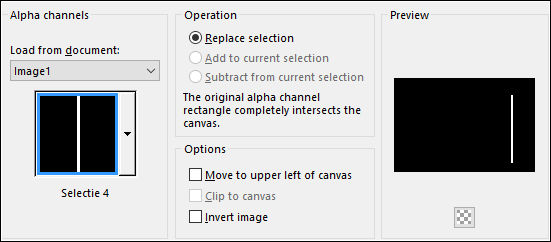
Selections / Load/Save Selection / Load Selection From Alpha Channel : Selectie 4
Selections / Promote Selection to Layer
Layers / Arrange / Bring to Top
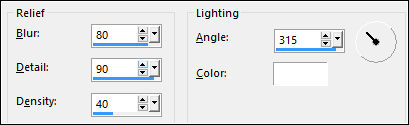
18) Effects / Artistic Effects / Enamel / Cor #ffffff
Effects / Edge Effects / Enhance
Mantenha a Seleção!!!!19) Layers / New Raster Layer
Preencha com a cor do Primeiro PlanoSelections / Modify / Contract / 2 pixels
Edit / Cut ... Ou Delete no tecladoSelections / Select None
Layers / Merge / Merge Down
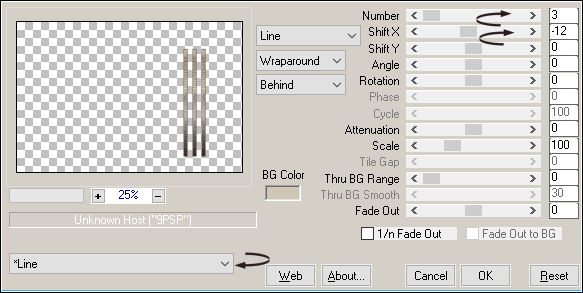
20) Effects / Plugins / MuRa's Meister / Copies
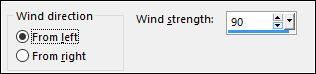
21) Effects / Distortion Effects / Wind / From Left Marcado / 60
Adjust / Sharpness / Sharpen More
22) Image / Rotate Left
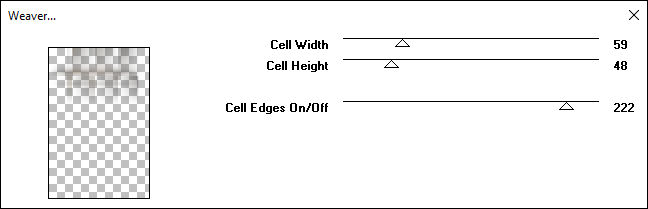
Effects / Plugins / Toadies / Weaver
Effects / Edge Effects / Enhance More
Image / Rotate Right
Blend Mode / Overlay23) Mude a cor do Segundo Plano para #ffffff
Ative a Segunda Layer à partir da Layer do fundo. (Group of Raster 2)
Layers / New Raster Layer
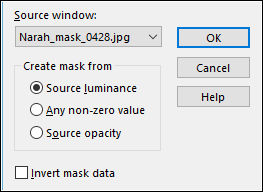
Preencha com a cor do Segundo PlanoLayers / New Mask Layer / From Image : Narah_mask_0428
Layers / Merge / Merge Group
Image / Mirror / Mirror Horizontal
Blend Mode / Soft Light24) Edit / Copy Special / Copy Merged
Ative a Layer do topo25) Layers / New Raster Layer
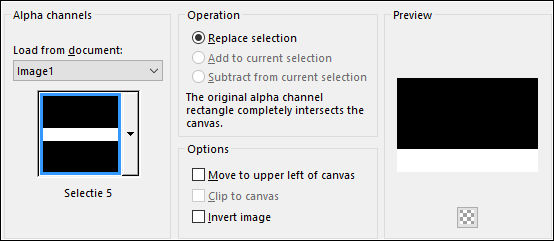
Selections / Load/Save Selection / Load Selection From Alpha Channel : Selectie 5
Cole na seleção!!!
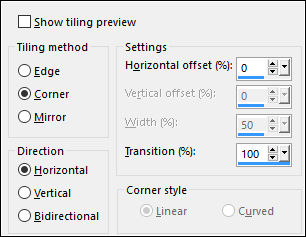
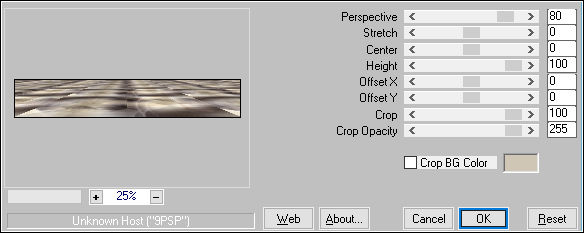
26) Effects / Plugins / MuRa's Meister / Perspective Tiling / Default
Selections / Select None
27) Effects / Geometric Effects / Cylinder Horizontal / Strength 70 %
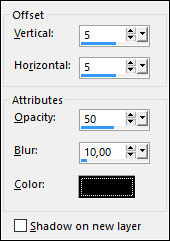
28) Effects / 3D Effects / Drop Shadow : 0 / 0 / 60 / 20,00 / #00000029) Maximize o tube <<KaD_Woman_110>>
Copie e Cole como Nova Layer
Image / Resize / 50% / Resize all Layers ... Desmarcado
Adjust / Sharpness / Sharpen
30) Adjust / Brightness and Contrast / Brightness/Contrast / Brightness 30 / Contrast 0 / Linear MarcadoLayers / Duplicate
Layers / Arrange / Move Down
Adjust / Blur / Gaussian Blur / Radius 10
Blend Mode / MultiplyOpacidade / 60
31) Ative a Layer do topoFerramenta Texto / Fonte: MorningGloryNF / Tamanho 110 pixels / Estilo: Negrito / Stroke Width 0 / Create as: Vector
Digite: Sandrine ou outro textoLayers / Convert to Raster Layer
Ferramenta <<Pick Tool (K)>> Position X:118 / PositionY: 37
Effects / 3D Effects / Drop Shadow: 2 / 2 / 50 / 2,00 / #000000
32) Na Paleta das Layers oculte as 4 primeiras Layers à partir da Layer do topo:
Ative a Layer <<Promoted Selection 1>>Edit / Copy Special / Copy Merged
33) Cole Como Nova Imgem
Effects / Plugins / AAA Frames / Texture Frame
Effects / Plugins / AAA Frames / Foto Frame:
34) Image / Resize / 20% ... Resize all Layers...Marcado
Maximize o tube <<KaD_Woman_110>>
Copie e Cole como Nova Layer
Image / Resize / 40% ... Resize all Layers ... Desmarcado
Image / Mirror / Mirror Horizontal
Posicione como segue:
35) Image / Add Borders / Symmetric Marcado / 1 pixel cor do Primeiro Plano
Image / Add Borders / Symmetric Marcado / 15 pixel cor do Segundo Plano
Copie
No Primeiro Trabalho:
Abra o Olho das 4 layers e ative a layer do Topo
Cole como Nova Layer
Image / Resize / 75% ... Resize all Layers... Desmarcado
Ferramenta Pick Tool (K) / Position X:670 Position Y: 89
Effects / 3D Effects / Drop Shadow: 3 / 7 / 40 / 2 / #2a1c1b
Adjust / Sharpness / Sharpen
36) Layers / Duplicate
Image / Resize / 75% ... Resize all Layers ... DesmarcadoFerramenta Pick Tool (K) / Position X:576 Position Y: 224
Nota: Clique em qualquer tecla do teclado para sair da ferramenta.
37) Ative a Terceira layer a partir da Layer do Topo (Raster 4)
Layers / Duplicate
Image / Resize / 75% ... Resize all Layers ... DesmarcadoFerramenta Pick Tool (K) / Position X:734 Position Y: 231
38) Primeiro Plano cor #2a1c1b
Ferramenta <<Color Changer Tool >> Clique no Texto com a cor do Primeiro PlanoCor do Segundo Plano #d0c6b5
39) Image / Add Borders / Symmetric Mrcado / 1 pixel cor do Primeiro Plano
Image / Add Borders / Symmetric Marcado / 3 pixels cor do Segundo Plano
Image / Add Borders / Symmetric Mrcado / 1 pixel cor do Primeiro Plano
40) Selections / Select All
Image / Add Borders / Symmetric Marcado / 25 pixels cor #ffffff41) Effects / 3D Effects / Drop Shadow : 0 / 0 / 60 / 20,00 / #2a1c1b
Selections / Select None
Image / Add Borders / Symmetric Marcado / 2 pixel cor do Primeiro PlanoImage / Add Borders / Symmetric Marcado / 35 pixels cor #ffffff
42) Maximize o tube <<419_KaD_Deco1>>
Copie e Cole como Nova Layer
43) Layers / Merge / Merge All (Flatten)
Image / Resize / Width 900 Pixels / Resize all Layers ...Marcado
Adjust / Sharpness / Unsharp Mask / Radius 2 / Strength 30 / Clipping 2 / Luminance Only not Checked
Opcional: Image / Add Borders / Symmetric Marcado / 1 pixel cor do Primeiro PlanoAdicione sua Marca d'água
44- Salve como JPGVersão com tube de Betsie:
©Tutorial traduzido por Estela Fonseca em 12/08/2017.
Não alterar nem repassar sem autorização.