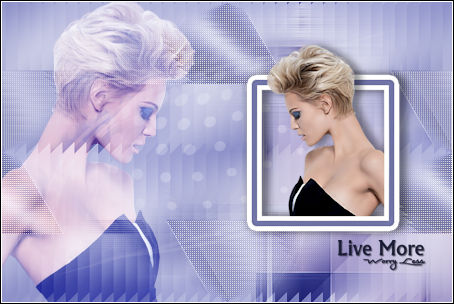
LIVE MORE
Tutorial de KaDs , original, Aqui.
Tutorial traduzido no PSP X9 mas pode ser feito em versões anteriores do PSP.
Materiais Necessários:
Mask de Narah. Nara compartilha suas Masks AQUI.
Tubes de Kads
Plugins Utilizados:
<I.C.NET Software> / Filters Unlimited 2.0Mehdi / Wavy Lab 1.1
Visual Manipulation / Slipthrough
°v° Kiwi's Oelfilter / Zig Zack
[AFS IMPORT] / sqborder2 **
Alien Skin Eye Candy 5 Impact / Glass /
Mehdi / Weaver
Preparação:
Abra os Tubes e a Mask no PSP, minimize.Clique duas vezes no Eye Candy Preset, ele será importado automaticamente
NOTA: se você estiver usando cores diferentes, talvez seja necessário colorir
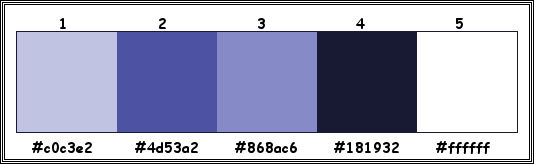
Tabela de Cores:
Nota: Ao trabalhar com suas próprias cores, jogue com o Modo Blend e / ou a Opacidade a seu critério.
Primeiro Plano cor #c0c3e2
Segundo Plano Cor #4d53a2
01- Abra a layer transparente <<420_KaD_Alfakanaal>>
Window / Duplicate (ou shift+D) / Feche o original
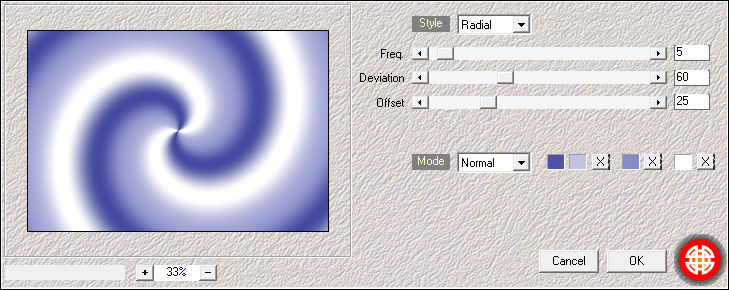
02- Effects / Plugins / Mehdi / Wavy Lab 1.1
Cores dos quadradinhos: #4d53a2 / #c0c3e2/ #868ac6 / #ffffff
03- Effects / Image Effects / Seamless Tiling
04- Adjust / Blur / Gaussian Blur / Radius 50
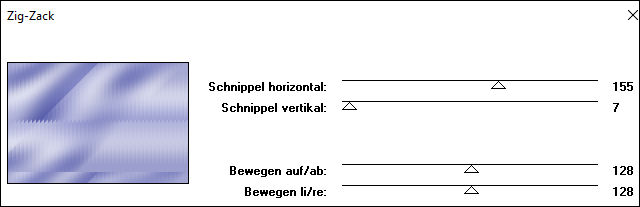
05- Effects / Plugins / Visual Manipulation / Slipthrough06- Effects / Plugins / °v° Kiwi's Oelfilter / Zig Zack
Adjust / Sharpness / Sharpen
07- Layers / Duplicate
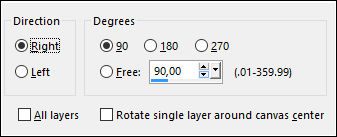
Image / Free Rotate :
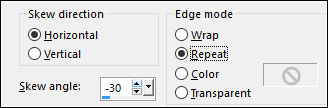
08- Image / Resize / 67% ... Resize all layers desmarcadoEffects / Geometric Effects / Skew
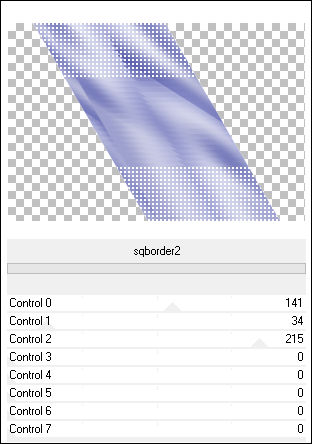
Effects / Plugins /<I.C.NET Software> / Filters Unlimited 2.0 / [AFS IMPORT] / sqborder2
09- Effects / Image Effects / Seamless Tiling
10- Effects / Edge Effects / Enhance
11- Selections / Load/Save Selection / Load Selection From Alpha Channel: Selectie 1
Edit / Cut (Ou Delete no teclado)
Mantenha a Seleção!
12- Ative a Layer do Fundo
Selections / Promote Selection to Layer
13- Adjust / Blur / Gaussian Blur / Radius 20
14- Effects / Geometric Effects / Circle / Transparente (marcado)Selections / Select None
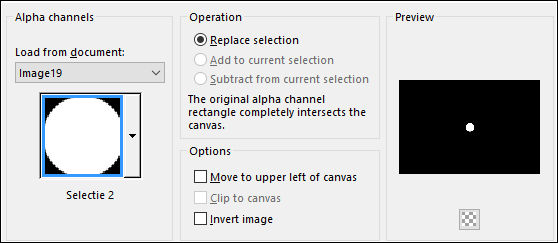
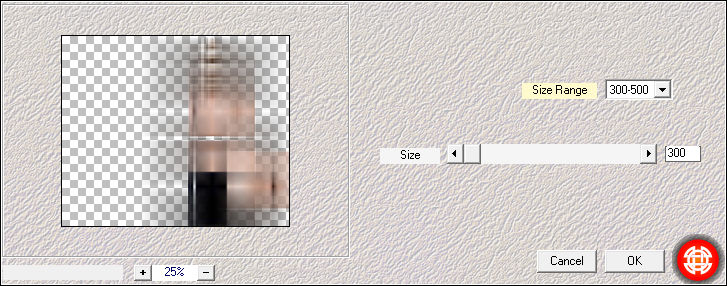
15- Image / Resize / 20% ... Resize all Layers ... Desmarcado16- Selections / Load/Save Selection / Load Selection From Alpha Channel : Selectie 2
Effects / Plugins / Alien Skin Eye Candy 5 Impact / Glass / Preset <<420_KaD_Glass>>
17- Selections / Select None
Effects / Edge Effects / Enhance
18- Edit / Cut
Cole como nova imagemMinimize no PSP
19- Volte para seu trabalho
Layers / Delete
Layers / Merge / Merge Visible
20- Effects / Image Effects / Seamless Tiling / Default
Resultado:
21- Segundo Plano cor #ffffff
Layers / New Raster Layer
Preencha com a cor do Segundo Plano
22- Layers / New Mask Layer / From Image :Narah_mask_0464
Layers / Merge / Merge Group
Blend Mode / Soft Light23- Maximize o tube <<KaD_WomanFace47>>
Remova a Marca d'água
Copie e Cole como nova layer
24- Image / Mirror / Mirror Horizontal
Ferramenta <<Pick Tool(K)>> Position X= 406 / Position Y=-2,00
Nota: Para sair do Pick Tool clique em qualquer tecla do teclado25- Effects / Plugins / Mehdi / Weaver
26- Effects / Edge Effects / Enhance More
Blend Mode / Soft Light27- Primeiro Plano cor #868ac6
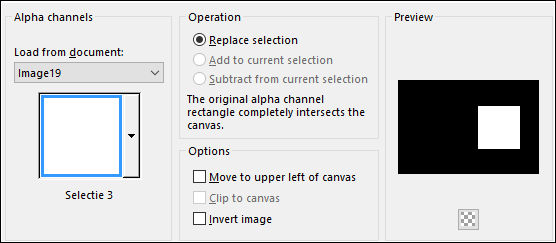
28- Selections / Load/Save Selection / Load Selection From Alpha Channel : Selectie 3
Edit / Copy Special / Copy Merged
29- Layers / New Raster Layer!!
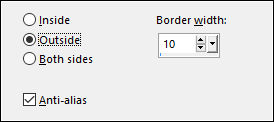
Cole na Seleção!!!30- Selections / Modify / Select Selection Borders :
Layers / New Raster Layer!
Preencha com a cor do Primeiro Plano
31- Selections / Modify / Select Selection Borders :
Layers / New Raster Layer!!
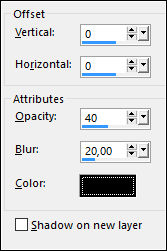
Preencha com a cor do Segundo Plano32- Effects / 3D Effects / Drop Shadow : Cor #000000
Selections / Select None
33- Layers / Merge / Merge Down34- Maximize o tube <<KaD_WomanFace47>>
Copie e Cole Como Nova Layer
Image / Mirror / Mirror Horizontal
35- Image / Resize / 50% ... Resize all Layers ...Desmarcado
36- Adjust / Sharpness / Unsharp Mask :
36- Ferramenta Pick Tool (K) / Postion X= 525 / Position Y= 82,00
37- Effects / 3D Effects / Drop Shadow Cor#000000
38- Ative a Segunda Layer a partir da Layer do topo (Raster 3)
Effects / 3D Effects / Drop Shadow Cor#000000
39- Ative a Layer do Topo
40- Selections / Load/Save Selection / Load Selection From Alpha Channel: Selectie 3
Selections / Modify / Contract / 10 pixels
41- Selections / Invert
42- Ferramenta <<Eraser Tool>> Apague as sobras do tube que estão na parte de baixo e à direita.
43- Selections / Select None
Layers / Merge / Merge Down
Edit / Repeat Layers Merge Down
44- Primeiro Plano Cor #18193245- Maximize o tube <<420_Text1>>
Copie e Cole como nova layer
Color Changer Tool
46- Clique com a cor do Primeiro Plano no Texto47- Image / Resize / 60% ... Resize all Layers ...Desmarcado
48- Press K on your keyboard to activate the Pick Tool
Ferramenta Pick Tool (K) / Postion X= 671,00 / Position Y= 476,00
49- Effects / 3D Effects / Drop Shadow / Cor #000000
50- Maximize o tube <<KaD_WomanFace47>>Copie e Cole Como Nova Layer
51- Image / Resize / 80% ... Resize all Layers ... Desmarcado
Posicione
Blend Mode / Overlay
52- Maximize a <<pequena imagem>>
Copie e Cole como Nova Layer
53- Image / Resize / 55% ... Resize all Layers ... Desmarcado
54- Ferramenta Pick Tool (K) / Postion X= 785,00 / Position Y= 40,00
55- Layers / Duplicate
56- Image / Mirror / Mirror Horizontal
Layers / Merge / Merge Down
Effects / 3D Effects / Drop Shadow / Cor #000000
57- Adjust / Sharpness / Sharpen
58- Image / Add Borders / Symmetric Marcado / 10 pixels cor #ffffff
Image / Add Borders / Symmetric Marcado / 10 pixels cor #868ac6
Image / Add Borders / Symmetric Marcado / 10 pixels cor #ffffff
59- Selections / Select All
Image / Add Borders / Symmetric Marcado / 1 pixel cor #181932
Image / Add Borders / Symmetric Marcado / 35 pixels cor #ffffff60- Effects / 3D Effects /Drop Shadow / Cor #000000
Selections / Select None61- Maximize o tube <<420_Deco1>>
Copie e Cole Como Nova Layer
Image / Add Borders / Symmetric Marcado / 1 pixel cor #181932
62- Opcional:
Image / Resize / 900 Pixels de Largura ... Resize all Layers ...Marcado
Adicione a sua marca d'água
42- Salve como JPG
Versão com tube de Maelles Dreams:
©Tutorial traduzido por Estela Fonseca em 08/09/2017.
Não alterar nem repassar sem autorização.