half way
Tutorial de ©Elizabeth Creations
Este tutorial foi traduzido usando o Corel'Paint ShopPro' 2022 ULTIMATE.
Material Necessário:
Plugins Usados:
Filters Unlimited 2,0 / Filter Factory Gallery F, Plugins AB 07, VM Toolbox e VM Experimental.
Adjust / Variations.
Lembre-se de salvar seu trabalho com frequência.
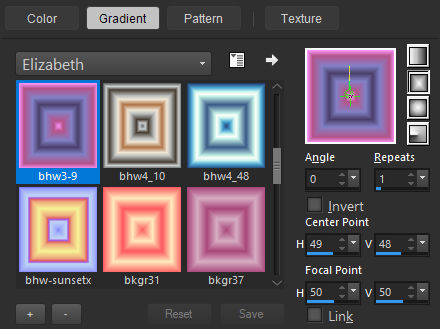
Há um gradiente na pasta de materiais... coloque-o na pasta de Gradientes do PSP.
1. Na Paleta de Materiais....defina seu Primeiro Plano com o gradiente fornecido bhw3-9...RETANGULAR...e com estasconfigurações:
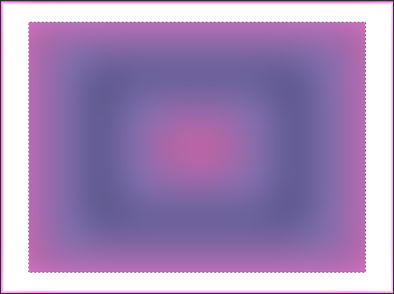
2. Abra uma nova imagem transparente de 980 X 730pix.
3. Preencha com o Gradiente do Primeiro Plano.Adjust / Blur / Gaussian Blur / Radius 53.
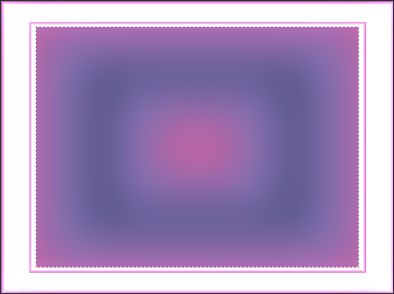
4. Effects / Plugins / Filters Unlimited 2,0 / Filter Factory Gallery F / Border Fade 2...Default.
5. Selection Tool (S) RECTANGLE...Feather em 0... Faça uma seleção dentro do retângulo como segue:
6. Selections / Promote Selection to Layer.
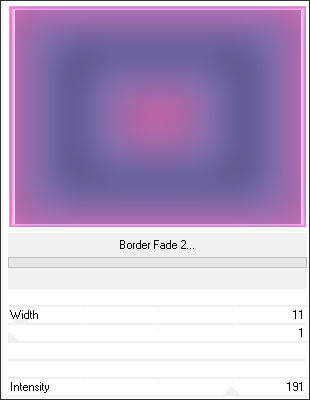
7. Effects / Plugins / Filters Unlimited 2.0 / Filter Factory Gallery F / Border Fade 2...mude apenas o valor width para 11.
8. Selections / Select None.
9. Selection Tool (S) RECTANGLE...Feather em 0... Selecione o retangulo interno:
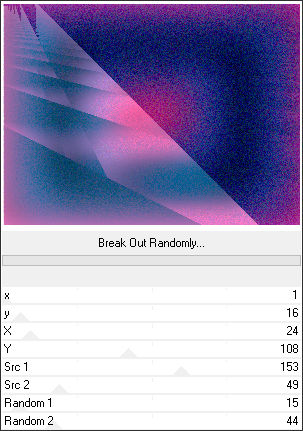
10. Effects / Plugins / Filters Unlimited 2.0 / Plugins AB 07 / Breakout Randomly...Default.
11. Selections / Select None.
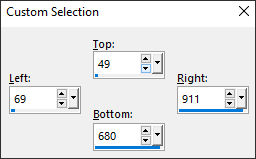
12. Selection Tool / RECTANGLE / Custom Selection:
13. Selections / Promote Selection to Layer.
Selections / Select None.
14. Effects / Plugins / Adjust / Variations....Clique em ORIGINAL e clique em MORE MAGENTA uma vez.
15. Image / Resize / 75% ... Resize all Layers ... Desmarcado.
16. Image / Mirror / Mirror Horizontal.
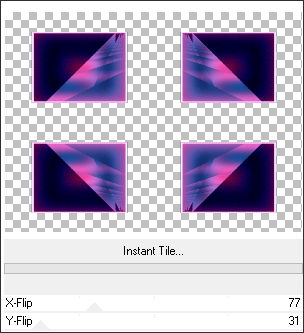
17. Effects / Plugins / Filters Unlimited 2.0 / VM Toolbox / Instant Tile... Default.
18. Effects / 3D Effects / Drop Shadow: 0 / 0 / 65 / 30 / Cor #00000019. Ative a Layer do Fundo
Ative a Magic Wand Tool...Feather e Tolerance em 0....Selecione a borda externa.
20. Layers / New Raster Layer.
Preencha com o Gradiente do Primeiro Plano.
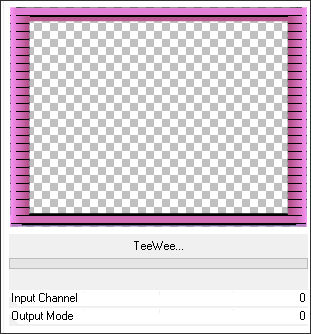
21. Effects / Plugins / Filters Unlimited 2.0 / VM Experimental / TeeWee...Default.
22. Blend Mode / HARD LIGHT.
23. Opacidade 55%.
24. Effects / Geometric Effects / Circle / Transparent ... Marcado.25. Selections / Promote Selection to layer.
26. Selections / Select None.Mova para a direita e posicione como no modelo ou
ative a Pick (K) Position X:246,00 / Position Y: 5,00 (Tecla M desativa a Pick)
27. Effects / 3D Effects / Drop Shadow: 0 / 0 / 65 / 30 / Cor #000000.
28. Layers / Duplicate.Image / Mirror / Mirror Horizontal.
29. Ative a segunda layer à partir do Topo . Promoted SelectionLayers / New Raster Layer.
30. Preencha com o Gradiente do Primeiro Plano.
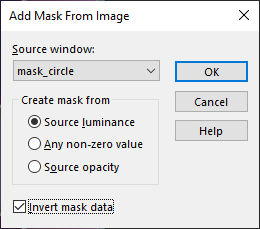
31. Abra a mask_circle.png no PSP ... Retorne ao seu trabalhoLayers / New Mask Layer / from Image: mask_circle
32. Layers / Merge / Merge Group.
33. Adjust / Sharpness / Sharpen More.
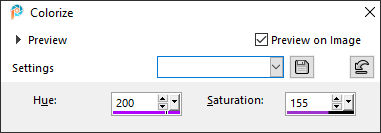
34. Adjust / Hue and Saturation / Colorize:
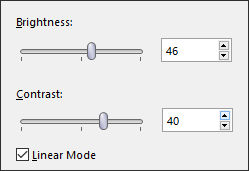
35. Adjust / Brightness and Contrast / Brightness/Contrast:
36. Layers / Merge / Merge Visible.
37. Effects / Plugins / Adjust / Variations ... clique ORIGINAL uma vez e em DARKER uma vez.
38. Abra o tube SuizaBella_Ref_AG-003946 ...Copie e cole como nova layer em seu trabalho.
39. Image / Resize /85% ... Resize all Layers ...Desmarcado.Posicione à direita.
40. Effects / 3D Effects / Drop Shadow: 7 / -6 / 65 /30 / Cor #000000
41. Abra o text.png....Copie e cole como nova layer
Ative a Pick (K) Position X:158,00 / Position Y: 162,00 (Tecla M desativa a Pick)
42. Assine seu trabalho43. Image / Add Borders / Symmetric Marcado / 3pix cor #31327D
Image / Add Borders / Symmetric Marcado / 5pix cor #ED5D1E
Image / Add Borders / Symmetric Marcado / 25pix cor #DBD6FF
Image / Add Borders / Symmetric Marcado / 2pix cor #31327D
Salve como JPG.
©Tutorial Traduzido por Estela Fonseca 28/06/2024.
Obrigada Elizabeth por me permitir traduzir seu trabalho.