OUTLINE
Tutorial de ©Elizabeth Creations - criado em 21/06/2022.
Este tutorial foi traduzido usando o Paint Shop Pro 2022 Ultimate.
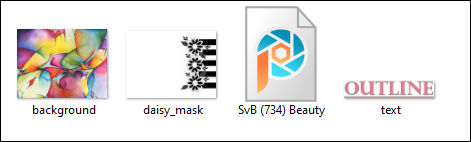
Material Necessário:
Plugins:
Filter Forge...
Filters Unlimited / Simple e Visual Manipulation...
Lembre-se de salvar seu trabalho com frequência.
1. Abra a imagem <<background.png>> Copie2. Abra uma nova imagem transparente de 980 X 730 Pixels.
Selections / Select All.
3. Cole na seleção.
Selections / Select None.
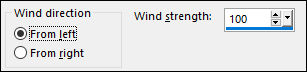
4. Effects / Distortion Effects / Wind:
5. Repita novamente este efeito.
Effects / Edge Effects / Enhance More.
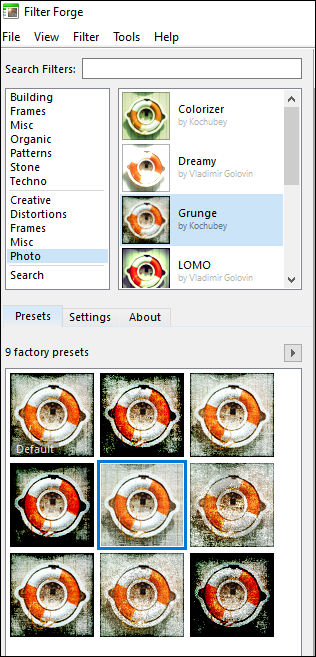
6. Effects / Plugins / Filter Forge:
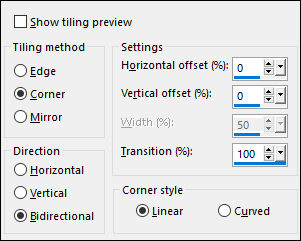
7. Effects / Image Effects / Seamless Tiling:
8. Layers / Duplicate.
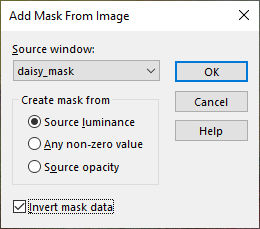
9. Feche o olho deste layer e ative a Layer do Fundo.10. Abra <<daisy_mask.png>> Minimize
Layers / New Mask layer / From Image: daisy_mask
11. Layers / Merge / Merge Group.12. Image / Flip / Flip Vertical.
13. Effects / 3D Effects / Drop Shadow: 0 / 0 / 100 / 10 / Cor #aa2931
14. Adjust / Hue and Saturation / Vibrancy 28.
15. Adjust / Brightness and Contrast / Brightness/Contrast:
16. Adjust / Sharpness / Unsharp Mask:
Layers / Arrange / Move Up.Blend mode / OVERLAY.
Feche o "olho" dessa layer
17. Abra e ativa a layer do Fundo
Effects / Plugins / Filters Unlimited / Simple / Blintz.
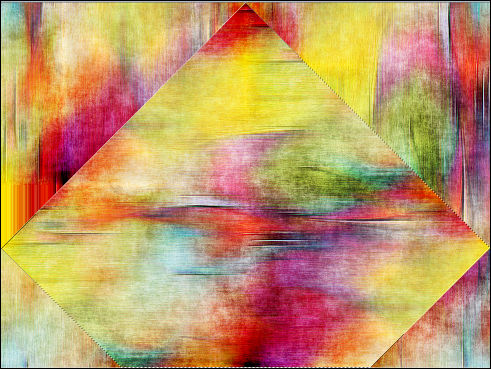
18. Freehand Selection Tool / Point to Point....MODE ADD...Feather e Tolerance = 0Selecione a figura central formada pelo efeito:
19. Adjust / Blur / Gaussian Blur / Radius 20.
20. Selections / Promote Selection to Layer.Selections / Select None.
21. Effects / Edge Effects / Enhance More.
22. Effects / Plugins / Filters Unlimited / Simple / 4 Way Average.
23. Effects / 3D Effects / Drop Shadow: 0 / 0 / 100 / 10 / Cor #aa2931.
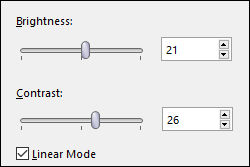
24. Adjust / Brightness and Contrast/ Brightness/Contrast:
25. Effects / Plugins / Filters Unlimited / Visual Manipulation / Transmission...default.
26. Effects / 3D Effects / Drop Shadow: 0 / 0 / 100 / 10 / Cor #aa2931.
27. Reduce the opacity to 65%.
28. Adjust / Brightness and Contrast/ Brightness/Contrast:
29. Ative e abra a layer do topo
Adjust / Hue and Saturation / Vibrancy 46.
30. Abra o << text.png >> Copie e Cole como nova layerLayers / Arrange / Bring to Top.
Posicione como na imagem:
31. Objects / Align / Horizontal Center.
32. Abra o tube <<SvB (734) Beauty>> Copie e Cole como nova layer33. Effects / 3D Effects / Drop Shadow: -1 / 18 / 50 / 31 / Cor #410F12
Posicione à esquerda, veja o modelo.
34. Assine seu trabalho
35. Se está satisfeita com o seu trabalho...Ative a Layer do Fundo e Copie
36. Image / Add Borders / Symmetric Marcado / 3 Pixels cor #FF0042
Image / Add Borders / Symmetric Marcado / 30 pixels cor #ffffff
37. Ative a <<Magic Wand Tool>> (Feather e Tolerance 0) Selecione a borda branca
38. Cole na seleção
Image / Mirror / Mirror Horizontal.
39. Selections / Invert.
40. Effects / 3D Effects / Drop Shadow: 0 / 0 / 90 / 15 / Cor #410F1241. Selections / Select None.
42. Image / Add Borders / Symmetric Marcado / 2 Pixels cor #FF0042
Salve como JPG.©Tutorial Traduzido por Estela Fonseca 09/08/2023.
Obrigada Elizabeth por me permitir traduzir seu trabalho.