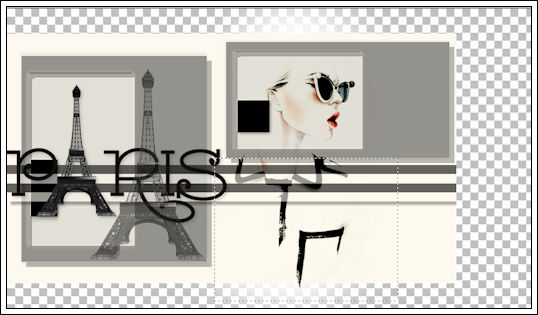
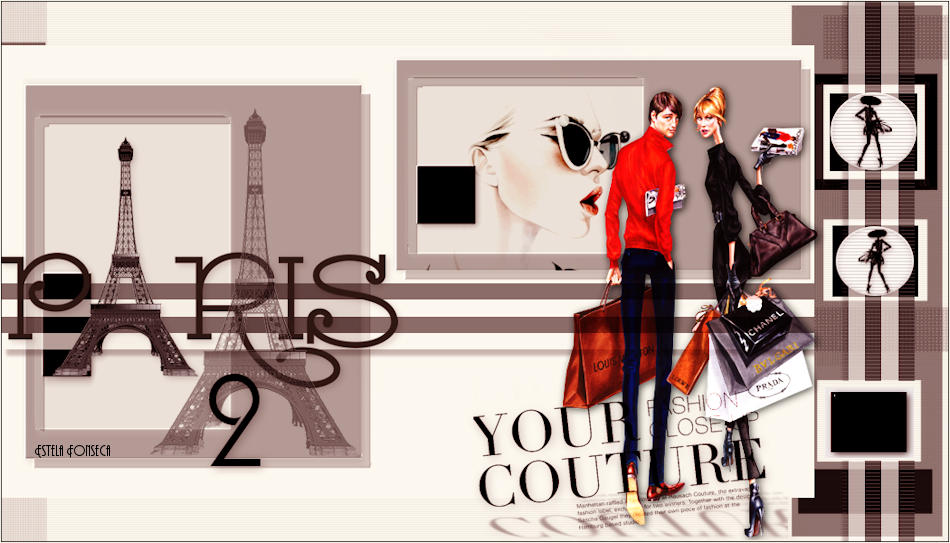
pARIS
Tutorial de ©Edith Graphics - Original Aqui
Tutorial traduzido no PSP X8
Materiais Necessários:
Tubes de: Alies , Guismo e YokaMask Monaiekje 22
Outros materiais de Edith
Plugins Utilizados :
Mura's SeamlessPenta com
Richard Rosenman
Preparação:Primeiro Plano Cor # fcf8ee / Segundo Plano Cor #000000
01- Abra uma nova imagem transparente de 900x500 pxPreencha com a cor do Segundo Plano
02- Layers / New Raster Layer
Preencha com a dor do Primeiro Plano
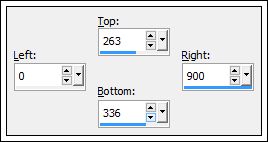
03- Selection Tool / Rectangle / Custom Selection:
Selections / Promote Selection to layer
Opacidade / 60%
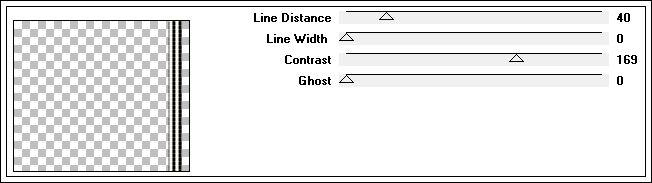
Effects / Plugin / MuRa's seamless / Checks with gradation
Effects / 3D Effects / Drop Shadow: #000000
Selections / Select None
04- Ative a layer <<Raster 2>>
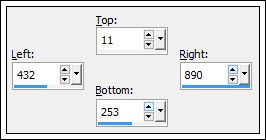
Selection Tool / Rectangle - Custom Selection:
Selections / Promote Selection to layer
Ative a Layer <<Raster 2 >>
Edit / Cut
Ative a Layer (Promoted Selection1)
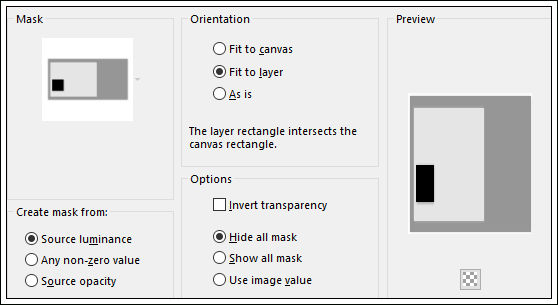
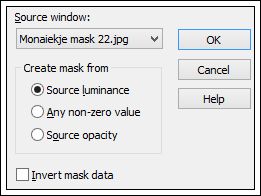
Selections / Load-save Mask / Load-Mask from disk:
Layers / Merge / Merge Group
Selections / Select None
05- Na Layer Raster 2
Selection Tool / Rectangle / Custom Selection:
Selections / Promote Selection to layer
Ative a layer <<Raster 2 >> Delete ou Edit / Cut
Na Layer <<Promoted Selection 1>>
Selections / Load-save Mask / Load-Mask from disk:
Layers / Merge / Merge Group
Selections / Select None
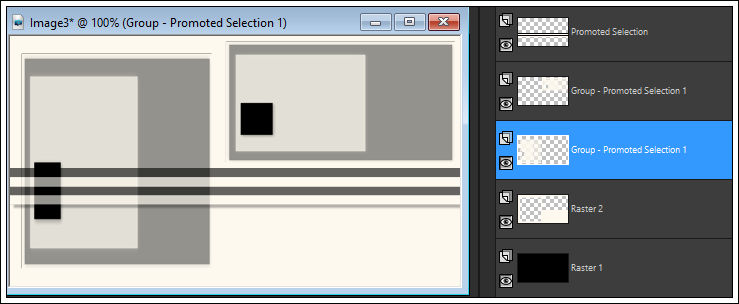
Seu Trabalho está assim:
Oculte a visibilidade da Layer do topo
Ative qualquer layer
Layers / Merge / Merge Visible
06- Ative a varinha mágica / Tolerance 8
Selecione as partes em cinza
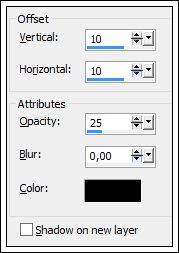
Effects / 3D Effects / Drop Shadow: 10 /10 / 25 / 0,00 / #000000
Selections / Select None
07- Faça a mesma coisa com a parte cinza da outra figura da esquerda.
Effects / 3D Effects / Drop Shadow: 10 /10 / 25 / 0,00 / #000000
Selections / Select None
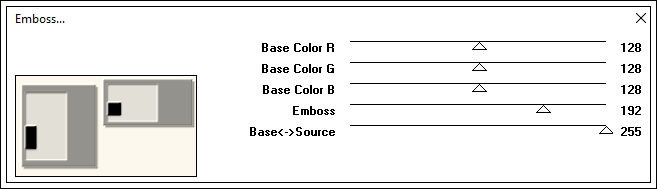
08- Effects / Plugin / Mura's Seamless / Emboss
09- Ative o tube << Yoka Lady Sunglass >> Copie e Cole como nova layer
Image / Resize / 80% (resize all layers desmarcado)
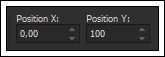
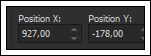
Posicione: Ative a Ferramenta Pick Tool (K)
Blend Mode / Multiply
Volte a Visibilidade da layer do topo.
Ative esta layer
10- Ative o tube <<CALGUISPARIS12022015 >>
Image / Resize / 300 pixels de Altura (All Layers marcadas)
Copie e Cole como nova Layer
Sem mexer no tube ative a Ferramenta Pick Tool (K) e coloque os valores destacados:
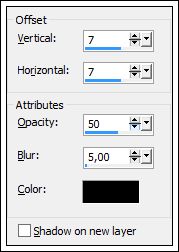
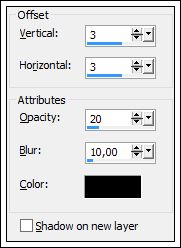
Effects / 3D Effects / Drop Shadow: : 3/3/20/10#000000
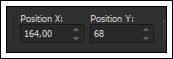
11- Ative o tube << calguiseiffel12022015 >>Image / Resize / 400 pixels de altura (resize all layers marcado)
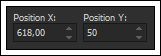
Sem mova o tube ative a Ferramenta Pick Tool (K) e coloque os valores destacados:
Opacidade / 55%
Adjust / Sharpness / Sharpen
12- Layers / New Raster Layer
Layers / Arrange / Send To Bottom
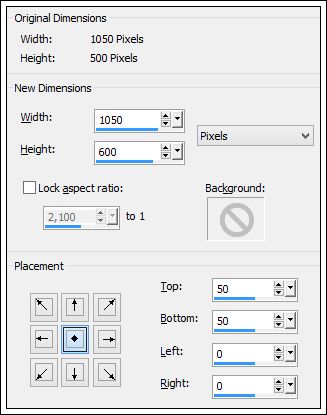
Image / Canvas Size: Faça isso duas vezes:
13- Ative a Layer << Raster 1 >>
Ferramenta Selection Tool (S) / Rectangle / Faça uma seleção como segue:
Delete no tecladoSelections / Select None
14- Ative a layer do fundo
Preencha com a cor #000000
Layers / New Raster layer
Preencha com a cor do Primeiro Plano
15- Ative a Mask <<Monaiekje>>
Image / Rotate Righ (duas vezes)
Minimize
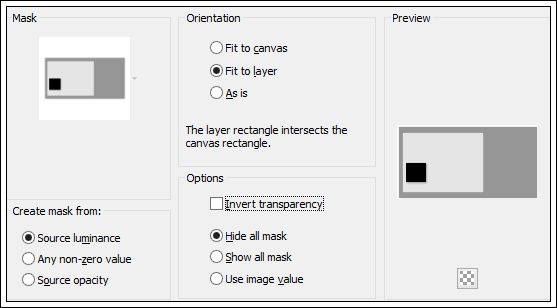
Layers / New Mask Layer / From Image:
Layers / Merge / Merge Group
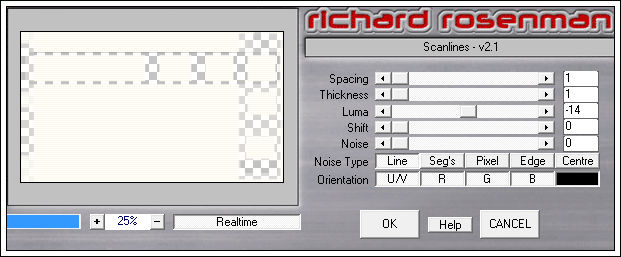
16- Effects / Plugin / Richard Rosenman / Scanlines
17- Effects / Plugin / MuRa's Seamless / Shadow
18- Ative a Layer <<Promoted Selection>>Layers / Duplicate
Image / Free Rotate / Right / 90°
Não Mexa ative a Ferramenta Pick Tool (K) Mode: Escala e coloque os valores destacados:
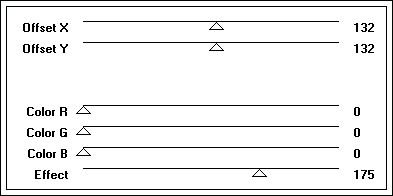
19- Effects / Plugin / Penta com / VTR2
Adjust / Sharpness / Sharpen
20- Ative a layer do topo
Abra o tube << Alies 1VR733-woman-04112013 >>
Copie e Cole como nova layer
Effects / 3D Effects / Drop shadow: 3 / 3 / 35 / 15,00 / #000000
Não Mexa ative a Ferramenta Pick Tool (K) Mode: Escala e coloque os valores destacados:
Adjust / Sharpness / Sharpen
21- Ative a Ferramenta de Texto / Fonte <<Andes>> Tamanho 48 points
Oculte a cor do Primeiro Plano
Digite "2" com a cor #000000
Layers / Convert to raster layer
Effects / 3D Effects / Drop shadow: 2 / 2 / 40 / 15,00 /#000000
22- Ative a Layer << Group Raster 5 >>
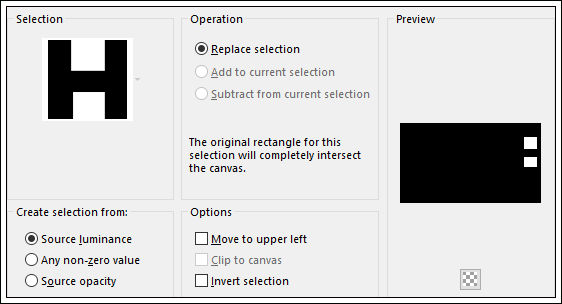
Selections/ Load save selection / Load selection from disk: sélection01paris2
Delete no teclado
Selections / Select None
23- Ative a layer do topo
Abra o tube <<bouton 1 >> Copie e Cole como nova layer (2 vezes)
Posicione o primeiro <<bouton>> no alto e à direita
Image / Mirror
Posicione
No segundo <<bouton>>
Image / Resize / 90% (resize all layers desmarcada)
Posicione
24- Abra o tube <<bouton 2 >> Copie e cole como nova layer
Posicione
25- Ative o tube <<Yokatexte >>
Image / Resize / 44% (resize all layers marcado)
Selecione a parte de cima e delete , tire a seleção.
Copie e Cole como nova layer
Posicione
Effects / 3D Effects / Drop shadow: 2/2/30/15 /#000000
26- Ative a layer do topo
Layers / New Raster Layer
Preencha com a cor #000000
Selections / Select All
Selections / Modify / Contract / 2 pixels
Delete no teclado
Selections / Select None
Layers / New Raster Layer
Preencha com a cor do Primeiro Plano
Selections / Select All
Selections / Modify / Contract / 1 pixel
Delete no teclado
Selections / Select None
27 - Layers / Merge / Merge All
Salve como jpg.
Outra versão com tubes de Guismo:
©Tutorial Traduzido por Estela Fonseca 22/05/2016.
Obrigada Edith por me permitir traduzir seu trabalho.