ANNE
Tutorial de ©Edith Graphics - Original Aqui
Material Necessário:
2 Tubes
1 Mask
3 Seleções
Os tubes são para uso pessoal, alguns incluem uma marca d'água,
É proibido remover, modificar ou distribuir os tubes na rede.
Agradeço aos criadores de tubes pelas suas licenças.
Plugins:
Medhi
Unlimited 2.0
Filter Factory Gallery A
Graphics Plus
Simple
Image Enhancement
Foreground cor #a728819
Background cor #d77e1e
01- Abra uma imagem transparente de 908/550 pixels
Preencha com a cor #d77e1e
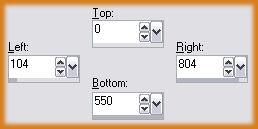
Selections Tool (S) / Custom Selection:
02-Layers / New Raster layer
Preencha com a cor do foreground
Selections / Select None
03- Effects / Geometric Effects / Skew: Horizontal / - 21 / Wrap
Layer / Merge / Merge All
03- Effects / Plugins / Filter Factory Gallery A / Wave: 255/204/157/137/255
04- Effects / Plugins /Filter Factory Gallery J / drink to me: 114
05- Effects / Plugins / Graphics Pluss / Emboss: 0/0/0/0.
Layers / Promote Background Layer
06- Foreground cor #ede4db
Ative a Layer <<Raster 1>>
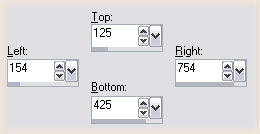
Selections Tool (S) / Custom selection:
Aplique a sombra: 4/4/50/20
Repita com os valores: -4/-4
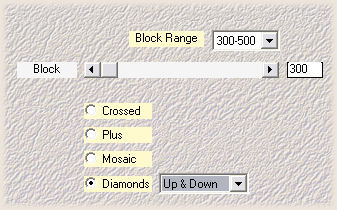
07- Effects / Plugins / Medhi / Sorting Tiles:
08- Copie e cole como nova layer
Effects / Plugins / Graphics Plus / Emboss
Opacidade 82%
Selections / Select None
09- Na layer do meio ( raster 1)
Selections / Select All
Selections / Modify / Contract / 42
Selections / Invert / Delete
Selections / Select None
10- Effects / Plugins / Simple / Left Right Warp
Aplique a sombra: 5/5/20/20
Valores negativos: -5/-5
Opacidade 82%
11- Selections Tool (S) / Custom Selection
Delete no Teclado
Selections / Select None
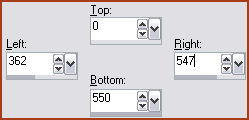
12- Selections Tool (S) / Custom Selection: Left 868/ right 908/ top 0/ bottom 550
Delete no Teclado
Selections / Select None
13- Ative a layer << Raster 3 >> a layer do topo
Image / Resize / 80% ... Resize all layers desmarcado
14- Layers / New Raster Layer
Layers / Arrange / Send to bottom
Preencha com a cor do Foreground
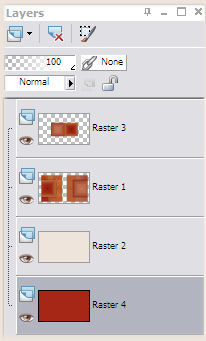
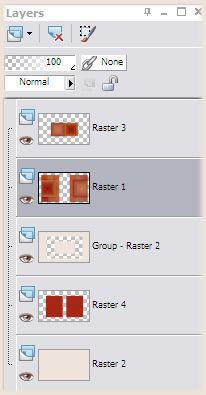
Suas layers, devem estar assim:
15- Ative a layer << Raster 1>>
Selections / Select All
Selections / Float
Selections / Invert
Ative a layer << Raster 4 >> Delete no Teclado
Selections / Select None
16- Ative a mask de cameron
Ative a layer <<Raster 2 >>
Layers / New mask layer / From image: mask cameron
Layers, merge / Merge Group
17- Layers / New Raster Layer
Layers / Arrange / Send to Bottom
Preencha com a cor do background
Ative a Layer <<Raster 4>> Image / Resize / 80% ...Resize All Layers ...Desmarcado
Ative a Layer <<Raster 1>>
Selections Tool (S) / Custom Selection
Delete no Teclado
Selections / Select None
As layers devem estar assim:
Ative a layer << Group Raster 2>>
Selections / Load save selection / Load selection from disk / seleção anne
Preencha a seleção com a cor do foreground
Effects / Plugins / Graphics Plus / Emboss / Default
Selections / Select None
18- Selections / Load save selection / Load selection from disk / seleção anne2
Preencha com a cor do background
Ative a layer << Raster 4 >> Delete
Selections / Select None
19- Ative a layer << Raster 4 >>
Selections / Load save selection / Load selection from disk / seleção anne3
Preencha com a cor do foreground
Ative a <<Raster 2 >> delete no teclado
Selections / Select None
20- Aplique a sombra: 5/5/20/3,00/ #000000
21 - Abra o tube do <<vaso>> Copie e cole como nova layer
Layers / Arrange / Bring to top
Image / resize / 94% ... all layers, desmarcado
Pick Tool (k) POS X; -24,00 / POS Y: 70,00
22- Effects / Plugins / Unlimited 2.0 / Color Filters / Color Booster:48
Abra o tube <<@nn020608>> Copie e cole como nova layer
Image / resize / 81% ... all layers, desmarcado
Pick Tool (k) POS X; 63,00 / POS Y: 83,00
Effects / Plugins / Unlimited 2.0 / Color Filters / Color Booster:58
Layers / Merge / Merge All
Redimensione para 850 pixels de largura
Layers / Merge / Merge All
Assine e salve como jpg.
©Tutorial Traduzido por Estela Fonseca 25/09/2010.
Obrigada Edith por me permitir traduzir seu trabalho.