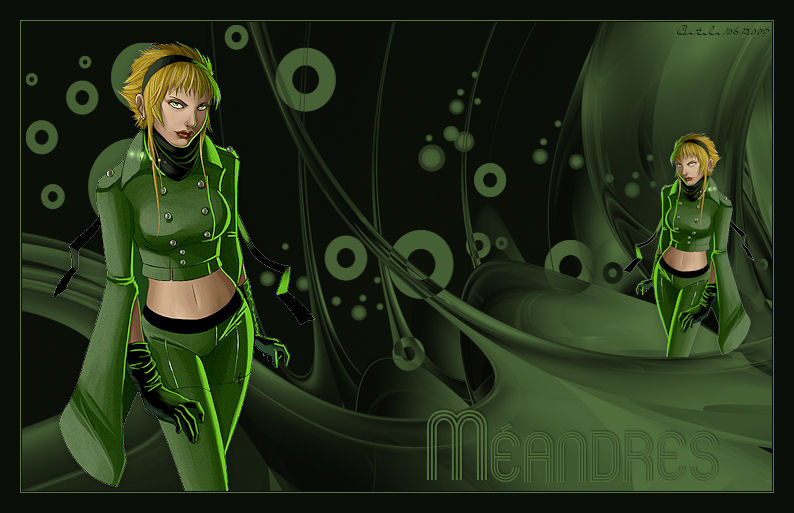
MEANDRES
Tutorial de ©Créa Barbouille - Original Aqui
Materiais: 1 Mask, 1 Seleção, 1 tube, 1 Fonte. AQUI.
Instale as seleções no seu PSP.
Minimize a Fonte.
1:) Foreground cor 91fce0 / Background cor " 000000 "
Abra uma imagem preta de 750px/469px .
2:) Abra a mask "claire_masque_meandres"
Em seu trabalho,
Layers, new layer
Preencha com a cor do foreground cor " 91fce0 "
Layers, new mask layer, from image.
Selecione a mask: "claire_masque_meandres"
Merge group.
3:) Layers, new layer
Selections, load selection, from disk
Selecione: "claire_meandres"
Preencha com a cor do foreground 91fce0
Selections, Select none.
Mude o blend mode dessa layer para diference.
4) Abra o tube "jet woman20-mei-2008"
Image, redimensione (450px) altura.
Adjust, sharpness, sharpen.
Copie e cole como nova layer.
Posicione.
Layers duplicate,
Image, mirror.
Image, resize para (50%). Desmarque , all layers.
Coloque a direita. (veja o exemplo!)
Nestas duas layers
Aplique a sombra (0/0/30/15 / # 000000).
5) Oculte a cor do foreground, background cor "91fce0 "
Escreva a letra "M" com a fonte "Mexcellent", size (100px)
Converta em layer,
Posicione.
Aplique a sombra (-1/1/40/2 / # 000000)
Com a mesma fonte, mesma cor, mas tamanho (72px)
Escreve "éandres"
Converta em uma layer
Posicione.
Aplique a sombra (-1/1/40/2 / # 000000)
6:) Image add borders symmetric (1), Cor "000000"
Image add borders symmetric (1), cor 91fce0 "
Image add borders symmetric (20), Color "000000"
Assine seu trabalho. Salve em JPG otimizado.
VOLTAR
©Tutorial Traduzido por Estela Fonseca 08/06/2009.
Obrigada Claire por me permitir traduzir seu trabalho.