PSP DIV3 - LES 248
Tutorial de ©castorke - Original Aqui
Traduzido no PSP 2022 Ultimate. Mas pode ser feito em versões anteriores.
Materiais Necessários:
Tubes: Bea, Virgínia
Máscara: Viviane
Agradeço pelos tubes.
Sem eles não seria possível realizar as aulas.Portanto, mantenha os tubes intactos e não os trate como se fossem seus.
Eles permanecem propriedade do artista original.
Plugins:Medhi/ WavyLab1.1
*&<Background Designers IV>/ @Night shadow e sf10 Slice N Dice
MuRa'S Meister/ Ladrilhos em Perspectiva
* Importe esses filtros para o Unlimited 2
Descompacte seu material em uma pasta de fácil acesso.
Salve seu trabalho regularmente!
DICA: duplique seus tubes e trabalhe com as cópias
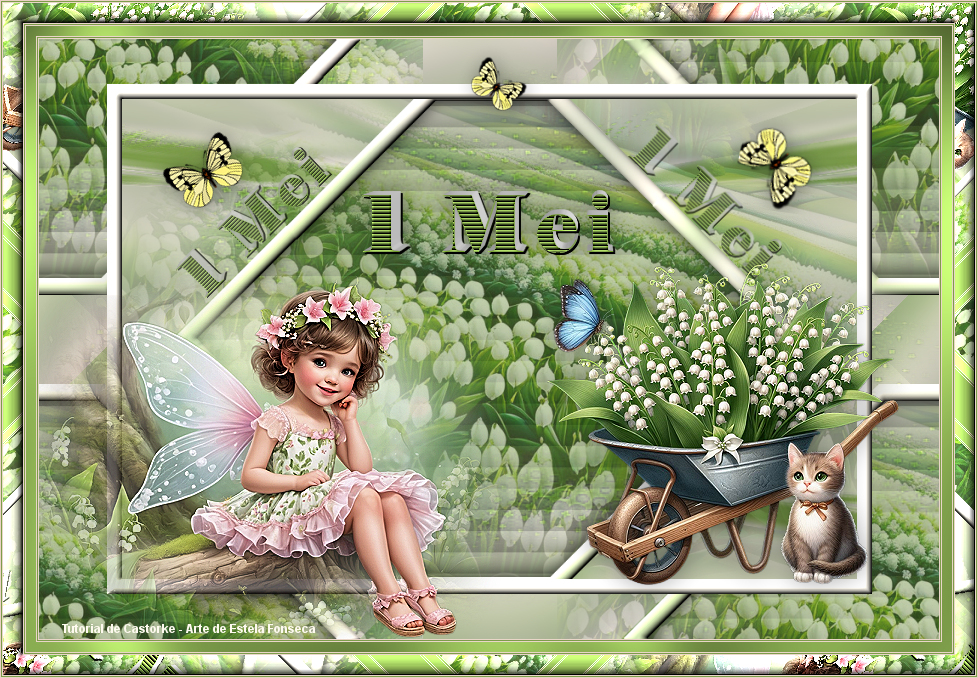
1. Abra Abra castorke_les248_alpha channel
2. Abra a paleta de cores
3. Primeiro Plano cor Nº1 #e9d6c8 e Segundo Plano cor Nº2 #7e904aOutras Cores: cor Nº3 #fffaef, cor Nº4 #a3a2b0
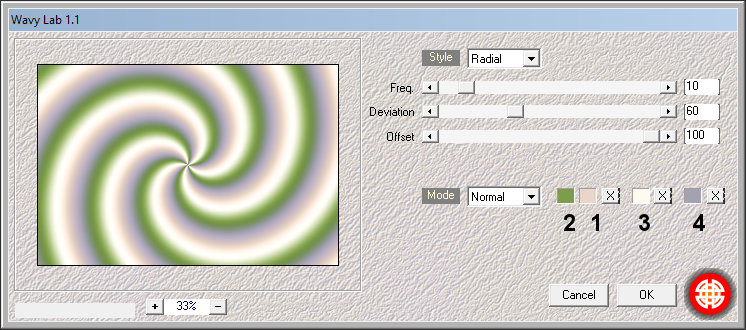
4. Efeitos/ Plugins/ Medhi/ WavyLab1.1
5. Adjust/Blur/Gaussian Blur / Radius 50
6. Efeitos/ Plugins/ Filters Unlimited 2.0/ &<Background Designers IV>/ Slice N Dice / configurações padrão.7. Layers / Duplicate.
8. Selections / Load save selection / Load selection from alpha channel: Selection #19. Selections / Pomote selection to layer
10. Selections / Mosify / Contract 20 Pixels11. Delete no Teclado (Edit/Cut)
12. Selections / Select None.
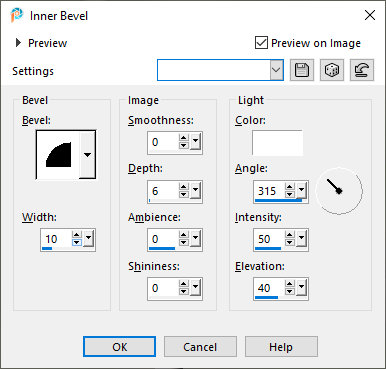
13. Effects / 3D Effects /Inner Bevel (Nº2)
14. Ative a Varinha Mágica (Feather e Tolerance em 0) e Toque com a varinha mágica no centro do quadro.
15. Layers / New Raster Layer.
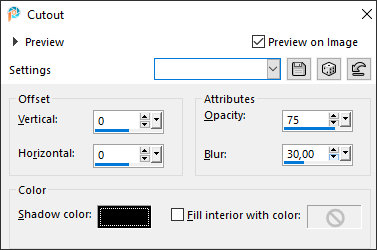
16. Effects / 3D Effects / Cutout.
17. Selections / Select None.
18. Layers / Merge / Down.
19. Layers / New Raster Layer
20. Preencha com a cor Nº2
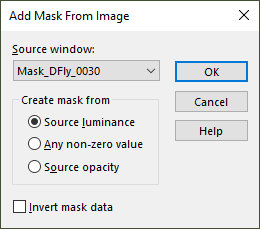
21. Abra Mask_DFly_0030 e minimize.
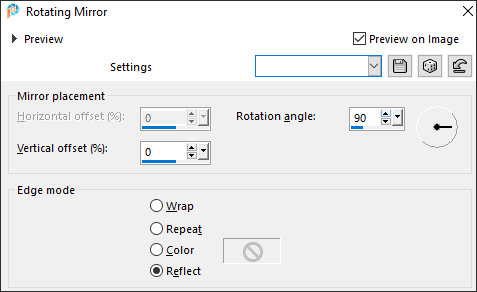
22. Layers / New Mask Layer / From Image.
23. Layers / Merge / Merge Group.
24. Adjust / Sharpness / Sharpen More.
25. Edit / Repeat Sharpen More.
26. Layers / Arrange / Move Down
27. Layers / Merge / Merge Down
28. Selections / Load save selection / Load selection from alpha channel: Selection #1
29. Selections / Promote Selection to Layer.
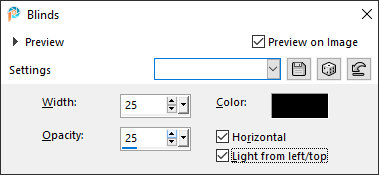
30. Effects / Texture Effects / Blinds.
31. Selections / Select None
32. Ative a Layer <<Raster 1>> Layers / Duplicate
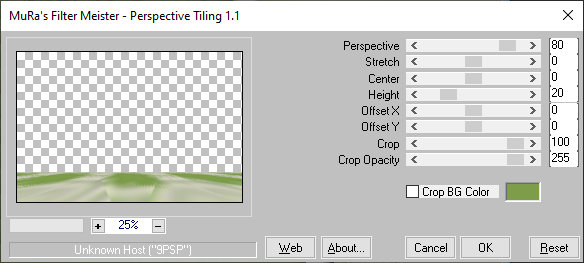
33. Effects/ Plugins/ MuRa's Meister/ Perspective Tiling.
34. Effects / Reflection Effects / Rotating Mirror.
35. Ative a layer do Topo (Promoted Selection).
36. Abra o tube: KGPebFFzQ0JhBE-wNMiyZNaaJss - Remova o nome.
37. Copie e Cole como nova layer em seu trabalho38. Reduza a opacidade à 55
39. Layers / Arrange / Move Down.
40. Ative a layer do Fundo (raster1)
41. Layers / Duplicate.
42. Fique nessa camada!
43. Feche apenas o olho da Raster 1
44. Layers / Merge / Merge Visible.
45. Image / Resize /85% ... Resize All Layers ... Desmarcado.46. Clique com a varinha mágica (Tolerance e Feather em 0) na parte transparente.
49. Selections / Invert.
50. Effects / Image Effects / Seamless Tiling / Configurações padrão.
51. Layers / New Raster LayerPreencha com a cor Nº3
52. Selections / Modify / Contracr 15
53. Delete no Teclado ou Edit /Clear
54. Selections / Select None.
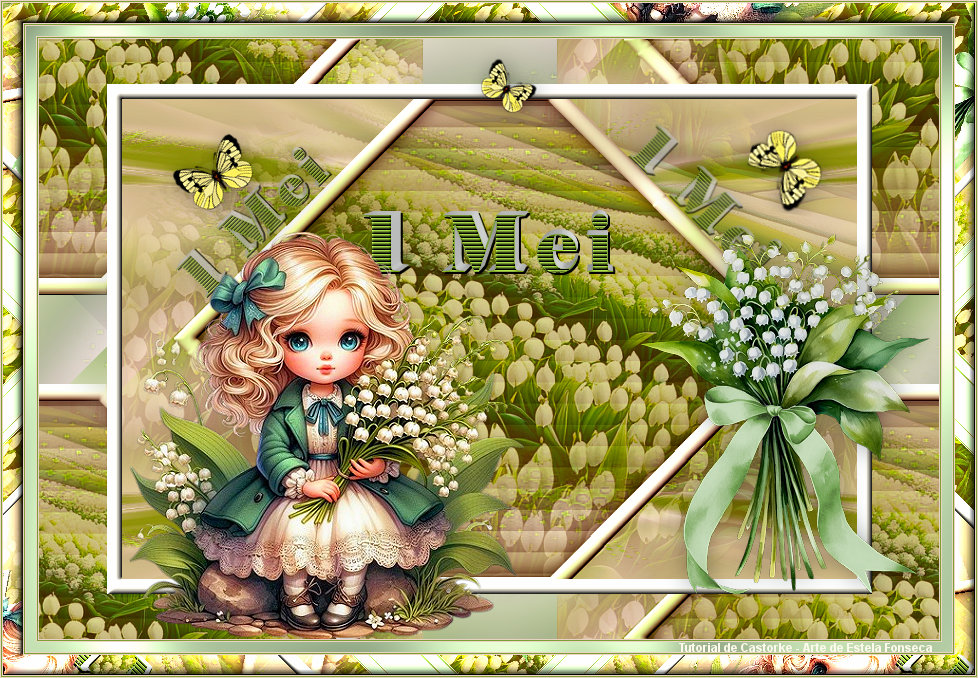
55. Effects / 3D Effects /Inner Bevel (Nº2)
56. Abra o olho da layer <<Raster 1>>
57. Layers / Merge / Merge All
58. Abra o tube: CV_0904-003 - Remova o nome.
59. Copie e Volte ao seu trabalho
60. Cole como nova layer.
61. Image / Resize / 60% ... Resize All Layers ... Desmarcado
62. Adjust / Sharpness / Sharpen ( 2 Vezes)
63. Coloque na parte esquerda inferior (Ver Modelo).
65. Abra o tube: 5pBa2SOmXZdJlzWaqwCKzKmGf74 (Remova o nome)66. Copie e Cole como nova layer em seu trabalho.
67. Image / Resize / 60% ... Resize All Layers ... Desmarcado ( 2 Vezes)
68. Coloque no canto inferior direito.
69. Effects / 3D Effects / Drop Shadow: 0, 0, 35, 35 preto.
70. Abra texto_2: Copie e Cole como nova layer em seu trabalho
71. Pick Tool (K) Posição X (137,00) / Posição Y ( 85,00)
72. Abra o Texto: Copie e cole como nova layer em seu trabalho73. Pick Tool (K) Posição X (323,00) / Posição Y ( 171,00)
74. Effects / 3D Effects / Drop Shadow: 0, 0, 35, 35 preto..
75. Abra o tube Decorativo - Copie e cole como nova layer
76. Posicione no topo77. Image / Add Borders / Symmetric Marcado / 1 Pixel cor Nº1
78. Image / Add Borders / Symmetric Marcado / 1 Pixel cor Nº 2
79. Image / Add Borders / Symmetric Marcado / 1 Pixel cor Nº 1
90. Selections / Select All.
91. Image / Add Borders / Symmetric Marcado / 10 Pixels cor Nº 2
92. Selections / Invert.
93. Effects/ Plugins / Filters Unlimited 2.0/ &<Background Designers IV>/ @Night Shadow / Com configurações padrão.
94. Selections / Select None.
95. Image / Add Borders / Symmetric Marcado / 1 Pixel cor Nº 1
96. Image / Add Borders / Symmetric Marcado / 1 Pixel cor Nº2
97.Image / Add Borders / Symmetric Marcado / 1 Pixel cor Nº 1
98. Selections / Select All
99. Image / Add Borders / Symmetric Marcado / 20 Pixels cor Nº2
100. Selections / Invert
101. Effects / Plugins / Filters Unlimited 2.0/ &<Background Designers IV>/ Slice N Dice / Configurações Padrão
102. Effects / 3D Effects /Inner Bevel (Nº2) Mesmas configurações de antes
103. Selections / Select None104.Image / Add Borders / Symmetric Marcado / 1 Pixel cor Nº 1
105.Image / Add Borders / Symmetric Marcado / 1 Pixel cor Nº2
106. Image / Add Borders / Symmetric Marcado / 1 Pixel cor Nº 1107. Coloque o seu nome ou a sua marca d'água
108. Layers / Merge / Merge All (flatten)109.Redimensione se desejar
110. Salve como JPG.
Versão com tube de EF e de Leeloo:
VOLTAR
© Tutorial Traduzido por Estela Fonseca em 27/04/2024.
Obrigada Castorke por me permitir traduzir seus trabalhos.