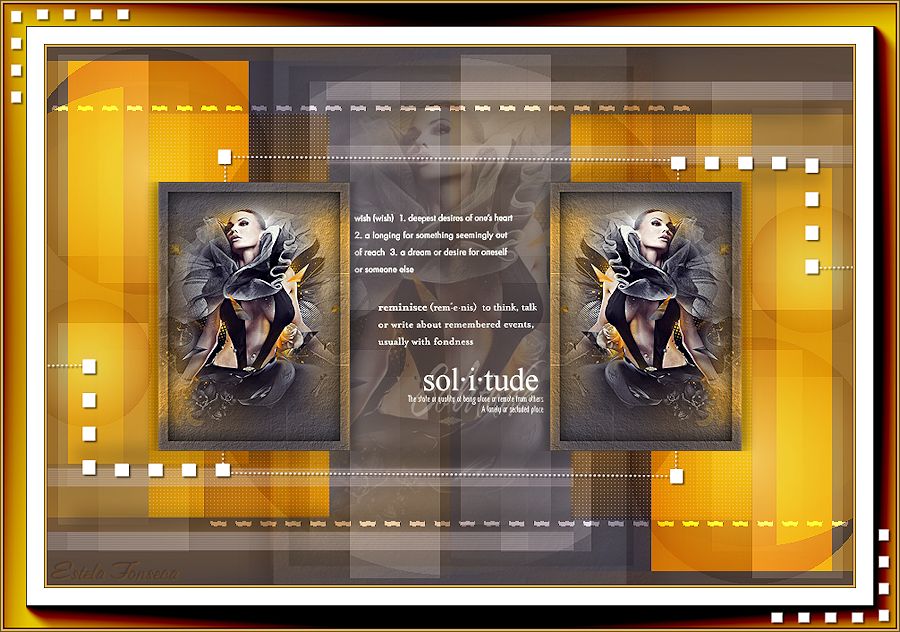
SOLITUDE
Tutorial de Anya ASDwebdesign , original, Aqui.

O tutorial foi criado e traduzido no PSP15. Mas pode ser feito em outras versões.
Materiais Necessários:
Tube by HaZal você encontra seus trabalhos AQUI
Plugins Utilizados:
AP [Lines] / Lines - SilverLiningItalian Editors Effect / Picture in Picture
VM Natural / Acid Rain
Xero / Clarity
AAA Frames / Foto Frame
Preparação:
Copie a seleção para a pasta de seleções do PSP
Copie a textura para a pasta de texturas do PSP
Cores Utilizadas:
Nota:Ao trabalhar com suas próprias cores, brinque com o Blend Mode e / ou opacidade a seu próprio critério!!!
Foreground cor #ffb127
Background Cor #4a4957
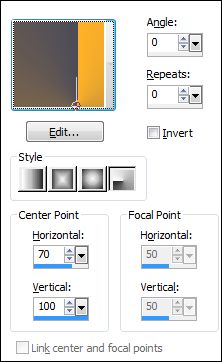
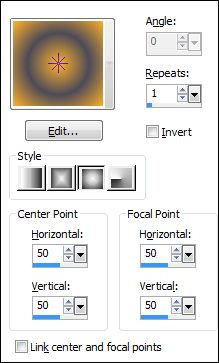
01- Forme no primeiro plano um gradiente (Corel_06_029) - Estilo: Radial
Abra uma nova imagem transparente de 900 x 600 px
Preencha com o gradiente.02- Layers / Duplicate
Image / Mirror
Image / Resize / 75% / Resize all layers desmarcado
Layers / Merge / Merge Visible
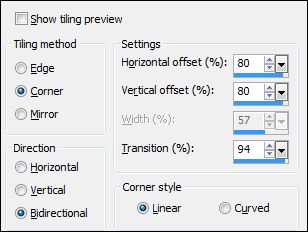
Effects /Image Effects / Seamless Tiling:
03- Layers / Duplicate
Image / Mirror
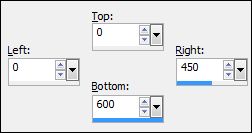
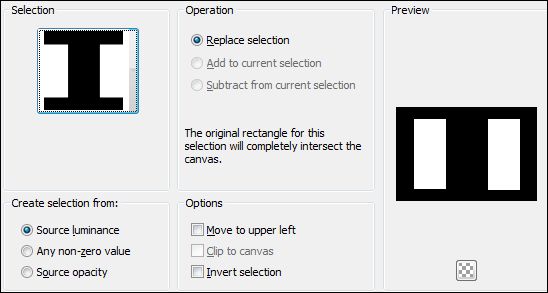
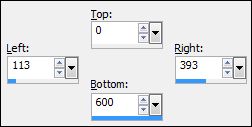
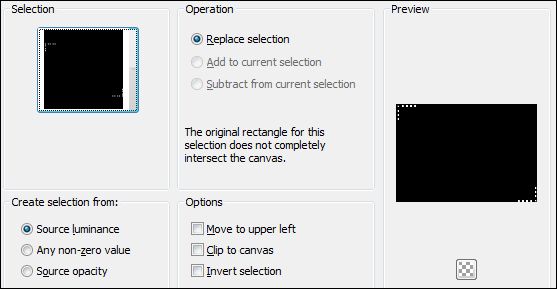
Ferramenta / Selection Tool / Rectangle / Custom Selection:
Edit / Cut
Selections / Select None
Image / Flip
Layers / Merge / Merge Visible
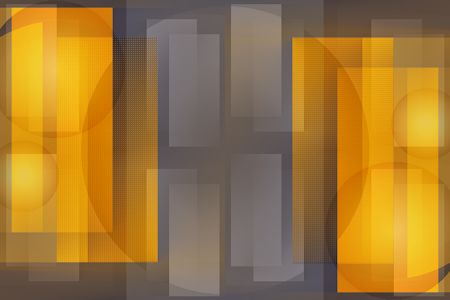
Seu trabalho está assim agora:
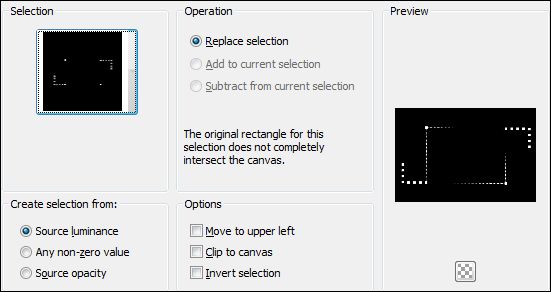
04- Selections / Load/Save Selection / Load Selection From Disk : ASDwebs_Sel_#291
Selections / Promote Selection to Layer
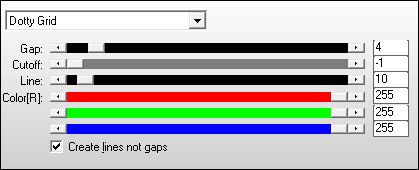
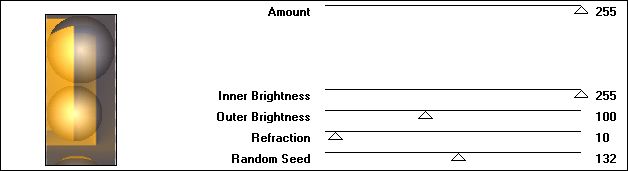
Effects / Plugins / AP [Lines] / Lines - SilverLining
Selections / Select None
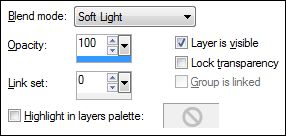
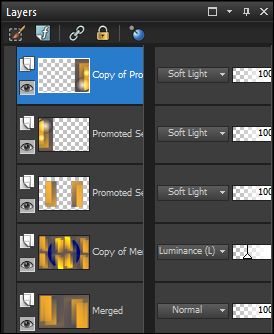
Na paleta das Layers Dê Duplo clique sobre a layer / Blend Mode / Soft Light
05- Clique na layer inferior (Merged)
Layers / Duplicate
Effects / Plugins / Italian Editors Effect / Picture in Picture
Blend Mode / "Luminance (Legacy)"Opacidade / 30
Adjust / Sharpness / Sharpen
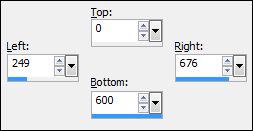
06- Clique na Layer inferior (Merged)Ferramenta / Selection Tool / Rectangle / Custom Selection:
Selections / Promote Selection to Layer
Effects / Plugins / VM Natural / Acid Rain
Selections / Select None.
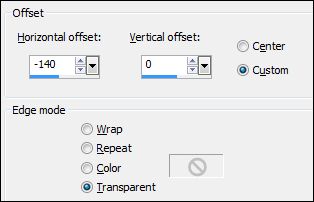
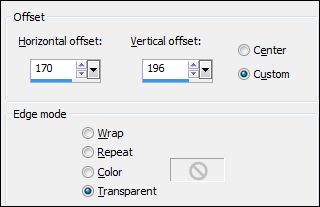
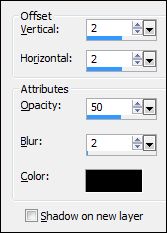
07- Layers / Arrange / Bring to TopEffects / Image Effects / Offset
Blend Mode / "Soft Light"
Adjust / Sharpness / Sharpen08- Layers / Duplicate
Image / Mirror
Image / FlipSeu trabalho está assim agora:
09- Abra o Tube "ASDwebs_Element1"
Copie / Cole como nova layerEffects / Image Effects / Offset
Layers / Duplicate
Image /Mirror
Image / Flip
Layers / Merge / Merge Down
Opacidade / 75
Adjust / Sharpness / Sharpen
10- Ative a layer inferiorFerramenta / Selection Tool / Rectangle / Custom Selection:
Selections / Promote Selection to Layer
Mantenha a seleção!!!!!
11- Layers / Arrange / Bring to Top
Adjust / Blur / Gaussian Blur / 20
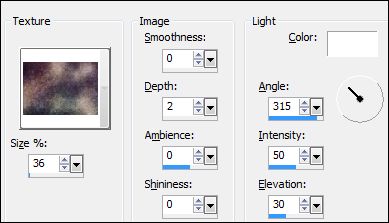
Effects / Texture Effects / Texture / Vintage 3 by cloaks
Abra o Tube "woman tubes 162-HaZaL"
Copie / Cole como nova layerSelections / Invert
Edit / Cut
Selections / Invert
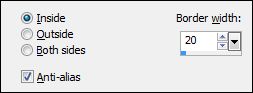
Selections / Modify / Select Selection Borders
Effects 3D Effects / Drop Shadow / Cor: #000000
Selections / Select None
Layers / Merge / Merge Down
12- Layers / Duplicate
Blend Mode / "Soft Light"Opacidade / 50
Layers / Arrange / Move Down
13- Ative a layer superiorImage / Resize / 50% / Resize all layers desmarcado
Effects / Image Effects / Offset
Layers / Duplicate
Image / mirror
Layers / Merge / Merge Down
Adjust / Sharpness / Sharpen
Effects / Plugins / Xero / Clarity : Clarity 10014- Mude a cor do foreground para branco #ffffff
Clique na segunda layer de cima para baixo ( Copy of Promoted Selection)Layers / New Raster Layer
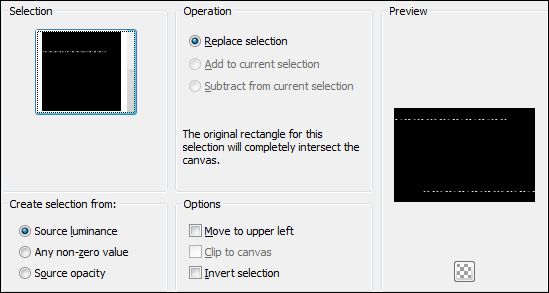
Selections / Load/Save Selection / Load Selection From Disk: ASDwebs_Sel_#292
Preencha com a cor do foreground
Selections / Select None
Effects / 3D Effects / DropShadow / Cor: #000000
Adjust / Sharpness / Sharpen
15- Abra o Tube "ASDwebs_Wordart_Solitude"
Copie / Cole como nova layer.Blend Mode / "Screen"
16- Ative a layer superior
Layers / New Raster Layer
Selections / Load/Save Selection / Load Selection From Disk : ASDwebs_Sel_#293
Preencha com a cor do foreground
Selections / Select None
Effects / Edge Effects / Enhance More
Blend Mode / "Overlay"17- Image / Add Borders / Symmetric marcado / 1 pixel cor #4a4957
Image / Add Borders / Symmetric marcado / 2 pixels cor #ffb127
Image / Add Borders / Symmetric marcado / 1 pixel cor #4a4957
Image / Add Borders / Symmetric marcado / 45 pixels cor #ffffff
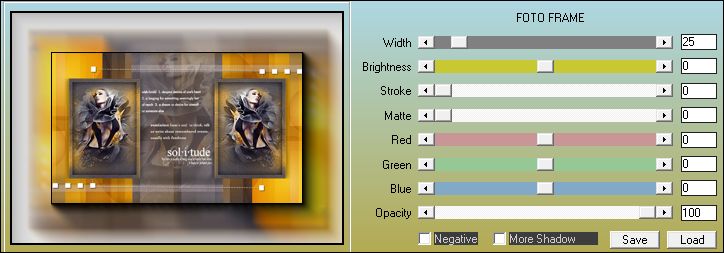
Effects / Plugins / AAA Frames / Foto frame
18- Selections / Select All
Selections / Modify / Contract / 25 px
Selections / Invert
Primeiro Plano Cor#ffb127 , forme um gradiente Foreground/Background (Corel_06_029) Estilo: Sunburst
Layers / New Raster Layer
Preencha com este gradienteSelections / Select None
Blend Mode / Burn
Layers / Duplicate
Nota: Se você usa cores diferentes, você pode não precisar duplicar a layer.19- Primeiro Plano cor branca #ffffff
Layers / New Raster Layer
Selections / Load/Save Selection / Load Selection From Disk : ASDwebs_Sel_#294
Preencha com a cor do foreground
Selections / Select None
Effects / 3D Effects / DropShadow / Cor: #000000
Adjust / Sharpness/ Sharpen
20- Image / Add Borders / Symmetric marcado / 1 pixel cor #4a4957
Image / Add Borders / Symmetric marcado / 2 pixels cor #ffb127
Image / Add Borders / Symmetric marcado / 1 pixel cor #4a495721- Image / Resize / Width 900 Pixels / Resize all layers marcado
Adicione o seu nome ou a sua marca d'água.Salve como JPG.
©Tutorial traduzido por Estela Fonseca em 30/06/2013.
Não alterar nem repassar sem autorização.