FANTASIA
Tutorial de ©Aliciar Deseños - Original Aqui
Criado no Corel X3, mas pode ser feito em outras versões anteriores
Materiais Necessários:
tube 6169dwtubes
Seleções sel_139, 140 y 141aliciar (Guarde nas pasta de Seleções de My PSP Files)
Gradiente GoldGradient (Guarde na pasta de Gradientes)
Marca d'água tutorialespspaliciar
Plugins Utilizados:
Flaming Pear/GliterattoAlien Skin/Eye Candy 5 Impact/Extrude
Alien Skin/Eye Candy 5 Impact/Perspective Shadow
Tutorial:
1. Abra uma imagem transparente de 988 x 600 Pixels.
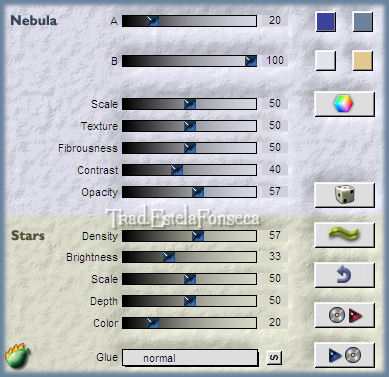
2. Effects / Pligin / Flaming Pear / Gliteratto Cores #3b429c y #6b839c
3. Layers / New Raster Layer.
Selections/Load/Save Selection/Load Selection From Disk/Load sel _140aliciar .
Preencha a seleção com o gradiente Gold.Selections / Select None
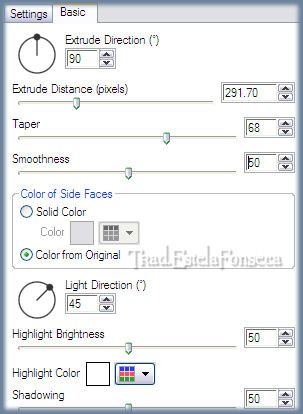
4. Effects / Plugin / Alien Skin/Eye Candy 5 Impact/Extrude.
Baixe a opacidade da layer para 70%
5. Effects/Geometric Effects/Perspective Vertical
6. Layers / New Raster Layer
Selections/Load/Save Selection/Load Selection From Disk/Load sel _139aliciar .
Preencha com o gradiente GoldGradiente.
Selections / Select None
7. Effects / Plugin / Alien Skin/Eye Candy 5 Impact/Extrude. ( mesmas configurações anteriores)
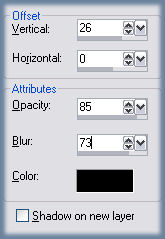
8. Effects/3D Effects/Drop Shadow
9. Effects /Plugin / Alien Skin/Eye Candy 5 Impact/Perspective Shadow:
Em Settings (Configurações) marque a opção: Reflect in Fronte, above
em Basic:
10. Copie o tube 6169dwtubes cole como nova layer
11. Layers / New Raster Layer.Selections/Load/Save Selection/Load Selection From Disk/Load sel _141aliciar .
Preencha com o gradiente GoldGradiente.
Selections / Select None
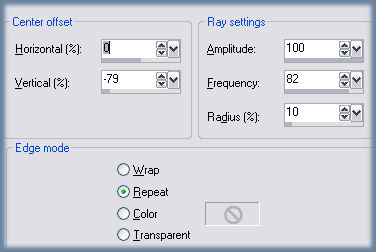
12. Effects/Distortion Effects/Spiky Halo:
13. Adicione borda a gosto.
14.Assine, coloque a marca d'água tutorialespspaliciar,merge all e exporte como .jpg
VOLTAR
©Tutorial Traduzido por Estela Fonseca 07/10/2010.
Obrigada Alicia por me permitir traduzir seu trabalho.


