GUILHEMINE
Tutorial de ©Alenza, original, AQUI.
Tutorial traduzido no PSP X8, mas pode ser feito com outras versões.
Material Necessário:
Tube de K@rine Dreams, seu site AQUI
Tube de Azalée Créations, seu site, AQUI
Plugins Utilizados:Simple Diamonds
DC Special, PatternEditDo
Mura's Meister, Perspective Tiling
Toadies, What are You ?
Simple, Pizza Slice Mirror
Alien Skin, Eye Candy 5, Impact, Glass
Penta.com, Dot and Cross
Preparação:Abra os tubes, duplique e feche os originais.
1) Abra uma nova imagem transparente de 900/600 pixels2) Primeiro Plano Cor #f4eff3 / Segundo Plano Cor #7d2f56
3) Preencha com a cor do Segundo Plano
Selections / Select All
Selections / Modify / Contract 20 pixels
Delete no teclado
Selections / Invert
Layers / Duplicate
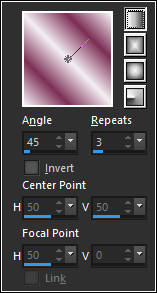
4) Forme um Gradiente estilo <<Linear>>
Preencha a Seleção
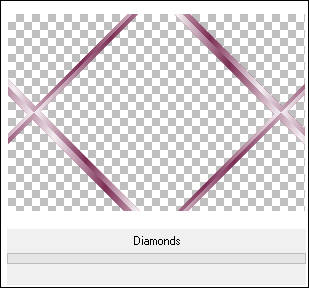
5)Effects / Plugin / Simple / Diamonds
Selections / Select None
Effects / Edge Effects / Enhance
6) Ative a Layer <<Raster 1>>
Effects / Texture Effects / Blinds
7) Layers / Merge / Merge Visible
8) Layers / New Raster LayerSelections / Select All
Selections / Modify / Contract 20 pixels
Preencha com a cor do Segundo Plano
Effects / 3d Effects / Drop Shadow: 2, 2, 50, 20, # 000000
Effects / 3d Effects / Drop Shadow: - 2, - 2, 50, 20, #000000
9) Selections / Modify / Contract 2 pixelsPreencha com a cor do Primeiro Plano
Selections / Modify / Contract 2 pixels
Preencha com a cor do Segundo Plano
10) Selections / Promote Selection to Layer
Effects / Texture Effects / Textil
Selections / Select None
11) Layers / New Raster Layer
Selections / Load Save selections / Load selections From disk: alenza_select383
Preencha a Seleção com a cor do Primeiro Plano
Selections / Modify / Contract 1 pixel
Preencha com a cor do Segundo Plano
Selections / Select None
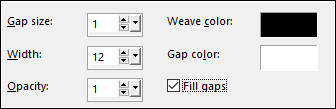
12) Effects / Plugin / DC Special / PatternEditDo.
(Você deve obter esse efeito, caso contrário, coloque a cor clara no fundo e aplique o filtro)
Opacidade / 63%
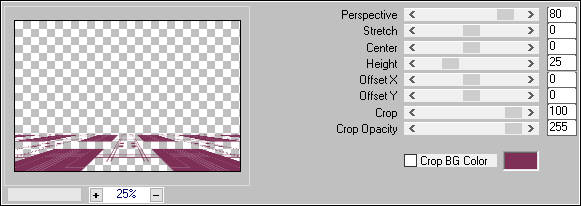
13)Effects / Plugin / Mura's Meister / Perspective Tiling.
14) Effects / Edge Effects / Enhance
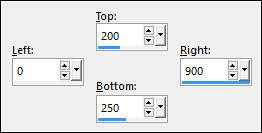
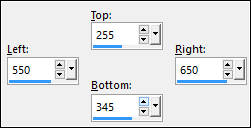
15) Selection Tool (S) / Rectangle / Custom Selection:
16) Layers / New Raster Layer
Preencha a Seleção com a cor do Primeiro Plano
Selections / Modify / Contract 2 pixels
Delete no teclado
Mude a Opacidade do Baldinho de Pintura 50%
Preencha a seleção com a cor do Primeiro Plano
Volte a opacidade do Baldinho de Pintura para 100%
17) Selections / Select None
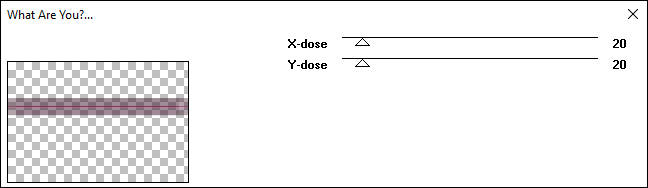
Effects / Plugin / Toadies / What are You ?
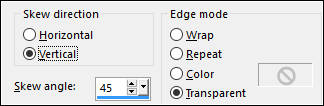
18) Effects / Geometric Effects / Skew
19) Effects / Plugin / Simple / Pizza Slice Mirror.
Opacidade / 28 %
Nota: Eu não baixei a opacidade.
Layers / Duplicate
Image / Mirror / Mirror Horizontal
Layers / Merge / Merge Down
Layers / Arrange / Move Down
20) Ative a Layer do topo
Layers / New Raster Layer
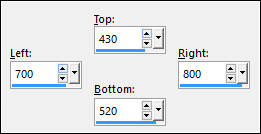
Selection Tool (S) / Rectangle / Custom Selection:
21) Preencha a Seleção com a cor do Primeiro Plano
Effects / 3D Effects / Drop Shadow: 20/20/50/0 / #000000
22) Selections / Modify / Contract 20 pixels
Preencha com a cor do Segundo Plano
Selections / Modify / Contract 1 pixels
Preencha com a cor do Primeiro Plano
Delete no teclado
Effects / Plugin / Alien Skin, Eye Candy 5 / Impact / Glass / Preset Clear
23) Selections / Select None
Layers / New Raster Layer
Selection Tool (S) / Rectangle / Custom Selection:
24) Repita os pontos n° 21 e 22.
25) Layers / New Raster LayerSelection Tool (S) / Rectangle / Custom Selection:
26) Repita os pontos n° 21 e 22.
27) Abra o tube <<Fleur >> Copie e Cole como nova layerOpacidade / 77 %
28) Abra o tube << alenza_traits_guilhemine >>
Copie e Cole como nova layer
Effects / Image Effects / Offset:
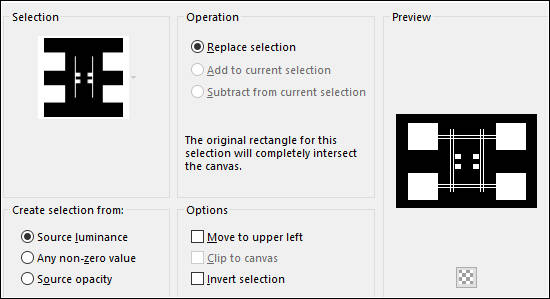
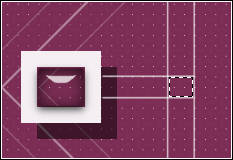
29) Ative a Varinha Mágica e Selecione o interior da forma, veja abaixo:
Effects / Plugin / Alien Skin eye Candy 5 / Impact / Glass / Clear
Selections / Select None
30) Abra o tube <<K@rine_dreams_Misted_Face_3199_Janvier_2016 à 80 %>>
Copie e Cole como nova layer
Image / Resize / 80% (resize all layers desmarcado)
Effcts / 3D Effects / Drop Shadow: 2 / 2 / 50 / 20,00 / #000000
Layers / Duplicate
31) Abra o tube << Vase-239-Azalee>>
Copie e Cole Como Nova Layer
Image / Resize / 70% (resize all layers desmarcado)
Effcts / 3D Effects / Drop Shadow: 2 / 2 / 50 / 20,00 / #000000
32) Image / Add Borders / Symmetric Marcado / 1 pixel cor do Primeiro Plano
Image / Add Borders / Symmetric Marcado / 20 pixels cor do Segundo Plano
Image / Add Borders / Symmetric Marcado / 1 pixel cor do Primeiro Plano
Image / Add Borders / Symmetric Marcado / 40 pixels cor do Segundo Plano
33) Selecione a Borda de 40 pixels com a Varinha Mágica
Preencha com o Gradiente do inicio
Effects / Plugin / Penta.Com / Dot and Cross / Default
34) Selections / Select None
Assine seu trabalho
Salve como jpeg.
Versão com tube de Yoka e de KaraX :
©Tutorial Traduzido por Estela Fonseca 20/03/2017.
Obrigada Alenza por me permitir traduzir seu trabalho.