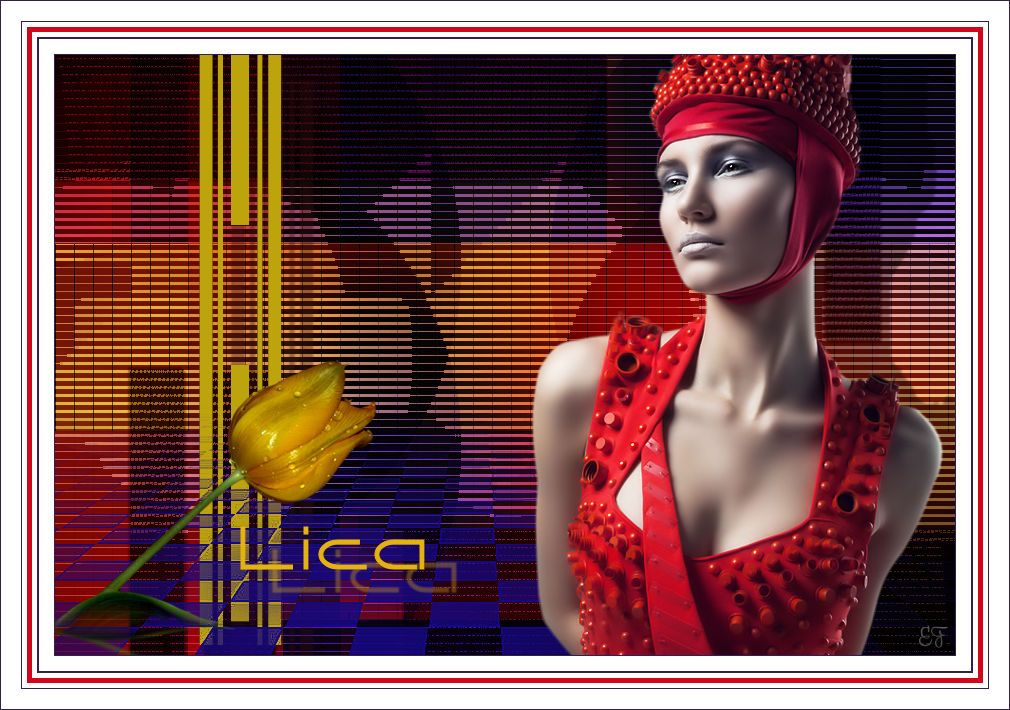
LICA
Tutorial de ©Adri. Original AQUI.
Traduzido no PSP X7
Materiais Necessários:
Tube - Luz Cristina
tube 2123 Woman Lb Tubes
Deco 1
Text
Mask : 1003211258397205672
Mask : xadresmik
Selection Ad_14
Bk Lica Image jpg
Plugins Utilizados:
Toodies / Picasso Last wordSimple / Pizza Slice mirror / blintz
deformation / circulator
toodies / what are you
tramage / tee wee / Wire Mesh
Nic software / Color effex pro / Contrast color range
1- Abra uma nova imagem transparente de 900x600 pixels2- Selections / Select all
3- Abra << Bkg-Lica >> Copie / Cole na Seleção4 -Layers / New Raster Layer
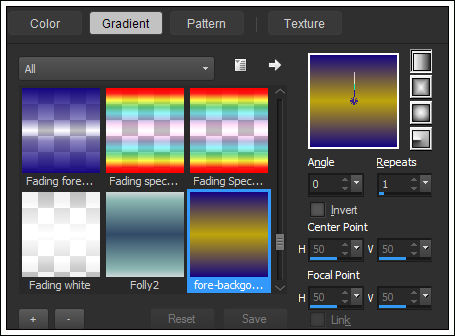
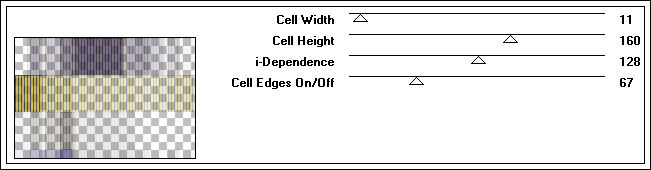
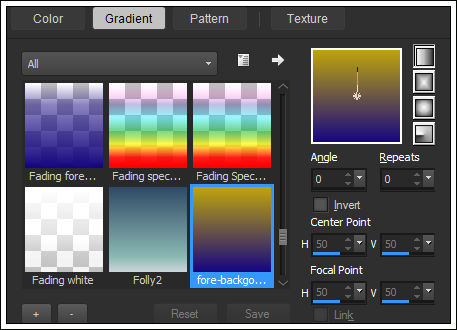
5-Primeiro Plano Cor #170880 / Segundo Plano Cor #bea40c
6- Gradiente estiloLinear: Angle 0 / Repeats 1
7- Preencha com o Gradiente
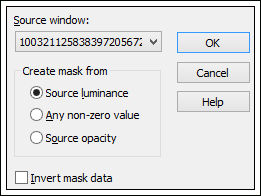
8- Abra a Mask <<1003211258397205672>> Minimize
9- Layers / New Mask Layer / From Image
10-Effects / Edge Effects / Enhance
11-Layers / Merge /Merge Group
12-Effects / Plugin / Toodies / Picasso Last word
13-Layers / New Raster layer
14- Primeiro Plano Cor#170880 / Segundo Plano Cor #bea40c Gradiente estilo Linear angle e repeats 0
15- Preencha com o gradiente
16-Effects / Plugin / Simple / Pizza Slice Mirror
17- Effects / Plugin / Simple / Blintz18-Effects / Plugin / Deformation / Circulator
19- Effects /Plugin / Tadies / What are you
20- Effects / Plugin / Tramage / tee wee
21- Blend Mode / Soft light
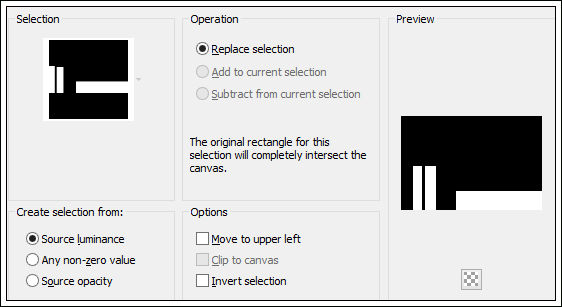
22- Selections / Load save selection / Load selection from disk: Selection AD_14
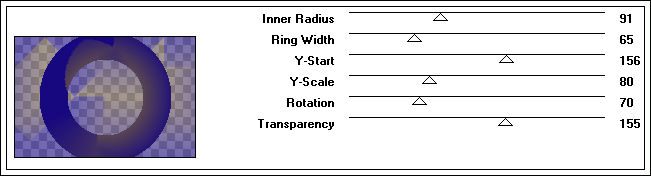
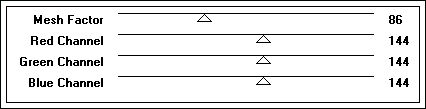
23- Effects / Plugin / Tramage / Wire Mesh
24- Effects / 3d Effects / Drop shadow :2 / 2 / 35 / 2,00 / #000000
Repita com: -2 / -2
25- Selections/ Promote Selection to layer
26- Selections / Selection none
Blend mode / Luminance legacy
(Blend Mode e Opacidade de acordo com suas cores)
27- Layers / DuplicateImage / Flip
28- Layers / Merge / merge down
29- Abra o <<deco 1>>30- Copie e Cole como nova layer
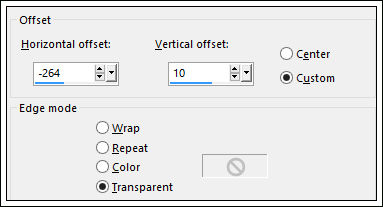
31-Effects / Image Effects /offset
Colorize usando os valores (Hue and Saturation) de suas cores
32-Effects / 3d Effects / Drop shadow: 25 /32 / 35/2,00 /Cor #320f0f
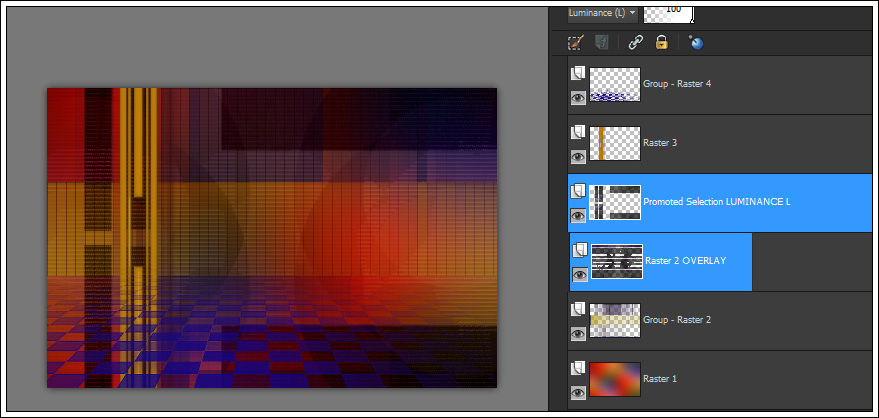
33- Ative a layer <<Raster 2>>
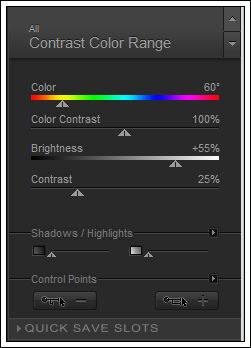
34- Effects / Plugin/ Nic software / Color effex pro 3 / Contrast Color Range
Blend mode / Overlay
35- Ative a layer superior
Layers / New Raster layer
36- Preencha com a cor #170880
37- Abra a mask <<xadresmik>> Minimize
38- Layers / New Mask Layer / From Image
39-Effects / Edge Effects / Enhance More
40-Layers / Merge / Merge Group
Seu trabalho e sua paleta de cores deve estar assim:
41- Abra o tube <<Luz Cristina 455>>
42- Copie e Cole como nova layer
43- Image /Resize / 80 % (Resize all layers desmarcado)
44-Effects / Image Effects / Offset:
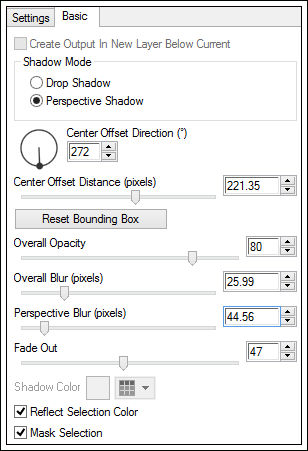
45- Effects / Plugin / Alien skin Eye candy 5 impact / Perspective shadow /Reflect in front
46- Abra o tube <<2123 Woman Lb Tubes>>
47- Copie e Cole como nova layer
48- Effects/ 3D Effects /Drop Shadow/ 23 / 76 / 35 / 2,00 /#000000
49- Abra o tube <<Text>> Copie e Cole como nova layer
50- Posicione como gostar
51- Effects / 3d Effects / Drop´Shadow: 35 /32 / 35 / 2,00 / #dc9c00
52-Image /Add Borders / 1 pixel cor #332149
Image /Add Borders /15 pixels cor #FFFFFF
Image /Add Borders / 2 pixels cor #332149
Image /Add Borders / 5 pixels cor #FFFFFF
Image /Add Borders / 5 pixels cor#d2051a
Image /Add Borders / 5 pixels cor#FFFFFF
Image /Add Borders / 1 pixel cor #332149
Image /Add Borders / 20 pixels cor #FFFFFF
Image /Add Borders / 1 pixel cor #332149
52- Coloque seu nome ou sua marca d'água
Layers / Merge / Merge All
Redimensione se desejar.
VOLTAR
©Tutorial Traduzido por Estela Fonseca em 03/08/2015.
Obrigada Adri por me permitir traduzir seu trabalho.