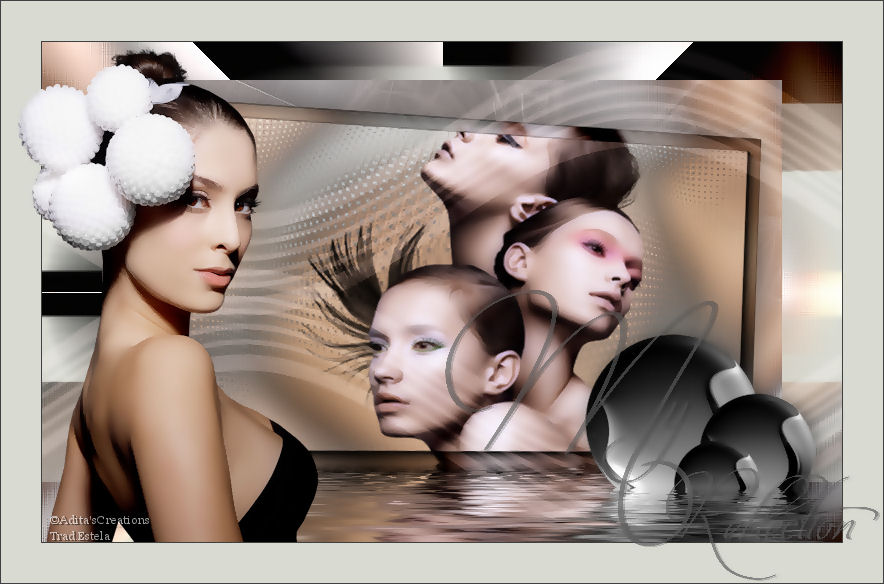
MY REFLECTION
Este tutorial é uma tradução de uma criação original de Adita , original, Aqui.
A criação desta tradução foi feita com o PSPX2 . Este tutorial é de nível avançado.
Material Necessário:
adita'screations_brush_MyReflectionPspBrush
Os tubes incluídos nos materiais são criações de Ann & Dove
As masks e o brush são criações de Adita e Cameron
Abra os tubes , duplique usando a tecla Shift +D.Feche os originais.
Plugins Utilizados:
Filters Unlimited 2.0
VM Distortion
AP16 (Power Blend)
Tho Moon
Flaming Pear
Xero
AAA Filters
Programa Corel Paint Shop Pro X2
01- Abra uma nova imagem transparente de 800 x 500 pixels.
Foreground cor # 404040Background cor # d5c8c7
Forme um Gradiente estilo Rectangular Angle 0 Repeats 2 - Center Point e Focal Point valores 50
Preencha a imagem com o gradiente
02- Selections - Select All
Abra o tube @ nn_060309_photos_Sarah_tdstudioImage - Resize - 53% - All layers marcadas
Copie o tube e cole na seleção
Selections - Select None
03- Effects - Image Effects - Seamless Tiling:
Adjust - Blur - Gaussian Blur - Radius 40
Effects - Plugins - VM Distortion - Radiator II- default
Effects - Edge Effects - Enhance More
04- Layers - Duplicate
Na Paleta das Layers - Ative a Layer "Raster 1"
Effects - Plugins - Two Moon - Paper Foil:17/0/0/11
05- Layers / New Raster layer - Preencha com a cor # d9ddb3
06- Layers - Load / Save Mask - Load from disk / maskcameron102
Layers - Merge - Merge Group
Effects - 3D Effects - Drop Shadow: 0/0/10/23,76/#000000
07- Ative a layer 2 (copy of raster 1) - Layers, new raster layer
Preencha com a cor do background
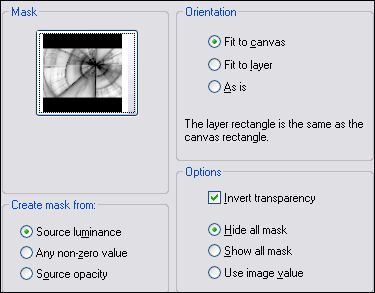
08- Layers - Load / Save Mask - Load from disk / mask © aditascreations_4 / Invert marcado
Layers - Merge - Merge Group
Effects - Edge Effects - Enhance
Reduza a opacidade para 69 %
Layers - Merge - Merge down.
Image / Resize / 85%, all layers, desmarcado.
09- Selections / Select all
Select Float / Selections - Modify - Expand 1 pixel
10- Layers - New Raster layer / Preencha com a cor = # 404040
Selections - Select None
Effects - 3D Effects - Drop Shadow: 0/0/85/45,54/#5c5755
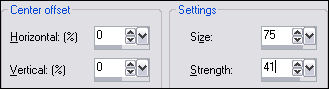
Effects - Plugins - Xero - Soft Vignette:
11- Nova layer transparente de 800 x 500 pixels
Preencha com um gradiente estilo Linear angle e repeats 0 / cores do tutorial.
12- Selections - Select All
Copie novamente o tube @ nn_060309_photos_Sarah_tdstudio - redimensionado no passo n° 02
Cole na seleção
Selections - Select None
13- Effects - Image Effects - Seamless Tiling
Mesma configuração do passo n°3
Adjust - Blur - Gaussian Blur - radius 40
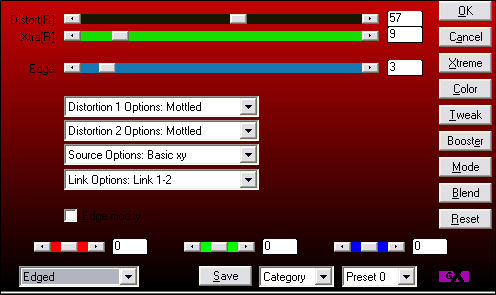
14- Effects - Plugins - AP16 (Power Blend) - Distort - GridEdge:
Effects - Edge Effects - Enhance More
Effects - Distortion Effects - Warp:
15- Abra o tube fashion-ss4d45 tube-colombe - Copie e cole como nova layer
Não mova. É o lugar certo.
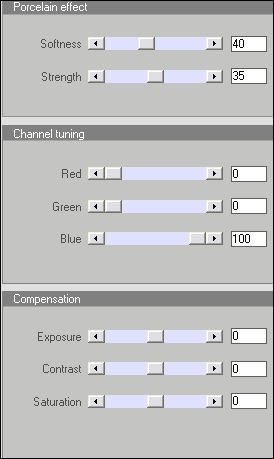
Effects - Plugins - Xero - Porcelain:
16- Layers - Merge - All Flatten
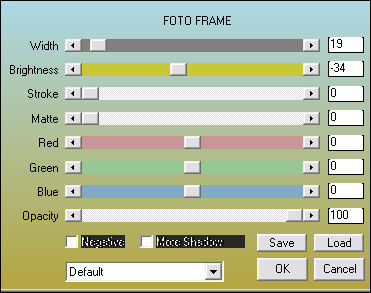
Effects - Plugins - AAA - Frames:
Image - Resize - 75% - All layers, desmarcado
Copie e cole como nova layer
Effects - 3D Effects - Drop Shadow: valores anteriores.
17- Effects - Geometric Effects - Perspective Horizontal, 15, transparente.
Image - Rotate - Free Rotate - Right - Free - 2,00
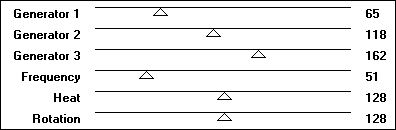
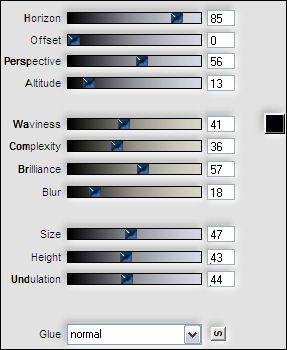
Effects - Plugins - Flaming Pear - Flood:
18- Layers - New Raster Layer
Selections - Load / Save selection - Load from disk - ©aditascreations_selection_MyReflectionPreencha com a cor do background
Selections - Select None
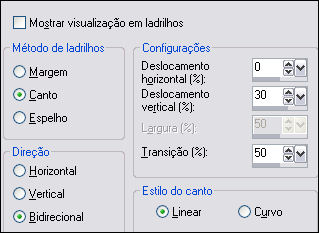
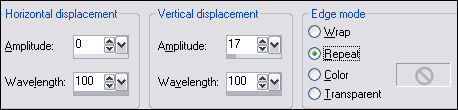
19- Effects - Distortion Effects - Waves:
Image Mirror
Effects - Image Effects - Offset: 0/80/Custom/Transparente
Blend Mode - Soft Light
Opacidade - 85 %
Layers - Duplicate / Image - Flip
Layers - Merge - Merge Visible
20- Abra o tube @ nn_090209_tube-made-by-@ nn_blauweballen_tdstudio - Copie
Cole como nova layer
Image - Resize - 55% - All layers, desmarcado
Adjust - Hue and Saturation - Colorize: 255 / 0
Posicione como no modeloEffets -3D Effects - Drop shadow:1/1/49/23,76/#000000
Effects - Plugins - Flaming Pear - Flood ;Altere a linha Horizon para 90
21- Layers - Merge - Merge All
Image - Add Borders - Symmetric marcado - 1 pixel cor = # 404040
Image add borders symmetric 40 pixels cor # d9dbd3
22- Copie novamente o tube @ nn_060309_photos_Sarah_tdstudio / redimensionado na etapa 2
Cole como nova layer
Posicione.
Layers - New Raster Layer - Ferramenta Paint Brush
Identifique o brush adita'screations_brush_MyReflection
Aplique o brush na parte inferior direita da tag, cor # f3f3f4
Effets -3D Effects - Drop shadow:1/2/30/1,00/#000000
Layers - Merge - Merge down
Effects - Plugins - Xero - Super Smooth:3/23
23- Layers - Merge - All Flatten
Image - Add Borders - Symmetric - 1 pixel = cor # 404040Assine seu trabalho
Layers - Merge - Merge All
File / Export / JPEG Optimizer
©Tutorial traduzido por Estela Fonseca em 14/02/2010.
Não alterar nem repassar sem autorização.