KITTY
Este Tutorial é de ©Adita's Creations, traduzido com a permissão da autora.
Original AQUI.
Programa Corel Paint Shop x3 - AQUI
Material Necessário:
Kittys-galadress - https://kittyspsp.nl/
Element Butterfly del Kit IAL-BelleDeNuit
aditascreations_mask_00
aditascreations_mask_3
aditas_mask_0_11
Coloque as masks na pasta de masks de My PSP Files
aditascreations_brush_kitty_01
BrushTip_aditascreations_brush_kitty_01
Coloque os brushes na pasta de Brushes
Plugins Utilizados:
Toadies-Weaver - AQUI
Penta.com-Color Dots - AQUI
I.C.Net Software Filters Unlimited 2.0-Bottoms & Frames - AQUI
Alien Skin Eye Candy 5: Impact-perspective shadow - AQUI
Preset aditascreations_preset_kitty_01
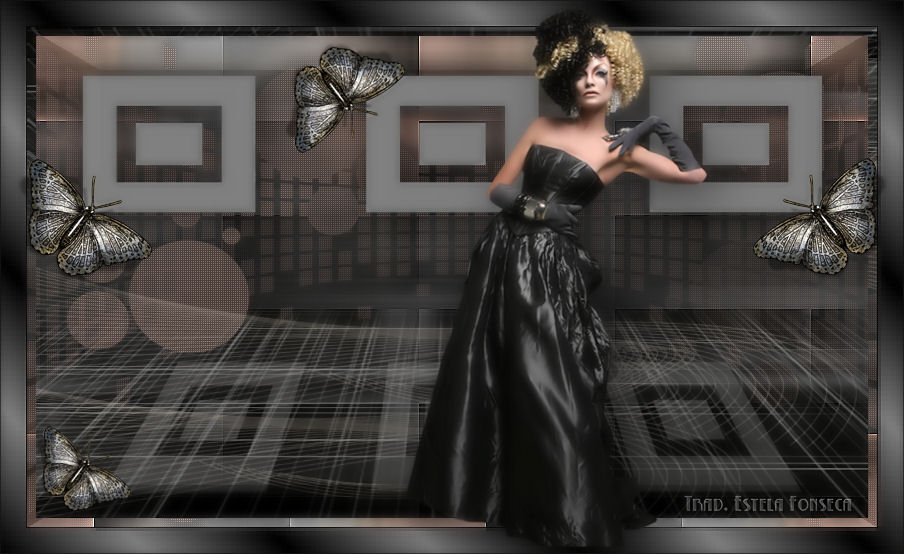
01:) Abra uma imagem transparente width 850 x 500 Height
Foreground cor #808080, Background cor #000000 / forme um gradiente estilo linear:Angle 0 / Repeats 0 com invert marcado.
Preencha com o gradiente
Selections, Select All
Ative o tube Kittys-galadress
Image, Rezise 70 %
Copie e cole na seleção
Selections, Select None
02:) Effects, Image Effects, Seamless Tiling:
Adjust, Blur, Motion Blur : 291/100 / Repita o Motion Blur novamente
03:) Effects, Plugins, Toadies, Weaver : 59/48/222Effects, Edge Effects, Enhance
Layers, New Raster Layer
Preencha com a cor do foreground #808080
Aplique a mask / aditascreations_mask_00
Layers, Merge, Merge Groups
Effects, 3D Effects, Drop Shadow : -10/0/55/18,80/#000000
04:) Layers, New Raster Layer
Ative a Ferramienta Flood Fill Tool , nas seguintes configurações:
Foreground cor #5b4841 / Preencha
Aplique a mask/ mask aditas_mask_0_11
Layers, Merge, Merge Groups
Effects, 3D Effects, Drop Shadow:-10/0/55/18,81/#000000
05:) Effects / Plugin Penta.com / color dot: 90/2/255/255/255
Layers / Merge / Merge visible
Layers, New Raster Layer
Foreground cor #808080 / Ative a Ferramienta Flood Fill Tool , configurações:
Preencha a layer
06:) Aplique a mask/mascara aditascreations_mask_3
Layers, Merge, Merge Groups
Effects, Image Effects, Offset: 0/300/Custom / Wrap
Effects, 3D Effects, Drop Shadow : -1/1/70/42,57/#000000
07:) Layers, Duplicate
Effects, Image Effects, Offset :0/213/custom/wrap
Effects, Geometric Effects, Perspective-Vertical: -52/transparente
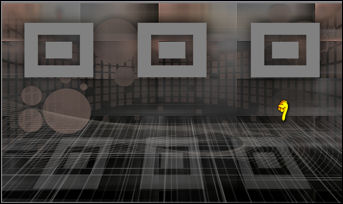
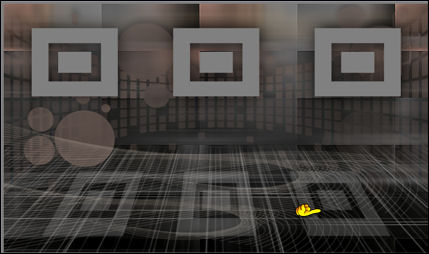
08:) Ative a Ferramenta Raster Deform Tool
View, Rules - mova a layer para baixo , clicando no ponto central como mostra a imagem
View, Rules
Opaciade da layer 34%
Layers, Merge, Merge All (Flatten)
09 Layers, New Raster Layer, Foreground cor # D5C8BA
Ative a Ferramienta Paint Brush , configurações:
Aplique o Brush como na imagem:
10:) Layers, Duplicate
Coloque o Brush do lado esquerdo como na imagem:
Layers, Merge, Merge Visible
Effects, Plugins, Toadies, Sucking Toad Beavel 1 valores : 44/133/201
11:) Effects, Plugins, I.C.Net Software, Filters Unlimited 2.0, Bottoms & Frames, Mirrored Frame : 10
Image, Add Borders, 1 pixel cor #000000
Image, Add Borders, 25 pixels cor #808080
Ative a Ferramenta Magic Wan ou Varinha Mágica seleccione a borda
12:) Cores do tutorial Foreground #808080, Background #000000
Gradiente linear : Angle 45 Repeats 9/ Invert marcado
Preencha a seleção com o gradiente
Effects, Distortion Effects, Pixelate , symmetric marcado, valor 5
13:) Adjust, Sharpness, Sharpen
Selections, Select None
14:) Ativeo tube Kittys-galadress Copie e cole como nova layer, posicione como no exemplo
Effects, Plugins, Alien Skin Eye Candy 5: Impact, Perspective Shadow,
preset aditascreations_preset_kitty_01 ok
Ative o element Butterfly / Duplique e feche o original
15:) Image Rezise, 15%
Copie e cole como nova layer / Posicione
Layers, Duplicate
Image, Mirror
Layers, Duplicate
Image, Rezise 90 %
16:) Ative a Ferramenta Raster Deform Tool / Posicione a borboleta como na imagem final do tutorial
Na Paleta das layers
Ative a layer Raster 2
17:) Layers, Duplicate
Image, Rezise, 75 %
Posicione no canto inferior direito - Veja o exemplo do tutorial
18:) Layers, Merge, Merge Visible
Image, Add Border, 1 pixel cor #000000
Layers, New Raster Layer
19:) Adicione a sua marca d'água ou o seu nome
Layers, Merge, Merge All (Flatten).
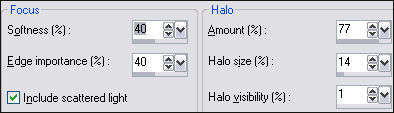
Adjust, Softness, Soft Focus valores siguientes:
©Tutorial Traduzido por Estela Fonseca em Março de 2010.
Não alterar nem repassar sem autorização.