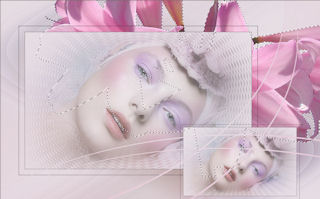
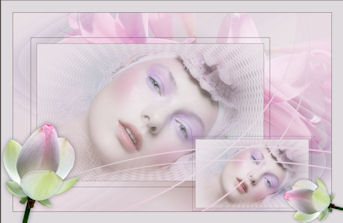
ANGEL FACE
Tutorial de Adita's Creations , original, Aqui.
É totalmente proibido usar o meu material em outros tutoriais,
pois são exclusivos de Adita's Creations Copyright.
Material Necessário:
Kitty.S-Dreaming-Image16.pspimage
MAS-Flowers_Lily_26032009.pspimage
Yoka-Flowers-Lotusbud160309.pspimage
brush: adita'screations_angelface_1.PspBrush
adita'screations_angelface_brush.PspBrush
adita'screations_13pspmask
Fonte Intima Script Two
Abra os tubes - Duplique (Shift + D) e feche os originais.
Plugins Utilizados:Filters Unlimited 2.0: Aqui
VM Distortion / Radial Pox: Aqui
AAA Frames / Transparent Frames: Aqui
Photo-Plugin: Aqui
NVR Border Mania: Aqui
Nik. Color. Efex.Software: Aqui
Programa Corel Paint Shop Pro X2:Aqui
01) Abra uma imagem transparente de 800 x 500 px
Cor do foreground: #e7cad8 /Cor do background: #e4e2e5
Forme um Gradiente / Style Rectangular / Angle 0 e Repeats 0
Preencha a imagem com o gradiente.
Selections / Select all.
02) Abra o tube: Kitty.S-Dreaming-Image16.pspimage - Duplique (shift + D) e feche o original
Copie e cole na seleção
Selections / Select None
03- Adjust / Blur / Gaussian Blur: Radius 40
Layers / Duplicate
Ative a Layer original e Oculte a layer da Cópia
04- Effects / Plugins / I.C.Net Software / Filters Unlimited 2.0: Lens Effects / Vertical Slices: Slices: 128
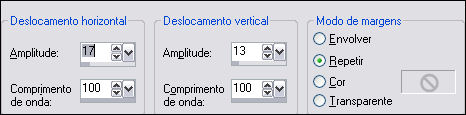
Effects / Distortion Effects / Wave:
05- Effects / Edge Effects / Enhance
Na Paleta das Layers, Ative e volte a visibilidade da layer da cópia:
06- Effects / Plugins / VM Distortion / Radial Pox:175,99,109,39.
Effects / Edge Effects / Enhance
07- Abra o tube: Kitty.S-Dreaming-Image16.pspimage
Duplique (shift + D) e feche o original
Copie e cole como nova layer
Layers / Merge / Merge Down
08- Effects / Plugins /AAA Frames / Transparent Frame: 20/0/stroke marcado
Image / Resize: 75 % (all layers desmarcado)
09- Effects / Image Effects / Offset: -55,0, custom, transparente marcado
Layers / Duplicate
Image / Resize: 50 % (all layers desmarcado)
10- Effects / Image Effects / Offset: 227, -153, custom, transparente
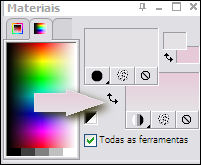
Inverta o Gradiente, clicando na setinha conforme mostra a imagem abaixo:
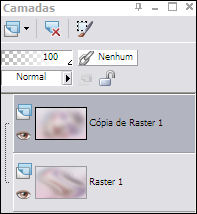
11- Ative a layer ( copy of raster 1)
Layers / New Raster Layer
Preencha com a cor
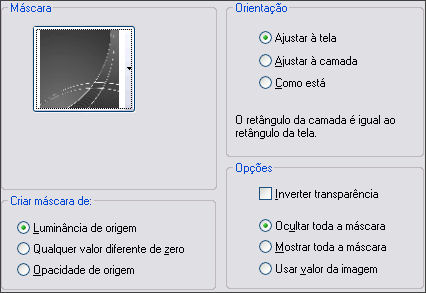
12- Layers / Load/Save Mask / Load Mask From Disk:adita'screations_13pspmask
Layers / Merge / Merge Group
13- Selecione a layer de baixo: Raster 1
Layers / New Raster Layer
14- Abra o tube: MAS-Flowers_Lily_26032009.pspimage
Duplique (shift + D) e feche o original
Edit Copy / Edit / Paste / Paste as new Selection
Posicione como na imagem:
Selections / Select None
15- Blend Mode: Overlay
Baixe a opacidade para: 81
Layers / Merge / Merge All
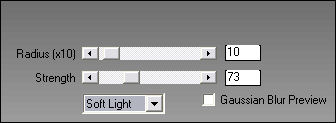
16- Effects / Plugins / Photo-Plugins / Soft Focus:
17- Effects / NVR Border Mania / Instant Button #1:
Image / Add borders / 30 px / cor: #dfdade
18- Abra o tube: Yoka-Flowers-Lotusbud160309.pspimage
Duplique (shift + D) e feche o original
19- Image / Resize: 65 % - Image , resize 90%, all layers, desmarcado
Copie e cole como nova layer
Coloque no canto inferior esquerdo, veja exemplo
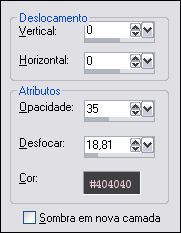
20- Effects / 3D Effects / Drop Shadow:
Layers / Duplicate
21- Image / Resize: 60 % (all layers desmarcado)
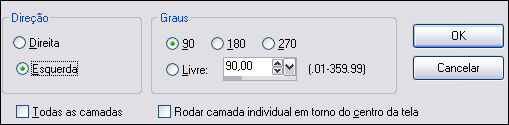
Image / Rotate / Free rotate:
22- Posicione como no modelo
Layers / Merge / Merge All
23- Effects / NVR Border Mania / Instant Button #1:
Layers / New Raster Layer
Foreground cor # e4e2e5
24- Ative a Ferramenta Paint Brush e localize o brush: adita'screations_angelface_1.PspBrush
Configure como na imagem abaixo:
25- Layers / New Raster Layer
Foreground cor #f589bd
Ative a Ferramenta Paint Brush, localize o brush: adita'screations_angelface_brush.PspBrush
Configure como mostra a imagem abaixo:
Posicione como no modelo
Effects / 3D Effects / Drop Shadow:
Layers / Merge / Merge Visible
26- Effects / Plugins / Nik Software / Color Efex 3.0 Complete: Bi Color User Defined
Adicione a sua marca dágua , Merge all.
File / Export / JPEG Optimizer©Tutorial traduzido por Estela Fonseca em 14/02/2010.
Não alterar nem repassar sem autorização.